Creating an API tool
You can create an API tool when you want an agent to call a specific API endpoint and GET, POST, PUT, PATCH, or DELETE data in an agent task.
For example, you can set up an API request that allows the agent to:
- Fetch account details from your CRM
- Perform a Platform account operation using the Boomi Platform API
- Get a weather forecast from a weather API
The tool only supports REST, RESTful, and SOAP APIs. You can create it manually by providing the details of the API endpoint or you can upload an OpenAPI specification file, and the tool will auto-fill the fields.
Prerequisites
To create, edit, and deploy agents and tools, you must have one of the following roles:
- Agent Garden Administrator
- Agent Garden Developer
- A custom role with privileges (Agent Garden Access, Agent Create, Agent Edit, Agent Feedback Submit, Agent Garden Feedback View)
Read Agent Garden: Getting Started for details on adding roles and setting up custom privileges.
Important considerations
- The maximum upload size for the OpenAPI spec file is 1MB.
- The request body has a 5,000-character limit.
- The Agent Designer supports XML and JSON API responses.
- Agentstudio truncates tool responses greater than 100k tokens.
- API calls made on your behalf by an agent may be subject to call limits or other restrictions.
- Username, passwords, authentication tokens, and the following headers are hidden in the user interface after you click Save.
'authorization', 'x-api-key', 'x-auth-token', 'api-key', 'client-secret', 'x-auth-key', 'private-token', 'session-token', 'x-amz-security-token'
- Agent step and Structured agent mode do not support OAuth 2.0/2.1 authentication. This authentication type is only available for Conversation mode agents.
Authentication options
You can use one of the following authentication options when setting up an API tool:
| Authentication method | Description |
|---|---|
| None | Select when no authentication is needed to connect. |
| Platform JWT | Select when using Boomi Platform APIs. No additional configuration is required. When a user interacts with an agent, the agent uses the JWT token of the user automatically when calling the API. This means that what the agent can access and respond to will depend on the user's permissions in the Boomi Platform. |
| Token | Select when the API requires a Bearer token for authorization. Agent Designer automatically adds the Authorization header. You only need to provide the token value. This field does not accept API keys or other key types. You can add any custom headers to the Headers section. |
| Basic Authentication | Select when using username and password to connect to the API. |
| OAuth 2.0/2.1 | Select when using OAuth 2.0/2.1 Authorization Code flow to authenticate with an external identity provider. Conversational agents using an MCP tool from this MCP server prompts the user asking them to sign in with their credentials, allowing the agent to provide user-specific data. The authorization timeout is set to 10 minutes. You can click cancel and retry authorization. Configure the client ID, client secret, and Authorization server and token URLs. You can also configure Authorization Server and Access token parameters as well as scope restrictions. For details on configuring OAuth fields, refer to Configuring OAuth settings. Before you begin, ensure you have registered your app with your identity provider and entered the following Callback URL/ redirect URI in the OAuth settings for your system (Salesforce, AWS, Okta, Google Console, and so on): North America Platform: https://ai-agent-garden.datalake-prod.boomi.com/api/v1/oauth/callback EU Platform http://ai-agent-garden.datalake-uk-prod.boomi.com/api/v1/oauth/callback |
Create an API tool
Follow these steps to create an API tool.
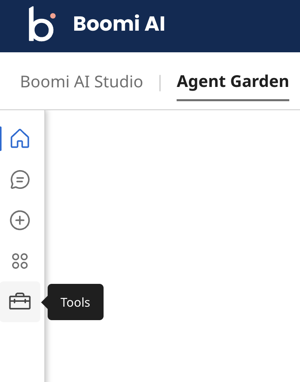
- Navigate to Agent Garden > Tools and click Create New Tool.
- Select API.
- Click Add Tool.
- Enter a tool name to identify the tool. The character limit is 32.
- Enter a description of what the tool does. This description helps the Large Language Model (LLM) understand what the tool does. The character limit is 150.
- Optional: Click Add Input Parameter to add parameters for the API call that you want the agent to retrieve from the user in the chat window. For example, you can add an input for an account ID that’s required to call account information from an API. The agent will ask the user to supply the account ID. You can set different parameters, including values for the request body.
- Enter a parameter name. The name cannot have spaces.
- Enter a parameter description.
- Select the data type for the value that parameter accepts (integer, boolean, or string).
- Optional: Turn on the Required? toggle the parameter value is required for the API call.
- Click Add Input Parameters.
- Click Save & Continue.
- In the Configuration screen, select one of the following:
- Build with specs - enter API endpoint information based on an OpenAPI specification you upload. The document must be in JSON or YAML file format. The fields auto-fill with API details. The maximum upload size for the API spec is 1MB.
- Manually - enter API endpoint information into the fields.
- Add the Endpoint Base URL for the API endpoint. For example:
https://api.openweathermap.org/data/2.5https://petstore.swagger.io/v2
- Select the HTTP Method.
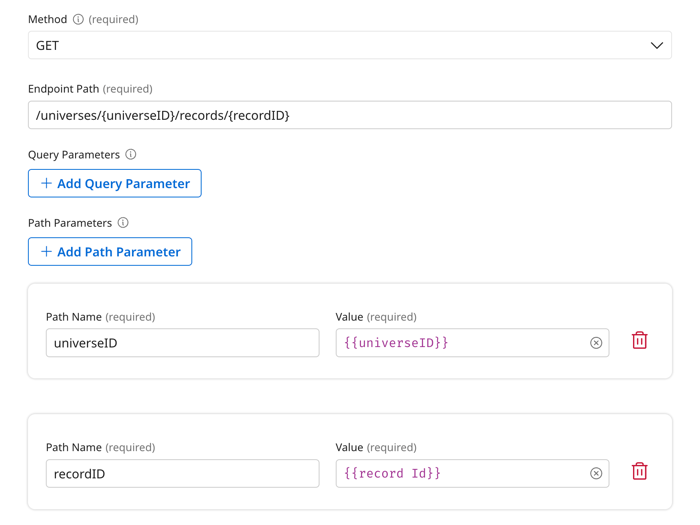
- Enter the Endpoint Path including any path parameters. You can enter a static value for the path parameter or if you want the agent to ask the user to supply specific path parameter values, the endpoint needs to include an input parameter (created in step 6) in a single curly brace. Ensure that the input parameter name spelling matches. For example:
/universes/{universeID}/records/{recordID} - Optional: Click Add Query Parameter to add query parameters.
- Add the Name. Ensure it matches the query parameter name specified by the API.
- In Value, add a static value or select the input parameter you added in step 6. If you select the input parameter, the agent will ask the user for the value.
- Optional: Click Add Path Parameter to add path parameters. The path parameter spelling and format must match exactly with the text that you entered in step 11. Any spaces, and capitalization must match exactly.
- Add the Path Name. Ensure it matches the path name specified by the API.
- In Value, add a static value or select the input parameter you added in step 6. If you select the input parameter, the agent will ask the user for the value.
- Select Authentication and enter credentials. You can select None for no authentication. For guidance on setting OAuth 2.0/2.1, refer to Authentication.
- Optional: Add headers if the API requires headers for authentication, rate limiting, content negotiation, and so on.
- Select the Request Type to specify the format for the request body. Within the request body, if there are specific filters or field values, you can enter a static value in the body or you can add an input parameter in step 6 so the agent asks the user for a value. To invoke the input parameter menu, enter a curly brace
{. Remove any extra spaces surrounding parameters as this can cause an error when the agent calls the API. If there is no request body, select NONE. For example: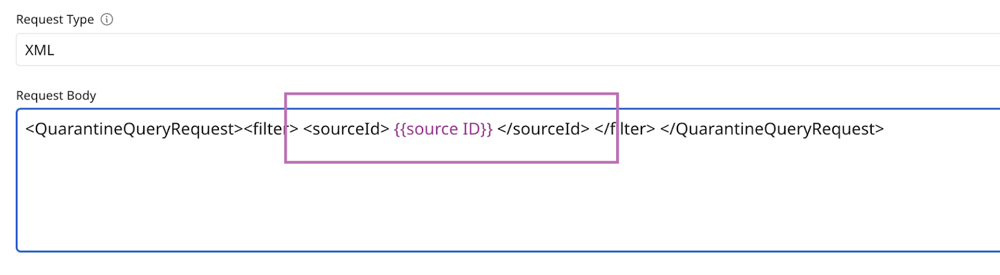
- Click Save & Continue.
- Review your tool settings and click Deploy Tool to activate it and add it to agents. Deployed tools show as active in the Tools list view and are available in the Tools tab to attach to an instruction when you create an agent.
Next steps:
- Create another tool. Agents can use multiple tools to complete tasks.
- Build an agent
