Creating an Integration tool
Integration tools allow AI agents to execute deployed, pre-configured business workflows you’ve built in Boomi Integration. After you create the integration tool, you can add it to an agent task.
You can add input parameters to your integration tool. Input parameters allow AI agents to receive data from users during a conversation. To run the process, the agent can then pass this data into an integration via Dynamic Process Properties. For example, you can instruct the agent to ask the user for a data value so it can trigger an integration that updates a specific field in a Salesforce opportunity.
Here’s an example of an integration that uses a Dynamic Process Property:
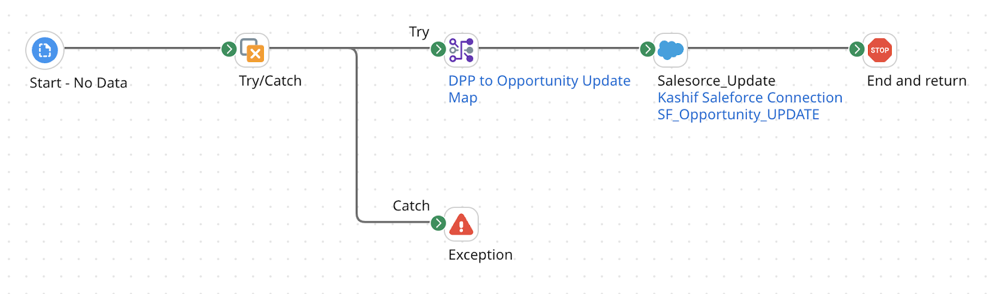
In this example, the map function contains the dynamic process property name and a blank default value that the agent gets from the user during a chat conversation. It passes in the given value when running the integration.
Prerequisites
To create, edit, and deploy agents and tools, you must have one of the following roles:
- Agent Garden Administrator
- Agent Garden Developer
- A custom role with privileges (Agent Garden Access, Agent Create, Agent Edit, Agent Feedback Submit, Agent Garden Feedback View)
Read Agent Garden for details on adding roles and setting up custom privileges.
To retrieve and run integrations with your agent, you must have the following privileges:
- Build Read and Write access
- Runtime management
- Environment management
- Packaged component deployment
- Execute
- View Results
Read User management for details on setting up privileges.
Important considerations
- Agents calling an integration tool only receive execution status (success/failure), not return documents. Depending on your use case, explore using Agent step for agentic workflows or creating an API with your process for conversational UI experiences.
- Offline atoms attached to environments in the Runtime drop-down do not display any processes in the designer.
- The underlying execution engine of the agent uses the Integration Execution API to trigger it on your behalf, using your credentials.
Data passthrough setting
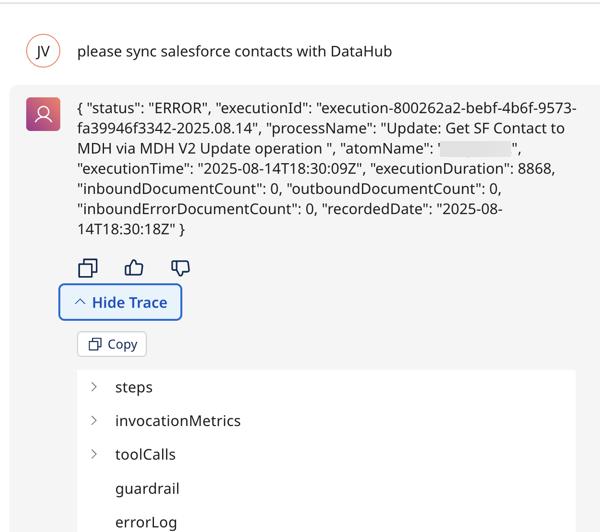
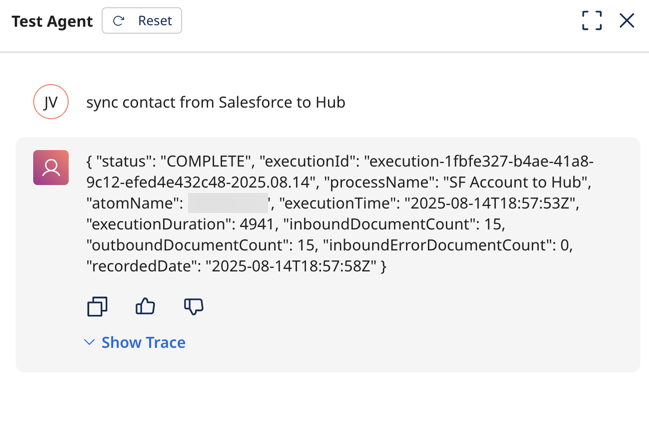
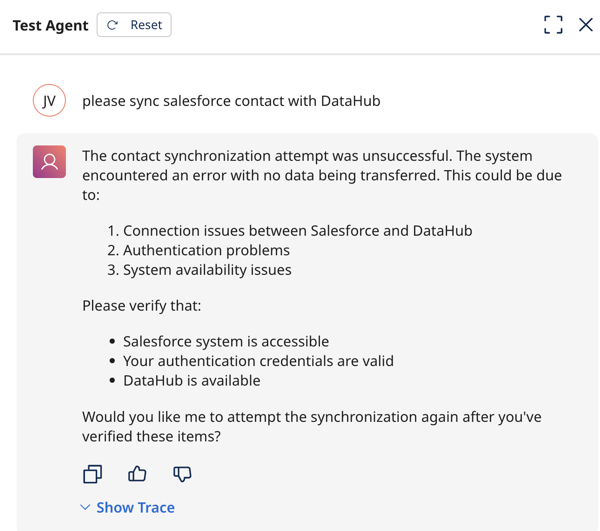
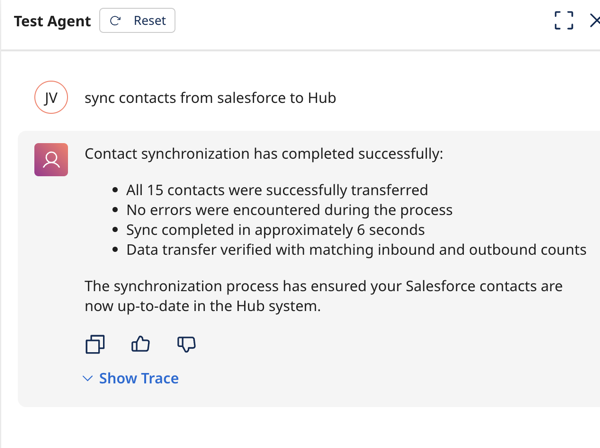
If you select data passthrough when attaching a integration tool, the agent responds with raw system data from the integration's execution status. When Data passthrough is deselected, the agent responds with the data processed using natural language text. For example, here's the agent's response after triggering an integration.
Integration execution failure response with data passthrough enabled:
Integration execution success response with data passthrough enabled:
Integration execution failure with data passthrough deselected:
Integration execution success with data passthrough deselected:
Create an Integration tool
Follow these steps to create an Integration tool.
The Integration tool only supports non-listener processes. Agents calling an integration tool only receive execution status (success/failure), not return documents. We recommend using the integration tool when you want an agent to trigger a process. To have the agent receive information from an integration, create an API with your process and connect it to an API tool. Refer to Creating a Sales Data Visualization agent for an example.
- Navigate to Agent Garden > Tools and click Create New Tool.
- Select Integration.
- Click Add Tool. Enter a tool name. The character limit is 32.
- Enter a description of what the tool does. This description helps the LLM understand what the tool does. The character limit is 150.
- Optional: Click Add Input Parameter. You can use an input parameter to pass data from the user to the agent during a conversation in order to run the integration. For example, the agent can ask for a contact ID and an email to query contact records in Salesforce. You can add up to 5 parameters.
- Enter a name to identify the input parameter. The name cannot include spaces. For example, contact_id.
- Enter a description explaining the input parameter.
- In Type, select the data type for the value (integer, string, or boolean).
- Optional: Turn on the Required? Toggle if the agent needs to pass in the parameter from the user in order to run the process. This prevents the agent from proceeding without the value.
- Click Add Input Parameter.
- Click Save & Continue.
- Select the environment for your deployed process. This is the environment you created in Runtime Management.
- Select the Runtime where you deployed the process.
- Select the deployed process name.
- Click Save & Continue.
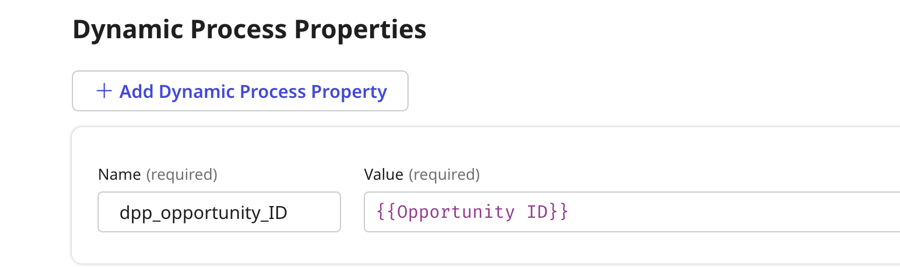
- Optional: Click Add Dynamic Process Property.
- Enter a name for the property. The name needs to match the name of the dynamic process property exactly in your integration. For example, dpp_opportunity_id.
- In Value, do one of the following:
- Enter a static value
- Select an input parameter you added in step 5.
- Click Save & Continue.
- Review your tool settings and click Deploy Tool to activate it. Deployed tools show as active in the Tools list view and are available in the Tools tab to attach to an instruction when you create an agent.
Next steps:
- Create another tool. Agents can use multiple tools to complete tasks.
- Build an agent
