Testing and troubleshooting an agent
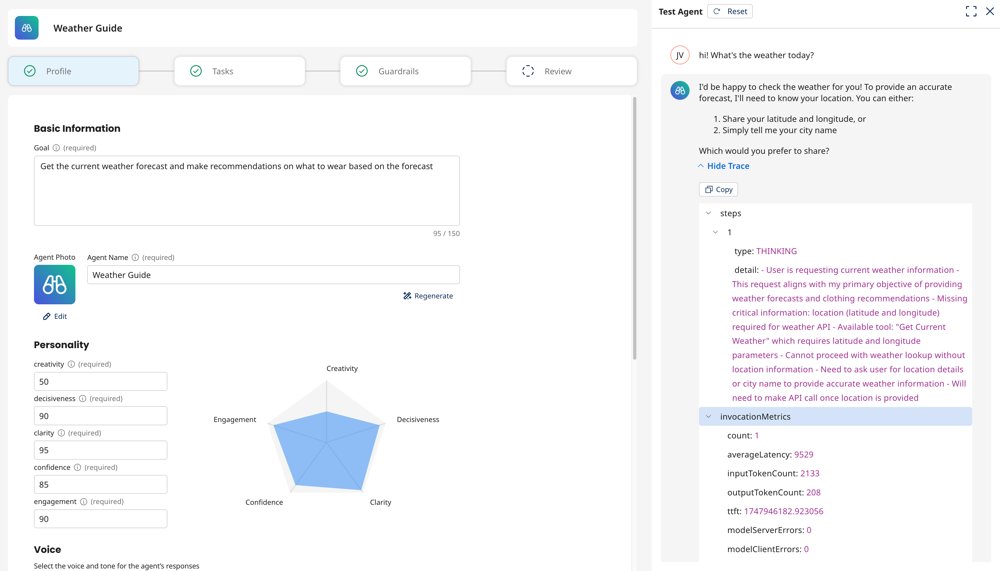
After you create an agent, you can test it in the Test Agent interface in Agent Designer before packaging and deploying it to a production environment. Since the test interface is in the same place where you build agents, you can iteratively test your agent as you make configuration changes.
When you start using the chat interface, Agent Designer automatically deploys the agent to your default test environment and runtime cloud. You can select a different environment in the drop-down at the top of the testing window. For details on managing packages, deploying to multiple environments, and working with regional runtime clouds, refer Deploying agents.
Using the agent trace
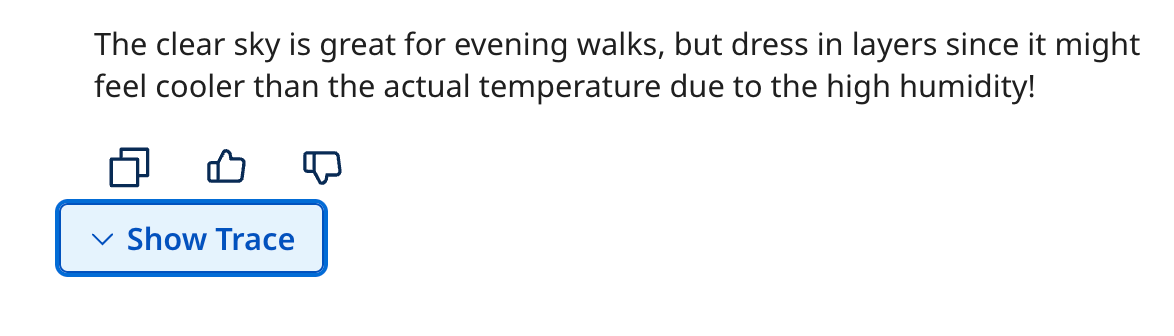
The agent’s responses include a Show Trace section where you can see details on the agent’s response, reasoning, and the tools it uses. These details can help you fine-tune your agent and troubleshoot issues with responses and behavior.
The agent trace is only available in the Test Agent window.
Analyzing deployed agent behavior
For deployed agents, you can view session logs containing details of the agents behaviour, performance, and troubleshooting issues. Read Tracing sessions of Boomi Agent Garden agents to learn more.

Testing your agent
Test your agent iteratively. Test your agent before and after you add tasks and guardrails. Testing iteratively helps you easily identify which configuration is causing an issue and which configurations are working correctly.
-
In Agent Garden > Agents, open your agent and converse with it in the Test Agent window.
noteTesting your agent may count against any usage limits.
-
Select Show Trace to view details about the agent's reasoning, tool responses, latency, and more to troubleshoot and fine tune agent behavior.
You can copy tool response code for Action steps.

Testing best practices
-
Test the same input multiple times: AI agents are non-deterministic, meaning the same input can produce slightly different responses each time. Run the same input at least five times to build confidence that responses are consistently valid, even if they are not identical.
-
Test phrasing variations: Users will not phrase requests the same way you do. Test variations of the same request to ensure the agent handles them correctly. For example, an agent that handles "what is the status of my order" should also be tested with "can you pull up my order info."
-
Maintain a test input set: Keep a set of test inputs with expected outputs. Use this set to quickly verify agent behavior after any configuration change and confirm you have not broken existing functionality.
-
Enable Extended Thinking during testing: Turn on Extended Thinking in the agent's model configuration while testing to see the agent's reasoning in the trace. Note that Extended Thinking increases latency. Disabling Extended Thinking removes the reasoning section from the trace, potentially making it harder to diagnose reasoning issues.
-
Watch for live plan streaming: With Extended Thinking on and no guardrails set, the chat interface streams the agent's plan as it generates it, instead of showing a static "Thinking..." message. You see the agent's reasoning unfold in real time in the Test Agent window. If you set guardrails, there is no plan streaming and you'll see the standard "Thinking..." indicator instead. Agentstudio deactivates plan streaming since the agent must validate the full response before returning it.
Agent trace field reference
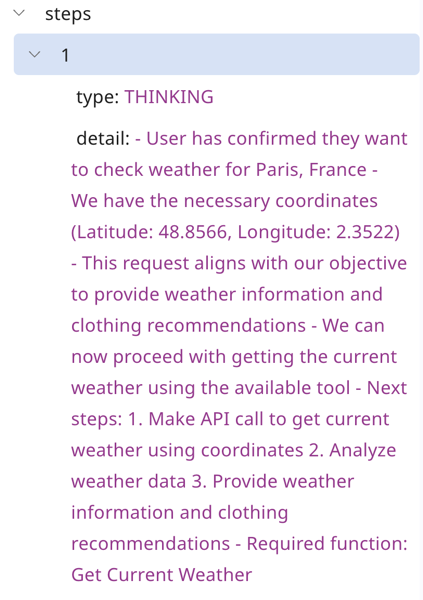
Thinking step fields
A thinking step shows the agent's reasoning.
| Field | Description |
|---|---|
| rationale | Describes agent reasoning during the step. |
| latencyMs | Total time taken by the LLM to generate and complete its response (in milliseconds) |
| inputTokens | Number of tokens sent to the LLM as input for a reasoning step |
| outputTokens | Number of tokens generated by the LLM in a reasoning step |
| ttft | Time elapsed from the LLM request submission until the first set of tokens are received (in milliseconds) |
Action step fields
An action steps shows tool usage and response data.
| Field | Description |
|---|---|
| toolName | Name of the tool you created in Agent Designer that was invoked |
| toolId | Unique identifier for the tool |
| toolType | Category of tool used. Valid values: MCP, API, Application, Integration, DataHubQuery, Prompt |
| requiresApproval | Boolean indicating whether user approval is required before tool execution |
| input | Parameters passed to the tool (for example, latitude, longitude) |
| response | Raw response data returned by the tool after execution |
| latencyMs | Time taken by the tool to run the tool call (in milliseconds) |
| success | Boolean indicating whether the tool execution completed successfully |
Retrieval step fields
A retrieval step shows when the agent fetches content from an attached asset, such as a Meta Hub business glossary or a Knowledge Hub knowledge base. The step triggers during agent execution. The agent uses the asset's name and purpose to determine when retrieval is relevant.
| Field | Description |
|---|---|
| assetType | Type of asset retrieved. Valid values: GLOSSARY, KNOWLEDGE_BASE |
| assetName | Name of the retrieved glossary or knowledge base |
| assetId | Unique identifier of the retrieved asset |
| input | Parameters sent for the retrieval request. For a knowledge base, this includes the fields listed in Knowledge base input fields |
| response | Content retrieved from the asset. For a knowledge base, this includes the fields listed in Knowledge base response fields |
| latencyMs | Time taken to complete the retrieval (in milliseconds) |
| success | Boolean indicating whether the retrieval completed successfully |
Knowledge base input fields
When assetType is KNOWLEDGE_BASE, the input object includes the following fields:
| Field | Description |
|---|---|
| query | The query text sent to the knowledge base |
| retrievalMode | The retrieval mode used for the query. Valid values: lexical, semantic, hybrid |
| topK | The result limit applied to the query. The number of chunks requested from the knowledge base |
| filters | Metadata filters applied to the query, if any |
| repositoryId | Unique identifier of the repository the knowledge base belongs to |
Knowledge base response fields
When assetType is KNOWLEDGE_BASE, the response object includes the following fields:
| Field | Description |
|---|---|
| content | The chunks of content returned by the knowledge base |
| chunksReturned | Number of chunks returned by the knowledge base |
| chunksUsed | Number of returned chunks the agent used to generate its response |
| topScore | Relevance score of the highest-ranked chunk returned |
| khActivityId | Unique identifier for the retrieval activity, logged in Knowledge Hub |
| khLatencyMs | Time taken by Knowledge Hub to execute the retrieval (in milliseconds) |
| errorType | Type of error returned if the retrieval failed (for example, unavailable) |
| errorCode | HTTP error code returned if the retrieval failed (for example, 503) |
| errorLogs | Detailed error messages logged for a failed retrieval |
Invocation metrics fields
| Field | Description |
|---|---|
| count | Number of times the LLM has been called |
| inputTokenCount | Number of tokens in the input |
| outputTokenCount | Number of tokens in the output |
| averageLatency | Average time in milliseconds to process the LLM request |
| ttft | Time elapsed from the LLM request submission until the first set of tokens are received (in milliseconds) |
| durationMs | Total time to complete the agent invocation, from start to finish (in milliseconds) |
Guardrail fields
Topic policy
| Field | Description |
|---|---|
| topicPolicy | Describes how the LLM applied topic-based filtering |
| name | The name of the policy from the Guardrails tab |
| type | Type of restriction (for example, DENY) |
| Action | Action taken (for example, BLOCKED) |
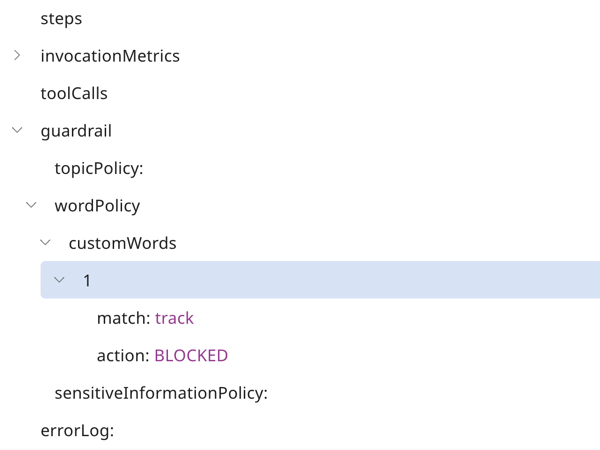
Word policy
| Field | Description |
|---|---|
| wordPolicy | Describes word-based filtering that causes a user's words to block the agent from responding |
| customWords | Displays the number and list of blocked words configured by the user in the guardrail. Match is the blocked word and Action describes the action the agent took ("BLOCKED") |
| managedWordLists | Displays the number and list of blocked words which are applied by default for all agents. Match is the blocked word, Action is the action agent took ("BLOCKED"), and the Type is the category of the word (for example, PROFANITY, INSULTS) |
Sensitive information policy
| Field | Description |
|---|---|
| sensitiveInformationPolicy | Displays the number and list of RegEx matches that are configured by the user to prevent the agent from processing and producing sensitive information that matches a RegEx pattern |
| Name | The name of the Policy in the Guardrails tab |
| Match | The word or phrase that matched |
| regex | The pattern it matched to |
| Action | The action that Agent took ("BLOCKED") |
Content policy
| Field | Description |
|---|---|
| contentPolicy | Default content filters applicable to all agents for the following categories: HATE, SEXUAL, VIOLENCE, INSULTS, MISCONDUCT, PROMPT_ATTACK. These filters prevent agents from behaving inappropriately and in an unsafe manner |
| Type | The category of filter that was triggered |
| Confidence | A numerical score between 1-100 useful in determining how provoking a given prompt was |
| Filter Strength | The strength at which filter is configured (the only value is "HIGH") |
| Action | The action that the agent took ("BLOCKED") |
Troubleshooting tips
Using the trace to triage issues
When something looks wrong in the agent's response, use the trace to identify where the problem originates before making configuration changes.
- Reasoning or latency issues in thinking steps point to your tasks, instructions, or model settings. Review the rationale field to see whether the agent misinterpreted the request, then adjust instructions or model configuration as needed.
- Tool call failures in action steps point to your tool configuration. For MCP tools, also check the associated source connection to verify the server is accessible.
- Retrieval failures in retrieval steps indicate that the agent could not fetch content from an attached glossary or knowledge base. Check that the asset is still published and available, and that the agent has the required access.
- Guardrail triggers indicate that either the user's input or the agent's output was blocked. Review your guardrail policies to determine whether the rule that fired is too broad.
Troubleshooting agent performance
-
Be aware of context window limits: The user prompt, agent goal, tasks, and instructions combined cannot exceed 200K input tokens. Refer to Agentstudio token limits for details on limits for user input and agent responses.
-
Agent response limits: An agent reply is limited to 4,096 tokens (approximately 10,000 characters).
-
Adjust model settings to address latency issues: If your agent performs only simple tasks, such as sentiment analysis, summarization, and data formatting, select Fast in the Model Configuration section to improve the AI processing speed in the agent's Profile configuration.
-
Consider instruction clarity: Evaluate instructions and ensure that they do not cause conflicting actions that may conflict with LLM reason and logic or cause unnecessary action resulting in high latency.
-
Use Structured mode to reduce overhead: If your agent has consistent, predictable input and output schemas, enable Structured mode. Structured mode eliminates the overhead of the LLM parsing and formatting data, which can significantly reduce response time. Refer to Using Structured agent mode.
-
Enable data passthrough for tools: Data passthrough is a per-tool setting that allows tool responses to pass directly to the next step without LLM processing. If a tool returns data that only needs to be forwarded without interpretation, enabling data passthrough removes unnecessary processing overhead.
Instructions
-
Be specific and detailed: You may need to adjust your instructions or add additional tasks so that the Large Language Model (LLM) understands how to behave in certain situations. It may not have enough information or context to act appropriately. This can cause incorrect reasoning to show in the trace.
-
Include timelines and action triggers: Tell the agent when to do an action. This can correct issues where the agent is not following instructions in the way you want it to. For example, “After you get information from the database about X, confirm with the user that they want to do X.” “Before you do X, ask the user for the X parameter to make the API call using the X tool.”
Read Writing tasks and instructions for instruction best practices.
Tool configuration tips
Regardless of tool type, three foundational fields must be configured clearly for the agent to use a tool correctly. The name tells the agent which tool to select for a given task. The description tells the agent what the tool does and when to use it. The input parameters tell the agent what data to extract from the user's message or from another tool's response. Vague descriptions can lead to incorrect tool selection or failed calls.
-
Make changes to tool configuration: Your tool configuration may need adjustment to work correctly. The trace can indicate if the agent is having trouble using a specific tool during a tool step. Review Identifying and adding capabilities to agents for more information.
-
Ensure your tool is linked to the correct task: Your tool needs to be attached to the same task where it is relevant. You can attach a tool to multiple tasks. You may need to add additional instructions in the task that tell the agent when to use the tool for that particular outcome. For example, “Use the X tool to query the database and get information about X.”
Prompt tools
- Use accurate, well-formed examples: The quality of your examples directly affects agent output. Ensure examples are accurate and represent real-world scenarios.
- Cover the full range of expected outputs: Include examples for all possible outcomes, not just the most common one. If your prompt tool categorizes inputs and most examples map to one category, the agent will over-predict that category. Cover edge cases and less common outcomes.
Hub tools
- Limit query scope: Select only the fields the agent actually needs rather than returning all available fields. Sending the agent more data than it needs adds noise and slows processing.
- Use filters and constraints: Apply filters to narrow query results and reduce the volume of data returned to the agent.
MCP tools
- Verify the server is accessible: Before debugging your agent, confirm that the MCP server is up and that you can connect to it.
- Check for Stale tools: If an MCP tool has been updated on the server, it may be marked as Stale in Agent Designer. Refresh the tool to pull in the latest schema before testing.
- Verify the input and output schema: Confirm that the schema you have configured still matches what the MCP server expects. Schema changes on the server side can cause tool calls to fail.
API tools
-
Remove any extra spaces surrounding parameters: Extra spaces can cause an error when the agent calls the API.
-
Check required headers: Some endpoints require a Content-Type header specifying the format of the data you are sending, and some require an Accept header specifying what you expect back. Missing headers are a common cause of failed API calls.
-
Confirm credentials: Verify that your authentication credentials are current and correct. Boomi supports Token authentication, OAuth, JWT, and Basic Authentication.
-
Test API authentication: Test the API endpoint using Postman or a similar tool. Ensure the API call is successful and you have entered the correct credentials.
-
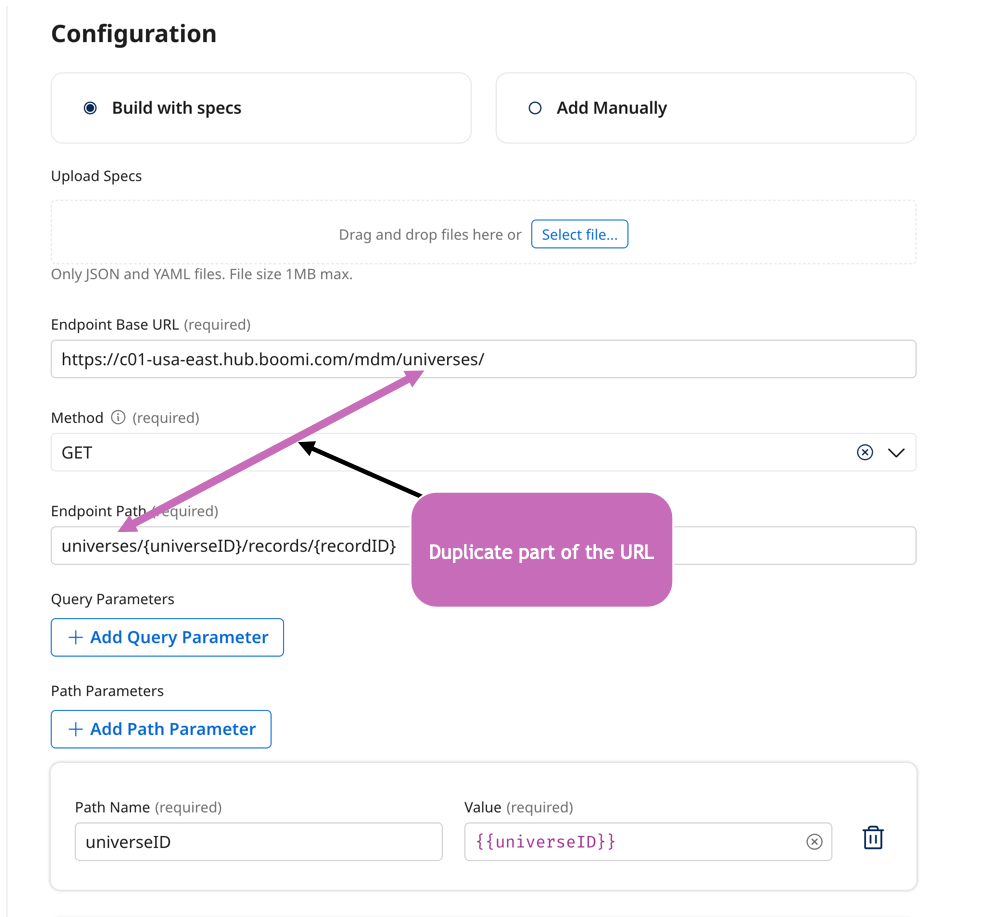
Check for duplication: Do not duplicate the URL in the API tool for the endpoint path. The API tool adds the base URL and the endpoint path to create the API call. For example, entering base URL and then base URL + endpoint path would duplicate the base URL and cause the tool to call baseURLbaseURL+endpoint path, causing an error.
Guardrails
Refer to Creating guardrails for guardrail configuration options and best practices.
- Adjust guardrails: Evaluate and adjust guardrails so they do not limit the agent from accomplishing the task. Guardrails cause the agent to respond with the blocked message you configured (for example, "I'm sorry but I'm only able to provide an order status and customer support contact information."). The trace can indicate when and how the LLM triggered the guardrail while following instructions.
-
Use the agent trace to identify the trigger: When a guardrail triggers unexpectedly, check the agent trace. The trace shows which guardrail fired and what action was taken (for example, BLOCKED), so you can identify exactly which rule is causing the issue.
-
Determine whether input or output was blocked: Keep in mind that agent outputs can trigger guardrails. If your agent retrieves data that could contain sensitive fields, make sure your guardrail policies are tested against agent output as well as user input.
-
Verify your policies: Confirm that your denied topics, word filters, and regex patterns are not blocking expected, legitimate terms and topics. Run test inputs that represent normal usage and check the trace to ensure nothing is being caught unintentionally.
-
Test guardrails one at a time: If you have multiple guardrails configured, test each one individually before enabling them all together. Adding several guardrails at once makes it difficult to identify which one is causing an unexpected block. Enable one, run your test inputs, verify the behavior, and then move on to the next.
