Creating a sales data visualization agent
The Sales data visualization agent provides concise sales analysis with charts to help make business decisions on sales initiatives and analysis.
You'll use the following services in the Boomi Platform to build an AI agent:
 Agentstudio
 Integration
 API Management
Prerequisites
- A CRM (Customer Relationship Management) system with opportunity data such as Salesforce
Agent overview
The Boomi Enterprise Platform lets you easily convert integrations into APIs that allow AI agents to both trigger integrations and receive data multiple times during a conversation with a user instead of a single turn execution. This enables the agents to answer user questions and provide follow-ups upon request.
We'll combine the API you create with Agentstudio's ability to generate charts and graphs natively, without the need to attach visualization tools or functions. This makes it simple for agents to turn data into visuals as part of the conversation. However, you have the flexibility to use your own visualization service if you prefer. If you choose this option, you can create an API tool, which you'll need to attach to the agent's instruction so the agent can call the API. Refer to Adding data visualizations to agent responses to learn more.
In this example, we'll build an AI agent that:
- Calls a user-created API to get Salesforce opportunity data
- Provides sales analysis and findings, such as the win rate and lead generation
- Generates chart and graph visualizations representing key data observations
We'll build an integration that:
- Listens for an incoming request
- Queries Salesforce opportunity data and filters opportunities created within the last 2 weeks.
- Returns documents
We'll build an API that:
- Retrieves the specified Salesforce data via a GET method
- Uses Basic authentication
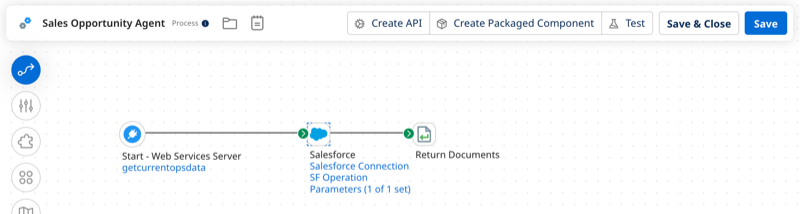
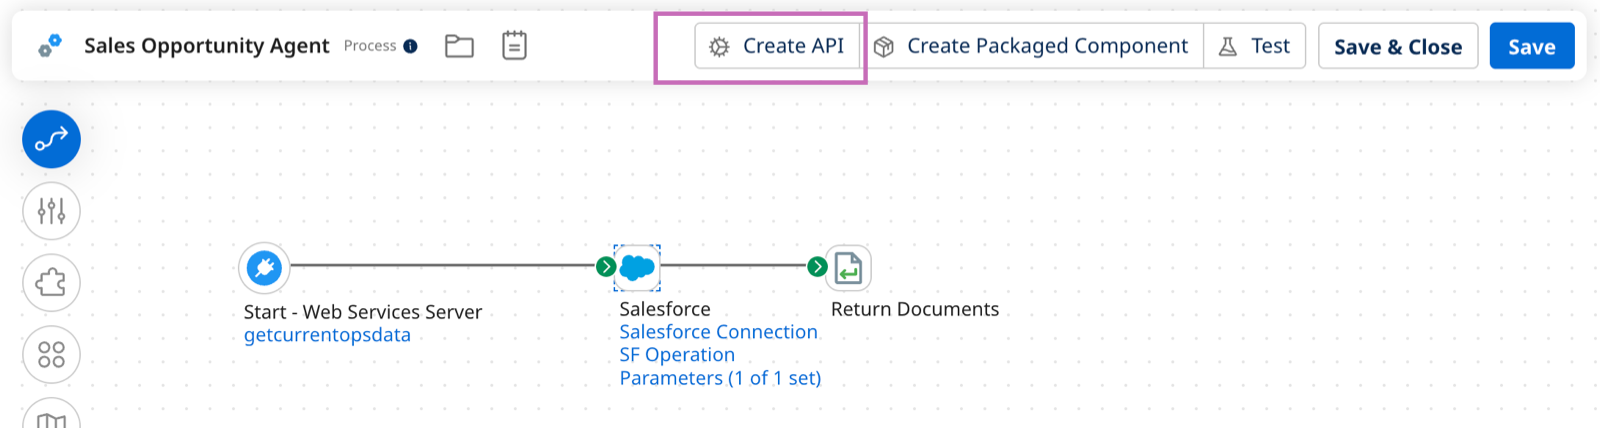
How the integration works
The integration pulls opportunity data from your CRM based on your filters. In this example, we're filtering by created date.
- Web Services Server connector listens for a request.
- Salesforce connector queries Salesforce for opportunities based on filters you specified.
- Return Documents step returns opportunity data.
Step 1: Configure the Salesforce connector step
- Navigate to Integration > Create New Component and create a new process. You can name the process Sales Opportunity Agent.
- In the Start step, select Web Services Server. You'll configure the rest of this connector later.
- Add a Salesforce Connector step.
- To configure the Salesforce connector, select or add a connection:
- Enter the user name for login.
- Enter the password, which is your Salesforce login password plus a security token obtained in Salesforce under your personal settings. Refer to Reset Your Security Token for details.
- In Action, select Get.
- In Operation, click the plus icon to create a new operation.
- Click Import Operation.
- Ensure the connection is selected. Click Next.
- In Object Type, select Opportunity.
- In Action, select Query.
- Click Next.
- After the opportunity object builds, click Next.
- Click Finish to attach the response profile.
- Add a filter to the query. Select the Filters tab in the operation.
- Add an expression.
- Add Created Date as the Filter Name.
- In Field, select CreatedDate.
- For the operator, select Greater Than or Equal To.
- Click Save.
- In the connector's Parameters tab, import the parameter.
- Add a static value for the date. Here's an example of the format:
2025-08-10T15:51:50.000Z. This will search for opportunities as a early as August 10, 2025 until the current date.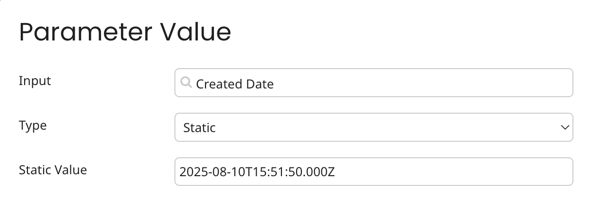
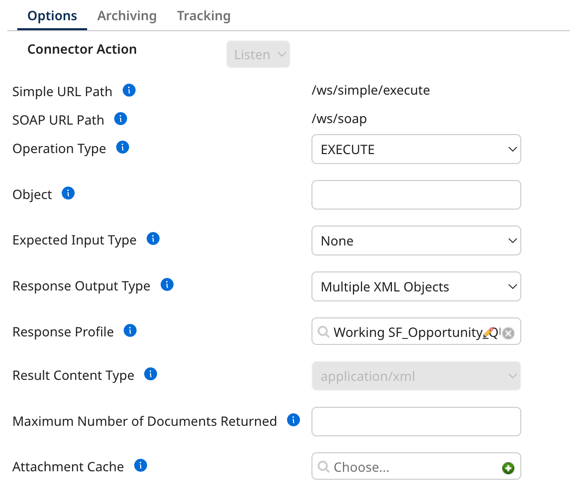
Step 2: Configure the Web Services Server step
- In the Web Services Server step, select Listen as the Action.
- In Operation, create a new operation.
- Select EXECUTE as the operation type.
- In Expected Input Type, select NONE.
- In Response Output Type, select Multiple XML Objects.
- Select the Response profile you created when you configured the Salesforce connector.
- Click Save & Close.
- Click Confirm Process Options. Select Make the recommended changes for me.
- Click OK.
- Click Save.
Step 3: Finish and deploy the integration
- Add a Return Documents step.
- Click Save.
- Click Create Packaged Component.
- Select your integration.
- Select Next: Add Details.
- Select Create Packaged Component.
- Select Deploy.
- Select your Deployment Environment. Refer to Runtime setup for how-to documents on setting up your runtime.
- Select the process.
- Select Next: Review.
- Select Deploy.
- Select Close.
Step 4: Create and deploy an API
- Select Create API.
- Enter a name for your API.
- Create a unique API path. For example, currentoppsdata.
- Create a Published API Title. For example, Get Current Opportunity Data.
- In Published Version, enter 1.0.
- Optional: Enter a description that describes the purpose of your API.
- In REST Endpoint, select GET.
- Optional: In Advanced Settings, specify the maximum number of documents returned. The default is 100.
- Select Create.
- Review the details then select Save and Deploy.
- Select the runtime environment.
- Select Package and Deploy.
Step 5: Set up authentication and test your API
- In Manage > Runtime Management > Runtime name > Shared Web Server, select Advanced as the API type.
- Ensure Authentication Type is set to Basic. Select the User Management tab.
- Click Generate Token to generate a token for the user name. Save this token for setting up your API tool authentication in your AI agent.
- Click Save.
- Optional: Test your agent in Postman or another API testing tool. Your base URL is in Runtime Management > Shared Web Server. Add
/ws/rest/Base API Path/Endpoint name. For example,https://c02-usa-east.integrate-test.boomi.com/ws/rest/opportunitydata/defaultDefault is added because it is the name of the REST endpoint.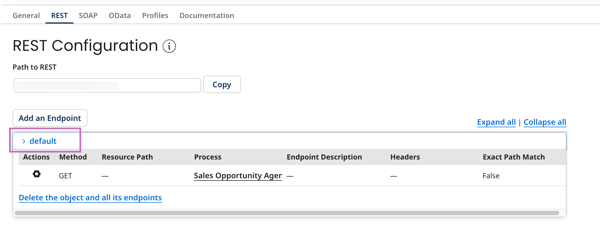
Step 6: Create a sales visualization AI agent
-
Navigate to Agentstudio > Agent Garden > Agent Designer.
-
Do one of the following:
- Select Blank Template > Build with AI and create your version of the agent that you customize to your needs. Refer to Building an agent for assistance.
- Recommended: Import the Sales Visualization agent using a YAML file. This imports all the settings for the agent, including personality, temperature, tasks, instructions, and guardrails. You can edit as needed to fit your business requirements. Refer to Importing an agent. Here is the YAML configuration to create the YAML file:
Agent YAML for import
    metadata:
exported_at: '2025-08-21T20:21:11Z'
schema_version: '1.0'
agents:
- objective: Fetch and analyze Salesforce opportunity data, generate appropriate visualizations,
    and provide data insights
    name: Sales Opportunity Visualizer
    personality_traits:
    voice_tone: Professional
    creativity: 85
    decisiveness: 90
    clarity: 95
    confidence: 88
    engagement: 90
    profile_picture:
    role: Sales Data Analyst
    colour: colour_blue
    image_id: img_location
    conversation_starters:
    - What is the win rate across different lead sources?
    - How much revenue is expected per fiscal quarter?
    - ' What is the win rate across different lead sources?'
    - I want to understand our sales trends
    - Can you create a visualization of our opportunity data?
    tasks:
    - name: Fetch Salesforce Data
        objective: Retrieve comprehensive opportunity data from Salesforce
        instructions:
        - Call the 'get current opps' tool to retrieve opportunity dataset
        - Validate the data has been successfully retrieved
        - Prepare data for analysis and visualization
        tools:
        - name: get current opps
            type: OpenAPI
            requires_approval: false
            response_passthrough: false
            unique_name: get_current_opps_6938
    - name: Analyze Opportunity Data
        objective: Perform detailed analysis of Salesforce opportunity data
        instructions:
        - Examine the retrieved opportunity dataset
        - "Identify key metrics such as \t\nstagename, leadsource, amount, closedate"
        - Determine the most appropriate chart type based on data characteristics
        tools: []
    - name: Present Insights
        objective: Communicate data analysis and visualization results
        instructions:
        - Write a clear, professional summary of data insights
        - Highlight significant trends, opportunities, or potential areas of improvement
        - Present findings in an easily understandable format
        - create charts and visualization to communicate the findings in a visual way
        tools: []
    guardrails:
    blocked_message: 'I cannot process requests that might compromise data privacy or confidentiality.
        I can only create data analysis and visualizations for sales opportunity data. '
    system: false
    policies:
        - name: Data Privacy Protection
        type: denied_topic
        configuration:
            description: Prevent unauthorized access to sensitive sales data
            sample_phrases:
            - Show me confidential customer details
            - Reveal individual sales rep performance without authorization
            - Extract personally identifiable information
        - name: Prohibited Terms Policy
        type: word_filter
        configuration:
            words:
            - password
            - secret
            - confidential
    custom_variables:
    unique_name: salesviz_6678
tools:
OpenAPI:
# --------------------------------------------------------
# OpenAPI Tool: get_current_opps_6938
# IMPLEMENTATION REQUIREMENTS:
# 1. Authentication: Basic Authorization credentials are required
# --------------------------------------------------------
    - name: get current opps
    description: query salesforce opps for current opps
    input_parameters: []
    base_url: https://c02-usa-east.integrate-test.boomi.com/ws/rest
    path: /currentops/default
    method: GET
    query_parameters: []
    path_parameters: []
    headers: []
    authentication:
        type: basic_auth
        config:
        username: ''
        password: ''
unique_name: get_current_opps_6938 -
In Tasks, edit the API tool by adding your API details:
- Base URL: Enter the base URL in Integration > Manage > Runtime Management > Runtime name > Shared Web Server > Base URL for API requests. API Type should be set to Advanced and Authentication Type set to Basic.
- After the base URL, add /ws/rest. For example, Endpoint Base URL:
https://c02-usa-east.integrate-test.boomi.com/ws/rest - Select GET as the method.
- Enter your unique API path name and add the REST endpoint name. For example:
/opportunitydata/default. - Select Basic Authentication.
- Enter the username from the Manage > Runtime Management > Shared Web Server > User Management tab. For example,
mycompany_name-1WF678.5529DFD. - Enter the token you generated in the User Management tab into the password field.
- Click Save & Continue.
-
Return to the agent and test your agent in the Test Agent window.
-
Click Save & Continue.
-
Open the agent. When you are ready to deploy:
- Navigate to the Review tab.
- Select Create, then Package & Deploy. Refer to Deploying agents to learn more about setting up environments for agent package deployment.
- Select a target production environment from the Production Environment drop-down.
- Select Create Package & Deploy.
-
Start using the agent in the conversational user interface.
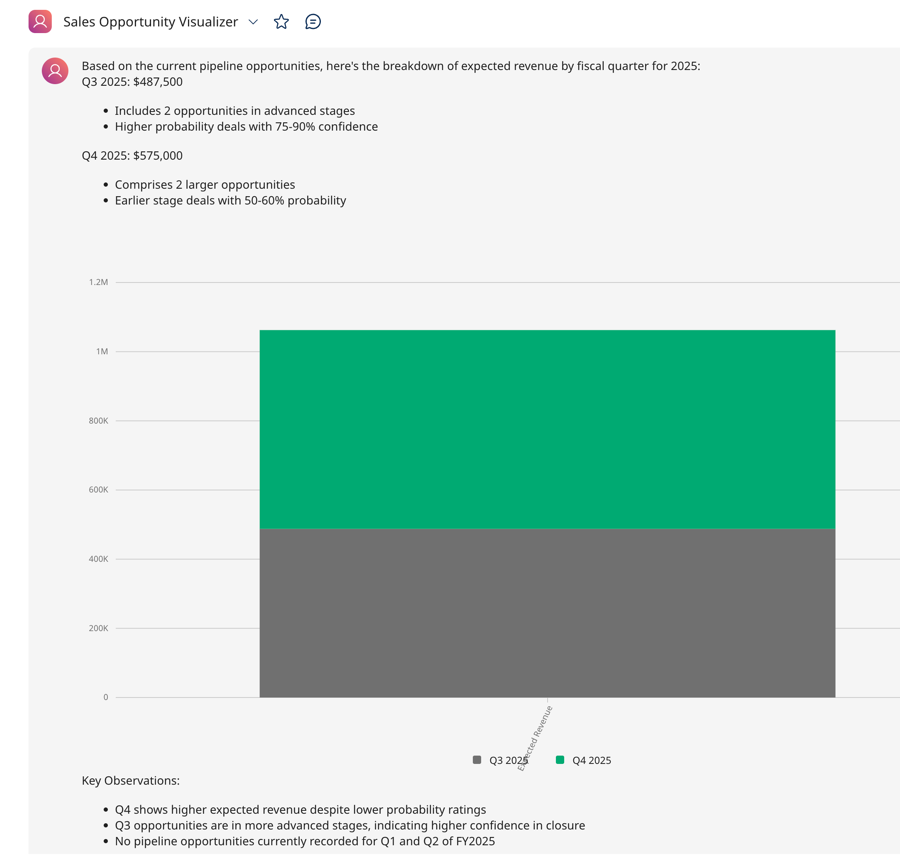
here's an example of a possible output: