Creating a Snowflake query agent
The Snowflake SQL Query Agent enables dynamic interaction with your Snowflake database by turning natural language requests into executable SQL queries. This makes it easy for business users and technical teams alike to retrieve employee information such as department lists, salary details, and personnel updates—without needing to manually write SQL.
You'll use the following services in the Boomi Platform to build this AI agent:
-
 Agentstudio
 -
 Integration
 -
A Snowflake Database with employee data
Prerequisites
- A Snowflake database account with the required access.
Agent overview
The Boomi Enterprise Platform allows you to transform integrations into APIs that can be accessed multiple times during a conversation with a user. By combining this with Agentstudio, you can create agents that understand natural language, generate the correct SQL, query Snowflake, and return the results directly in the chat flow.
This approach gives you a seamless way to access data-driven insights—whether they are asking simple questions like “Which employees are in HR?” or more advanced queries like “Who earns the most in the marketing department?”
In this example, we will build an AI agent called Snowflake Query Agent that:
-
Accepts natural language requests.
-
Generates SQL queries against a predefined Snowflake table.
-
Executes the query through a REST API connection.
-
Returns the results back to the user.
We’ll also walk through how to configure the integration process so that you can choose between a local runtime deployment or a cloud runtime deployment using the OpenAPI connector, depending on your needs.
How the integration works
The integration pulls data from your Snowflake database based on the SQL Query created by the AI Agent.
-
Web Services Server connector listens for a request: This request generated from the AI Agent contains the SQL statement generated from the user’s natural language query.
-
Local Runtime Path sets the SQL script: In the local runtime branch, the incoming SQL is placed into a document property. This property holds the SQL string.
-
Snowflake Connector executes the query: Using the Snowflake JDBC connection, the process executes the SQL directly against the Snowflake database. The connection provides credentials, database, schema, warehouse, and role context.
-
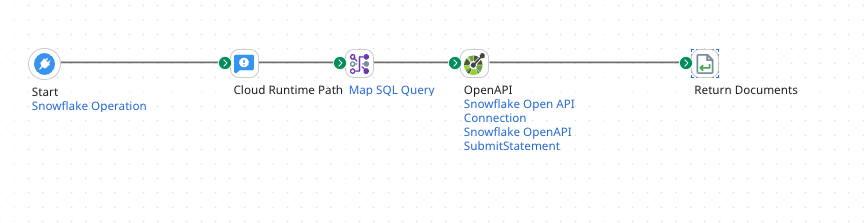
Cloud Runtime Path maps the SQL query: In the cloud runtime branch, the incoming SQL is transformed into the request format required by the Snowflake SQL API. This ensures the query is structured correctly for the OpenAPI call.
-
OpenAPI – SubmitStatement: The OpenAPI connector calls the Snowflake SQL API’s SubmitStatement endpoint. The SQL query is sent in the request body, along with headers for authorization and context. Snowflake executes the query and returns the result set as JSON.
-
Return Documents: The process returns the query results — whether from the JDBC connector or the SQL API — back to the requesting AI agent. The agent can then use the results to answer the user’s question.
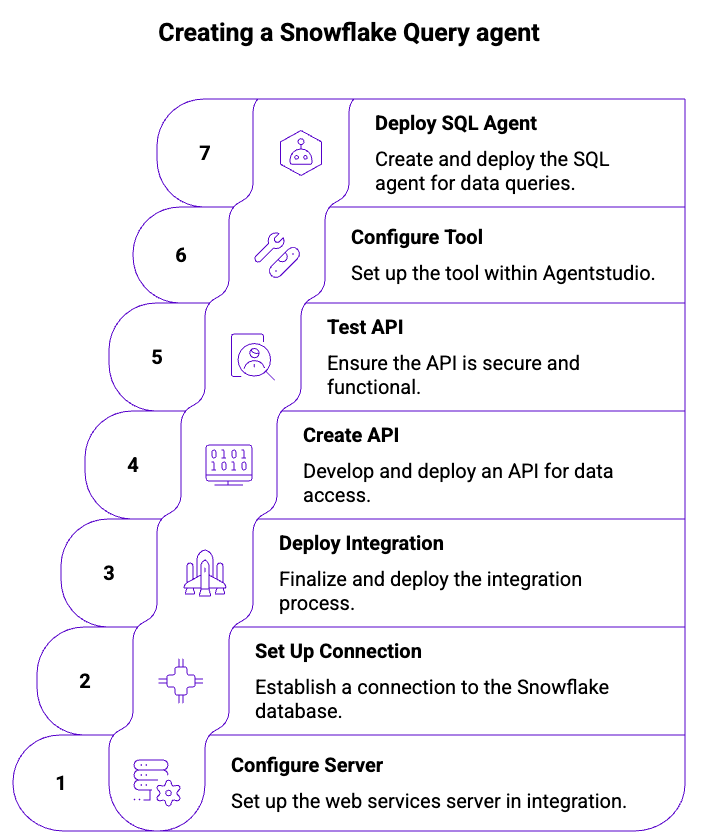
Step 1: Configure the Web Services Server step
-
Navigate to Integration > Create New Component and create a new process. You can name the process Snowflake Query Agent.
-
In the Start step, select Web Services Server.
-
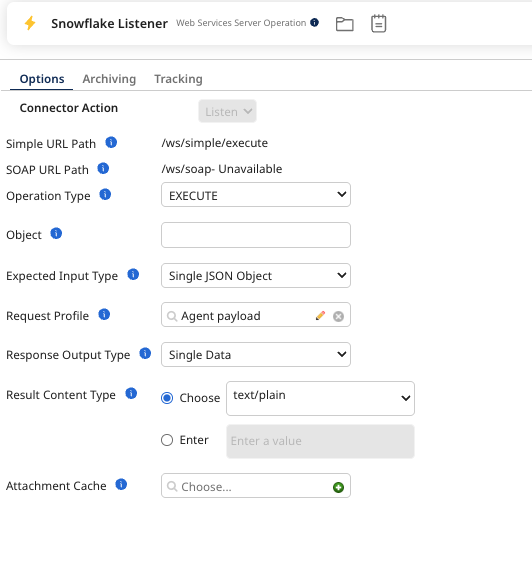
In the Web Services Server step, select Listen as the Action.
-
In Operation, create a New Operation and set up the following:
- Select EXECUTE as the operation type.
- In Expected Input Type, select Single JSON Object.
- In Request Profile, create new JSON profile.
- Rename it to Agent Payload and configure the following:
- Set the Value name as
Root, the value type as Object and Looping Option as Unique. - Right-click Object and “Add Object Entry”.
- Set value name as
sql, value typeSimpleand Data type asCharacter.
- Set the Value name as
- In Response Output Type, select None.
-
Click Save & Close.
Step 2: Set up the Snowflake connection
You can run the integration in two ways:
Option 1: Using a Cloud Runtime
-
Use the Web Services Server you created in step 1 as the Start step.
-
Add an OpenAPI connector and configure the following:
- Connection: Snowflake Open API connection. Refer to the next step for more information.
- Action: POST
- Operation: Snowflake OpenAPI SubmitStatement
-
Configure the Snowflake Open API connection as follows:
- OpenAPI specification: Snowflake SQL API spec. You can use "https://raw.githubusercontent.com/snowflakedb/snowflake-rest-api-specs/refs/heads/main/specifications/sqlapi.yaml"
- Server: Add in your Snowflake server. For example,
https://<youraccountID>.snowflakecomputing.com - Authentication: API Key. Refer to [Personal Access Token] obtain an API Key.
- API Key Request Location: Request Header
- Under API Keys, click Add Property and enter the following:
- Key: Authorization
- Value: Bearer
<yourAPIKeyfromSnowflake>
- Click Save and Close.
-
Set up the Snowflake Open API operation as follows:
-
Create a new JSON profile (OpenAPI SubmitStatement POST request) under Request Profile with the following:
- Create an Object and set it up as the image below:
-
Use the same JSON profile as Response Profile.
-
Under Header X-Snowflake-Authorization-Token-Type enter
PROGRAMMATIC_ACCESS_TOKEN. -
Click Save and close.
-
-
Add in a Map step and map the incoming SQL query(Agent Payload) into the OpenAPI SubmitStatement POST request.
- Fill in your values for Database, role, schema, warehouse.
- Connect the map from
Roottostatement.
-
Return the response via a Return Documents Step.
Option 2: Using a Basic Runtime
-
Install and configure a basic runtime connected to your environment. To set up a basic runtime, refer to Basic runtime setup.
-
Use the Web Services Server you created in step 1 as the Start step.
-
Add a Document Properties Step to map
sql(Agent Payload created in step 1) into a property (Snowflake - SQL Script).- Properties to Set: (Snowflake - SQL Script)
- Property Value: JSON Profile- Agent Payload- sql(sql).
-
Configure the Snowflake Connector
- For Snowflake connection: Use your Username and Password as Authentication and add in your account, warehouse, database, schema, and role details.
-
Add a Return Documents Step to send the results back to the agent.
Step 3: Finish and deploy the integration
- Click Save.
- Click Create Packaged Component.
- Select your integration.
- Select Next: Add Details.
- Select Create Packaged Component.
- Select Deploy.
- Select your Deployment Environment. Refer to Runtime setup for how-to documents on setting up your runtime.
- Select the process.
- Select Next: Review.
- Select Deploy.
- Select Close.
Step 4: Create and deploy an API
- Select Create API from your integration build dashboard.

- Enter a name for your API.
- Create a unique API path. For example, "snowflakeapi".
- Create a Published API Title. For example, Query Snowflake Database.
- In Published Version, enter 1.0.
- Optional: Enter a description that describes the purpose of your API.
- In REST Endpoint, select GET.
- Optional: In Advanced Settings, specify the maximum number of documents returned. The default is 100.
- Select Create.
- Review the details then select Save and Deploy.
- Select the runtime environment.
- Select Package and Deploy.
Step 5: Set up authentication and test your API
- In Manage > Runtime Management > Runtime you had set up > Shared Web Server, select Advanced as the API type.
- Ensure Authentication Type is set to Basic. Select the User Management tab.
- Click Generate Token to generate a token for the user name. Save this token for setting up your API tool authentication in your AI agent.
- Click Save.
- Optional: Test your agent in Postman or another API testing tool. Your base URL is in Runtime Management > Shared Web Server. Add
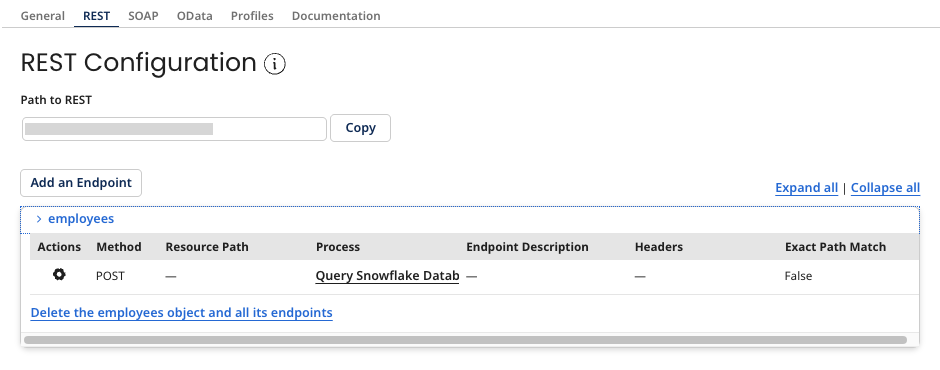
/ws/rest/Base API Path/Endpoint name. For example,https://c02-usa-east.integrate-test.boomi.com/ws/rest/snowflakedata/employeesDefault is added because it is the name of the REST endpoint.
Step 6: Configure and deploy the tool in Agentstudio
-
Navigate to Agentstudio > Agent Garden > Tools.
-
Select Create New Tool.
-
Hover over API and click Add Tool.
-
Enter the following details under Tool Signature:
- Tool Name: Snowflake Query Tool.
- Description: Executes query and displays response back.
- Input Parameters: Click + Add Input Parameter. Add
SQLQueryas the name,SQL Query Created by agentas the description and SelectStringas Type. Switch the Required? tab to On.
-
Under Configuration select the following
- Select Build with Specs.
- Endpoint Base URL:
<yourRuntimeURL>obtained from step 5. - Method: POST
- Endpoint Path: Endpoint path you obtained from your Runtime URL for example, /ws/rest/snowflake/employees.
- Authentication: Basic. Add in the details you obtained in step 5.
- Request Type: JSON
- Request Body:
{ "sql": "{{SQLQuery}}"}
-
Click Save and Continue.
-
Review your tool and click Deploy Tool.
Step 7: Create and deploy the SQL agent
-
Navigate to Agentstudio > Agent Garden > Agent Designer.
-
Select one of the following:
-
Blank Template > I will add manually, or
-
Import the agent using a YAML file (refer to Importing an agent for details).
-
Here’s an example YAML definition you can use to import the agent:
Agent YAML for import
metadata:
exported_at: '2025-09-17T06:50:06Z'
schema_version: '1.0'
agents:
- objective: This agent will create SQL query's based off the incoming user request
name: Snowflake Agent 001
personality_traits:
voice_tone: Professional
creativity: 50
decisiveness: 75
clarity: 50
confidence: 50
engagement: 75
profile_picture:
role: Default
colour: Sunset
image_id: img_location
conversation_starters:
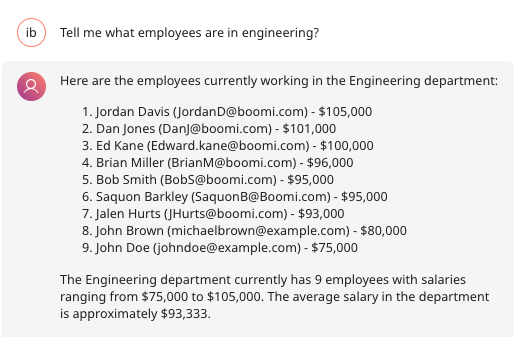
- Tell me which employees are in engineering?
tasks:
- name: Create a SQL Query
objective: Create a SQL Query based off of the users request using the table definition
instructions:
- "Generate A SQL query based on the user's requirements\n***Start of table***\n
TABLE EMPLOYEES.PUBLIC.EMP (\n\tFIRST_NAME VARCHAR(16777216),\n\tLAST_NAME VARCHAR(16777216),\n
\tDATE_OF_JOINING DATE,\n\tSALARY NUMBER(38,0),\n\tDEPARTMENT VARCHAR(16777216),\n
\tDEPARTMENT_MANAGER VARCHAR(16777216),\n\tEMAIL VARCHAR(16777216)\n);\n***End
of Table***"
tools: []
- name: Query Database
objective: Executes the generated SQL query.
instructions:
- Query Database with SQLQuery parameter.
tools:
- name: Snowflake Query Tool
type: OpenAPI
requires_approval: false
response_passthrough: false
unique_name: snowflake_query_tool_6086
guardrails:
blocked_message: Can't do that
system: false
policies:
- name: Prohibited Terms Policy
type: word_filter
configuration:
words:
- Delete
agent_mode: conversational
custom_variables:
inference_configuration:
performance_config:
processing_mode: standard
unique_name: snowflake_agent_6512
tools:
OpenAPI:
# --------------------------------------------------------
# OpenAPI Tool: snowflake_query_tool_6086
# IMPLEMENTATION REQUIREMENTS:
# 1. Authentication: Basic Authorization credentials are required
# --------------------------------------------------------
- name: Snowflake Query Tool
description: Executes query and displays response back
input_parameters:
- name: SQLQuery
description: SQL Query Created by agent
required: true
type: string
base_url: https://c02-usa-east.integrate-test.boomi.com
path: /ws/rest/snowflake/employees
method: POST
query_parameters: []
path_parameters: []
headers: []
authentication:
type: basic_auth
config:
username: ''
password: ''
request_body:
type: application/json
template: "{ \"sql\": \"{{SQLQuery}}\"}\n \n "
unique_name: snowflake_query_tool_6086
sources: {}
-
Define Agent Tasks
-
Task 1: Create a SQL Query
-
Description: Converts the user’s natural language request into a valid SQL query.
-
Instructions: Generate SQL based on the request using the predefined table:
***Start of Table***
TABLE EMPLOYEES.PUBLIC.EMP (
FIRST_NAME VARCHAR(16777216),
LAST_NAME VARCHAR(16777216),
DATE_OF_JOINING DATE,
SALARY NUMBER(38,0),
DEPARTMENT VARCHAR(16777216),
DEPARTMENT_MANAGER VARCHAR(16777216),
EMAIL VARCHAR(16777216)
);
***End of Table*** -
-
Task 2: Query Database
-
Description: Executes the SQL query created in Task 1.
-
Instructions: Pass the SQLQuery parameter to the Snowflake Query Tool REST API endpoint.
-
Tools: Select + Add New Tool and select the API tool you created in step 6. Click Save.
-
Select Save and Continue.
-
-
-
Define Guardrails: Leave guardrails blank.
-
Review your agent.
-
Test your agent in the Test Agent window.
-
Open the agent. When you are ready to deploy:
-
Navigate to the Review tab.
-
Select Create, then Package & Deploy. Refer to Deploying agents to learn more about setting up environments for agent package deployment.
-
Select a target production environment from the Production Environment drop-down.
-
Select Create Package & Deploy.
-
Start using the agent in the conversation user interface. Here is an example of a possible output: