Adding a Microsoft Copilot provider
Before adding a Microsoft Copilot account into the Agent Control Tower, ensure the prerequisites are met. You can obtain the Tenant ID, Client ID, and Client Secret from the applicable environment using Azure AD in Step 3. To obtain the Scope, refer to Step 5.
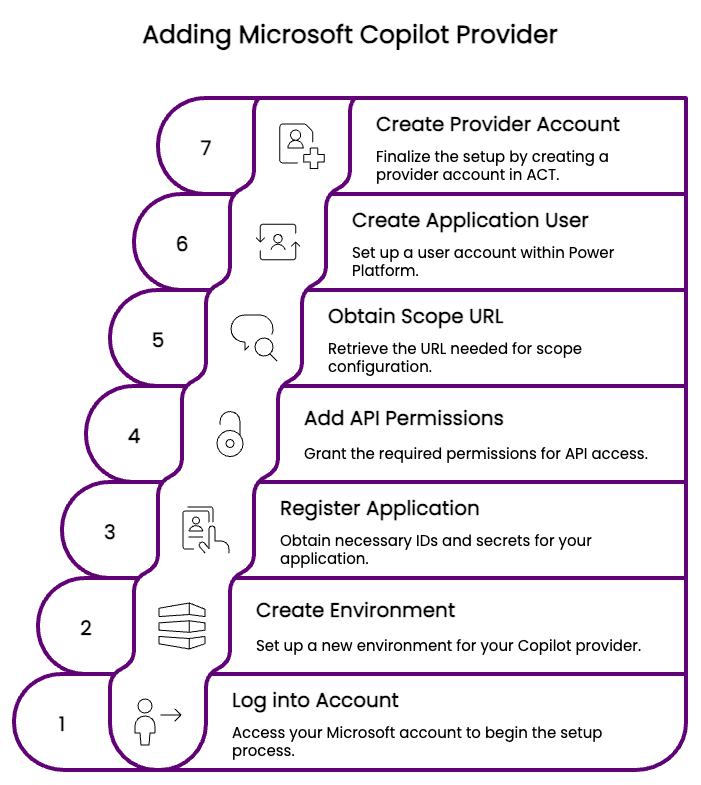
Step 1: Log in to the Microsoft Copilot Studio dashboard
- Navigate to Microsoft Copilot Studio Dashboard.
- Log in to your account.
The system logs your account into the Default Directory (default) environment by default. The "default environment" is a pre-configured environment designed for initial exploration and development and is not intended for long-term production use. To log into a Copilot provider account on the Agent Control tower, you will need a Dataverse environment.
To view your environments, click Environment Default Directory (default) in the upper right corner of your screen. A drop-down menu will list your supported environments. Your default environment will have "(default)" attached to your account name. If you do not have a Dataverse environment, you can create one by referring to “Creating a Dataverse Environment" in Step 2.
Step 2: Creating a Dataverse environment
If you have an existing Dataverse environment, ensure Add a Dataverse data store is enabled.
You can create a fresh Copilot Studio-enabled Dataverse environment if you are new to Microsoft Copilot and do not have a working environment to connect to the Agent Control Tower.
- Log in to Power Platform Admin Center.
- Navigate to Manage from the left-hand menu and click on Environments.
- Click +New and fill in the following in the Add Dataverse sidebar:
- Name: For example, "Copilot Dev"
- Region: Your region
- Type: Sandbox or Production
- Add a Dataverse data store: Yes (Mandatory to log into Agent Control Tower)
- Click Next.
- Keep all the selected information as default and select None under Security group unless needed otherwise. For more information on security groups, refer to Environment Security groups.
- (Optional)Under Enable Dynamics 365 apps? Toggle on Yes.
Enabling Dynamics 365 apps will allow system generated agents to appear. Keeping the toggle switched to No will only list agents that you have generated. It is important to note that this is a one time setting and cannot be switched later on.
- Click Save.
Step 3: Register an application in Azure AD
To obtain the Tenant ID, Client ID, and Client Secret:
- Navigate to the Azure Portal.
- You can access the Azure Active Directory / Microsoft Entra ID by using the search bar or the menu in the upper left corner.
- A Company Overview screen will open. Click +Add.
- Click App registration.
- Enter the following details:
- Name: For example, "Copilot API Access".
- Supported account types: Accounts in this organizational directory only (- Single tenant).
- Redirect URI: Leave blank or set if needed.
- Click Register.
- Copy the Application (client) ID and Directory (tenant) ID.
For the Client Secret, from the left menu,
- Navigate to Manage > Certificates & secrets.
- Click +New client secret.
- Enter a description (for example, ACT copilot).
- Set an expiry timeline or leave as default.
- Click Add.
- Copy the Value to your local device. The Value is the Client Secret and is a one-time view only.
Step 4: Add API permissions
- Navigate to Manage > App Permissions.
- Under Configured permissions, click Add a permission.
- Switch to the APIs my organization uses tab in the Request API permissions sidebar.
- Search for Dataverse and select it.
- Select Delegated permissions under What type of permissions does your application require?
- Select the checkbox for user_impersonation permission.
- Click Add permissions.
Step 5: Obtain the scope
For the scope:
- Navigate to the Power Apps dashboard.
- You can switch to your environment from the Environment Default Directory (default) in the upper right corner of your screen.
- Navigate to Settings > Developer resources.
- Copy your WebAPI endpoint to your clipboard(For example:
https://<yourenv>.api.crm.dynamics.com/.default).
Step 6: Create an Application User in Power Platform
- Navigate to the Power Platform admin center.
- Select Manage >
your environment. - Select Settings.
- Expand Users + permissions and select Application users.
- Click +New app user.
- Select the App that you created in Azure AD in step 3.
- Choose the Business Unit (for example, orgXXXXXXX: type "org" and select the suggestion that pops up).
- Under Security Roles, select the System Administrator role and click Save.
info
Optional roles you can apply include Bot Author, Bot Contributor and Bot Transcript Viewer.
- Click Create.
Step 7: Adding a provider account on Agent Control Tower
After you obtain all the prerequisites, log in to your Agent Control Tower and perform the following steps:
- Navigate to Manage providers.
- Click on Account.
- Click on +Add Account.
- Enter an Account Name for your provider account on the Add Account screen.
- Enter your organization's Co-pilot URL:
https://login.microsoftonline.comcan be used as default. - Enter the Scope you obtained from Step 5.
- Enter your Tenant ID, Client ID, and Client Secret obtained from Step 3.
- Click Add Account.
The account takes a couple of minutes to sync. After syncing, you will see your agents on the Agents screen. The Client ID and Client Secret are editable fields if you need to update expired credentials.
You can edit tags and trust levels of your copilot agents.
Next steps: Managing Microsoft Copilot agents
