Salesforce provider
Govern and manage your Salesforce agents through the Boomi Agent Control Tower. Connecting to your Salesforce instance allows you to seamlessly manage Salesforce-associated agents, tasks, and data directly within the Agent Control Tower alongside other provider agents. It streamlines operations and enhances control over your agent ecosystem.
The metrics for the Salesforce agents are currently not accessible. You can view the Status, Overview, and Tasks of the agents from the Agents page.
The new Salesforce Agentforce 360 for agent creation is currently not supported in Agent Control Tower. Agents that are newly created or edited using the beta version will not appear in Agent Control Tower.
Connecting to your Salesforce account requires your Client ID and Client Secret, both of which are obtainable when you create a Connected App. The Connected App acts as a bridge connecting your Salesforce Account with the Agent Control Tower.
For Salesforce accounts with the Winter ‘24 edition and above, External Client apps are the new generation of connected apps.
The Salesforce Provider empowers you to:
-
Consolidate: Gather information about Salesforce agents in one central location within the Agent Control Tower, cataloging them with other provider agents like Boomi and Amazon Bedrock.
-
Organize: Group and categorize Salesforce agents, enabling better management, tracking, and reducing oversight and security risks within your Salesforce agent ecosystem.
-
Manage: Monitor Salesforce agents and their associated metadata (For example, account details, sync status, total number of agents, and agent-specific details like tools, tags, trust level, and status).
-
Gain visibility: Provide an overview of all Salesforce agents connected through the integrated Salesforce instance, including agent-associated tasks and topics (standard and custom).
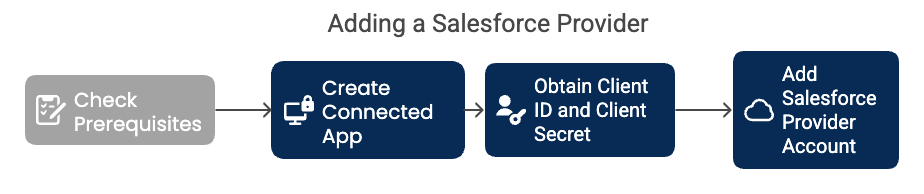
Prerequisites
-
Your Salesforce account needs to have access to Salesforce Agentforce Studio.
-
Your account should have a System Administrator Profile and a Salesforce User License. To check your Profile and User License, go to View Profile > Settings > Advanced User Details under My Personal Information.
-
Check the Salesforce edition that your account is working with.
-
Create an External Client App. If you are working with a Salesforce version below the Salesforce Winter ‘24 edition, create a Connected App
Step 1: Create an External Client App
If you have the Salesforce Winter ‘24 edition and above, create an External Client App to obtain your Client ID and Client Secret.
-
Log in to your Salesforce account.
-
From the upper-right corner of the Salesforce Dashboard, click on the Setup Menu.
-
Select Setup in the Setup Menu.
-
Search for "External Client Apps" in the Quick Find.
-
Under External Client Apps, select External Client App Manager.
-
Select New External Client App.
-
Under Basic Information:
a. Fill in an External Client App Name, which auto-populates the API Name. Choose a name that identifies the app's use, such as "Boomi_ACT".
b. Enter your Contact Email to receive the identity verification OTP.
c. Keep Distribution State as Local.
-
Under API (Enable OAuth Settings):
a. Select the Enable OAuth checkbox.
b. Under App Settings, enter the Callback URL:
https://login.my.salesforce.com/services/oauth2/tokenwhere login is your Salesforce login path in the URL.noteIf your URL has lightning.force.com, replace it with .my.salesforce.com for the CallbackURL to work. For example, "https://boomi-xxxxxx-de-ed.develop.my.salesforce.com".
c. Select Manage user data via APIs (api) as the required OAuth Scopes.
d. Under Flow Enablement, select Enable Client Credentials Flow.
e. Keep default selections under Security.
-
Click Create.
You will receive a success message notification.
Step 2: Obtain the Client ID and Client Secret
In the newly created app, perform the following:
-
Under the Policies tab, click Edit.
a. Expand OAuth Policies.
b. Select the Enable Client Credentials Flow checkbox under OAuth Flows and External Client App Enhancements.
c. Enter your Salesforce account username.
d. Keep the rest of the selections as default and click Save.
-
Under the Settings tab, expand OAuth Settings:
a. Click Consumer Key and Secret.
b. In the Verify Your Identity page, enter the verification code obtained in your email address and click Verify.
c. Copy your Consumer Key and Consumer Secret.
You can view the consumer key and secret at any point in time from the Settings tab in your created External Client App.
Step 3: Add a Salesforce provider account
Logging into a Salesforce account requires your Client ID and Client Secret. For more information, refer to the prerequisites.
-
Navigate to the Manage Provider screen in your Agent Control Tower.
-
Click Accounts under Salesforce provider.
-
In the Add Account screen,
a. Enter Account name: This is an identifier account name associated with your provider account.
b. Enter the Salesforce URL: Enter the Salesforce URL where you have created a Connected App/ External Client App
https://login.my.salesforce.com.c. Enter your Client ID (Consumer Key) and the Client Secret (Consumer Secret) you received through the Connected App/ External Client App.
d. Click Add Account.
The Sync Status of your newly added account takes a minute to move from In Queue to Syncing and Success. After a successful sync, you can view the agents attached to your account.
The Client ID and Client Secret are editable fields. If your credentials have expired, you can add a new Client ID and Secret to the account.
You can edit the tags and trust level to categorize and provide added information to your account.
Next steps: Managing Salesforce agents
If your Salesforce provider account has a Error/Disconnected status, check the status of your external client app and ensure it is set to enabled. If found disabled, enable the app and return to the Salesforce provider account details page and click Save. The Sync Now button will appear. Once synced, the Sync Status reflects the Success status.
