Amazon Redshift as a source connection
Before retrieving your connection string, ensure your Amazon Redshift cluster is accessible to Data Integration. For more information, refer to selecting connection methods such as Private networking, SSH tunnel, reverse SSH tunnel, and VPN.
Amazon Redshift on Data Integration combines the power of Amazon Redshift's data warehousing capabilities with Data Integration data integration and orchestration.
This integration lets you easily load and transform data from different sources into Amazon Redshift for advanced analytics and reporting. By integrating Amazon Redshift with Data Integration, you can easily extract the data warehoused in Redshift, transform it as needed, and load it into Targets for further analysis or operational use.
With Data Integration, businesses can streamline their data pipelines and use Amazon Redshift's scalability and performance for actionable insights. Data Integration offers flexible options for data management. You can securely store your data in your own Custom File Zone, giving you control over your designated storage. You can also use Data Integration default Managed File Zone, which requires no setup. For organizations needing greater control over data storage and management, the Custom File Zone is available. In both cases, a bucket serves as a repository for objects, where each object represents a file along with its associated metadata.
Amazon Redshift compatibility of versions
| Data Flow Modes | Versions Supported | Support for Managing Schema Drift |
|---|---|---|
| Multi-Tables (Standard Extraction) | All Versions | Yes |
Prerequisite
AWS superuser account
Make sure you have signed up for AWS as a Superuser.
AWS permissions setup
Creating a Redshift cluster
Procedure
- If you do not have a Redshift cluster, you can create one by following Get started with Amazon Redshift Serverless data warehouses topic.
- Once you create the cluster, you need to authorize access to the cluster.
Creating user and schema within the Redshift database
In the cluster creation wizard in AWS, you must define the database where Data Integration uploads the data.
Procedure
- Connect to your Redshift cluster using the credentials set during cluster creation, using your preferred SQL management tool (for example, Aginity, SQL Workbench/J, or DBeaver). Make sure the Redshift cluster is externally accessible. Get the host address from the Redshift cluster details.
- Create the user and schema by running the following SQL commands (replace Data Integration User and schema name with your desired names):
       CREATE USER <Data Integration User> with password '`<myPwd>`' CREATEUSER;
       CREATE SCHEMA IF NOT EXISTS <schema name> authorization < Data Integration User>;
- Grant the necessary permissions to the user by running the following commands:
   GRANT SELECT on ALL TABLES IN SCHEMA <schema name> TO <DataIntegration User>;
   GRANT EXECUTE on ALL FUNCTIONS IN SCHEMA <schema name> TO <Data Integration User>;
   GRANT USAGE on SCHEMA <schema name> TO `<Data Integration User>`
Replace Data Integration User with the user created and schema name with the schema you grant Data Integration permission. Repeat this process for every schema you want for Data Integration to access and use data.
Data Integration conducts a review of the Access Control Lists (ACLs) to ensure that these permissions replicate across all tables. The current Grant permissions found within the raw ACLs are structured as shown:
data_integration=arwdRxtDPA/data_integration,group test_group=arwdxtD/data_integration,user1_name=wx/data_integration,user1_name=x/data_integration
In this context, the string arwdRxtDPA denotes the permissions granted to the Data Integration user. Each character within this string corresponds to a specific action, with 'a' representing INSERT, 'r' representing SELECT, 'w' representing UPDATE, and 'd' representing DELETE. Data Integration interprets this string, generates grant statements, and subsequently executes them individually on the respective tables.
Allowlist our IP addresses
Procedure
- Log in to your AWS account and search for the Amazon Redshift service in the AWS console.
- Access the clusters section in the left sidebar.
- Select the cluster you created.
- Go to the properties tab and look for VPC security group under Network and security settings. Click the Security Group ID.
- In the Inbound rules tab, click Edit inbound rules.
- Add a Redshift rule type and specify the required source IP addresses. To learn more, refer to theData Integration allowlist IP addresses.
- Save the rules to allowlist the specified IP addresses.
Procedure
-
Navigate to the Data Integration Console.
-
Click Connections and select + New Connection.
-
Choose Amazon Redshift (Source).
-
Enter the Connection Name.
-
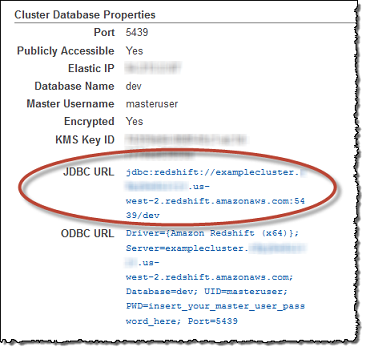
Enter your Host name.
-
Enter your Port.
-
Enter your Username and Password.
-
In the File Zone Connection section, you can use the Custom File Zone established, and then select the associated S3 Bucket.
-
Click the Test Connection to verify if your connection is up to the task. If the connection succeeded, you can use this connection in Data Integration.
SSL options (optional)
Key file
To establish an SSL connection and authenticate your Redshift user, you can use a key file (.pem).
SSH (optional)
Secure Shell Protocol (SSH) provides secure and encrypted access to internal databases from Data Integration servers to retrieve data.
Configure your SSH Tunnel server in your network to use SSH Tunneling via Data Integration. This server connects to your database server via the internal IP address or address, and accepts SSH connections from Data Integration IP addresses. Data Integration uses a key file to connect to the SSH server.
