Getting started with Data Integration
Data Integration is an end-to-end platform that addresses the complete data development lifecycle while delivering a single, easy-to-use solution for modern data teams. You can build and manage all your data flows and transformations in one place.
Data Integration comes with 180+ fully managed, out-of-the-box data sources that support all major data warehouses. You can also create advanced workflows using built-in orchestration capabilities that handle complex needs, and use Python in your workflows with first-class citizen Python DataFrame support.
Data Integration Kits offer pre-built, one-click installs, including all data flows, transformation logic, and SQL scripts for common use cases.
Data Integration capabilities
Data Integration supports a wide range of data integration scenarios:
- Extract, Load, and Transform (ELT): Move data from any source into your cloud data warehouse and transform it using SQL or Python.
- Change Data Capture (CDC): Replicate only changed records from your databases in real time, minimizing load and keeping targets fresh.
- Reverse ETL: Push processed data from your data warehouse back into operational tools such as CRMs, ad platforms, and support systems.
- Workflow orchestration: Build multi-step workflows with branching, conditional logic, loops, and dependency management.
- REST API integration: Connect to any REST API as a data source, a custom ingestion endpoint, or a data target.
- Pre-built Kits: Install complete, production-ready integration packages with a single click.
Key concepts
Understanding these building blocks helps you navigate Data Integration quickly:
| Concept | Description |
|---|---|
| Data Flow | The primary Data Flow unit in Data Integration. Every Data Flow — whether a simple load or a complex orchestration — is a Data Flow. |
| Source to Target Flow | Extracts data from a source connector and loads it into a target data warehouse or data lake. |
| Logic Flow | Orchestrates multi-step workflows using SQL steps, Python steps, and nested Data Flows. |
| REST Action | Connects to any REST API to ingest, transform, or push data. |
| Connection | Stores the credentials and configuration for a data source or target. Connections are reusable across Data Flows. |
| Environment | An isolated workspace containing its own Data Flows, connections, and variables. Use environments to separate development, staging, and production. |
| Variables | Dynamic values you can reference across Data Flows and environments, using curly bracket syntax { }. |
| Kit | A pre-built, one-click integration package that includes all Data Flows, transformation logic, and SQL scripts for a common use case. |
Data Integration architecture
Data Integration is a fully managed SaaS platform. It uses a multi-tenant architecture that logically separates customer data using a customer-specific Tenant ID, with access and privileges granted based on user roles.
How data moves through the platform
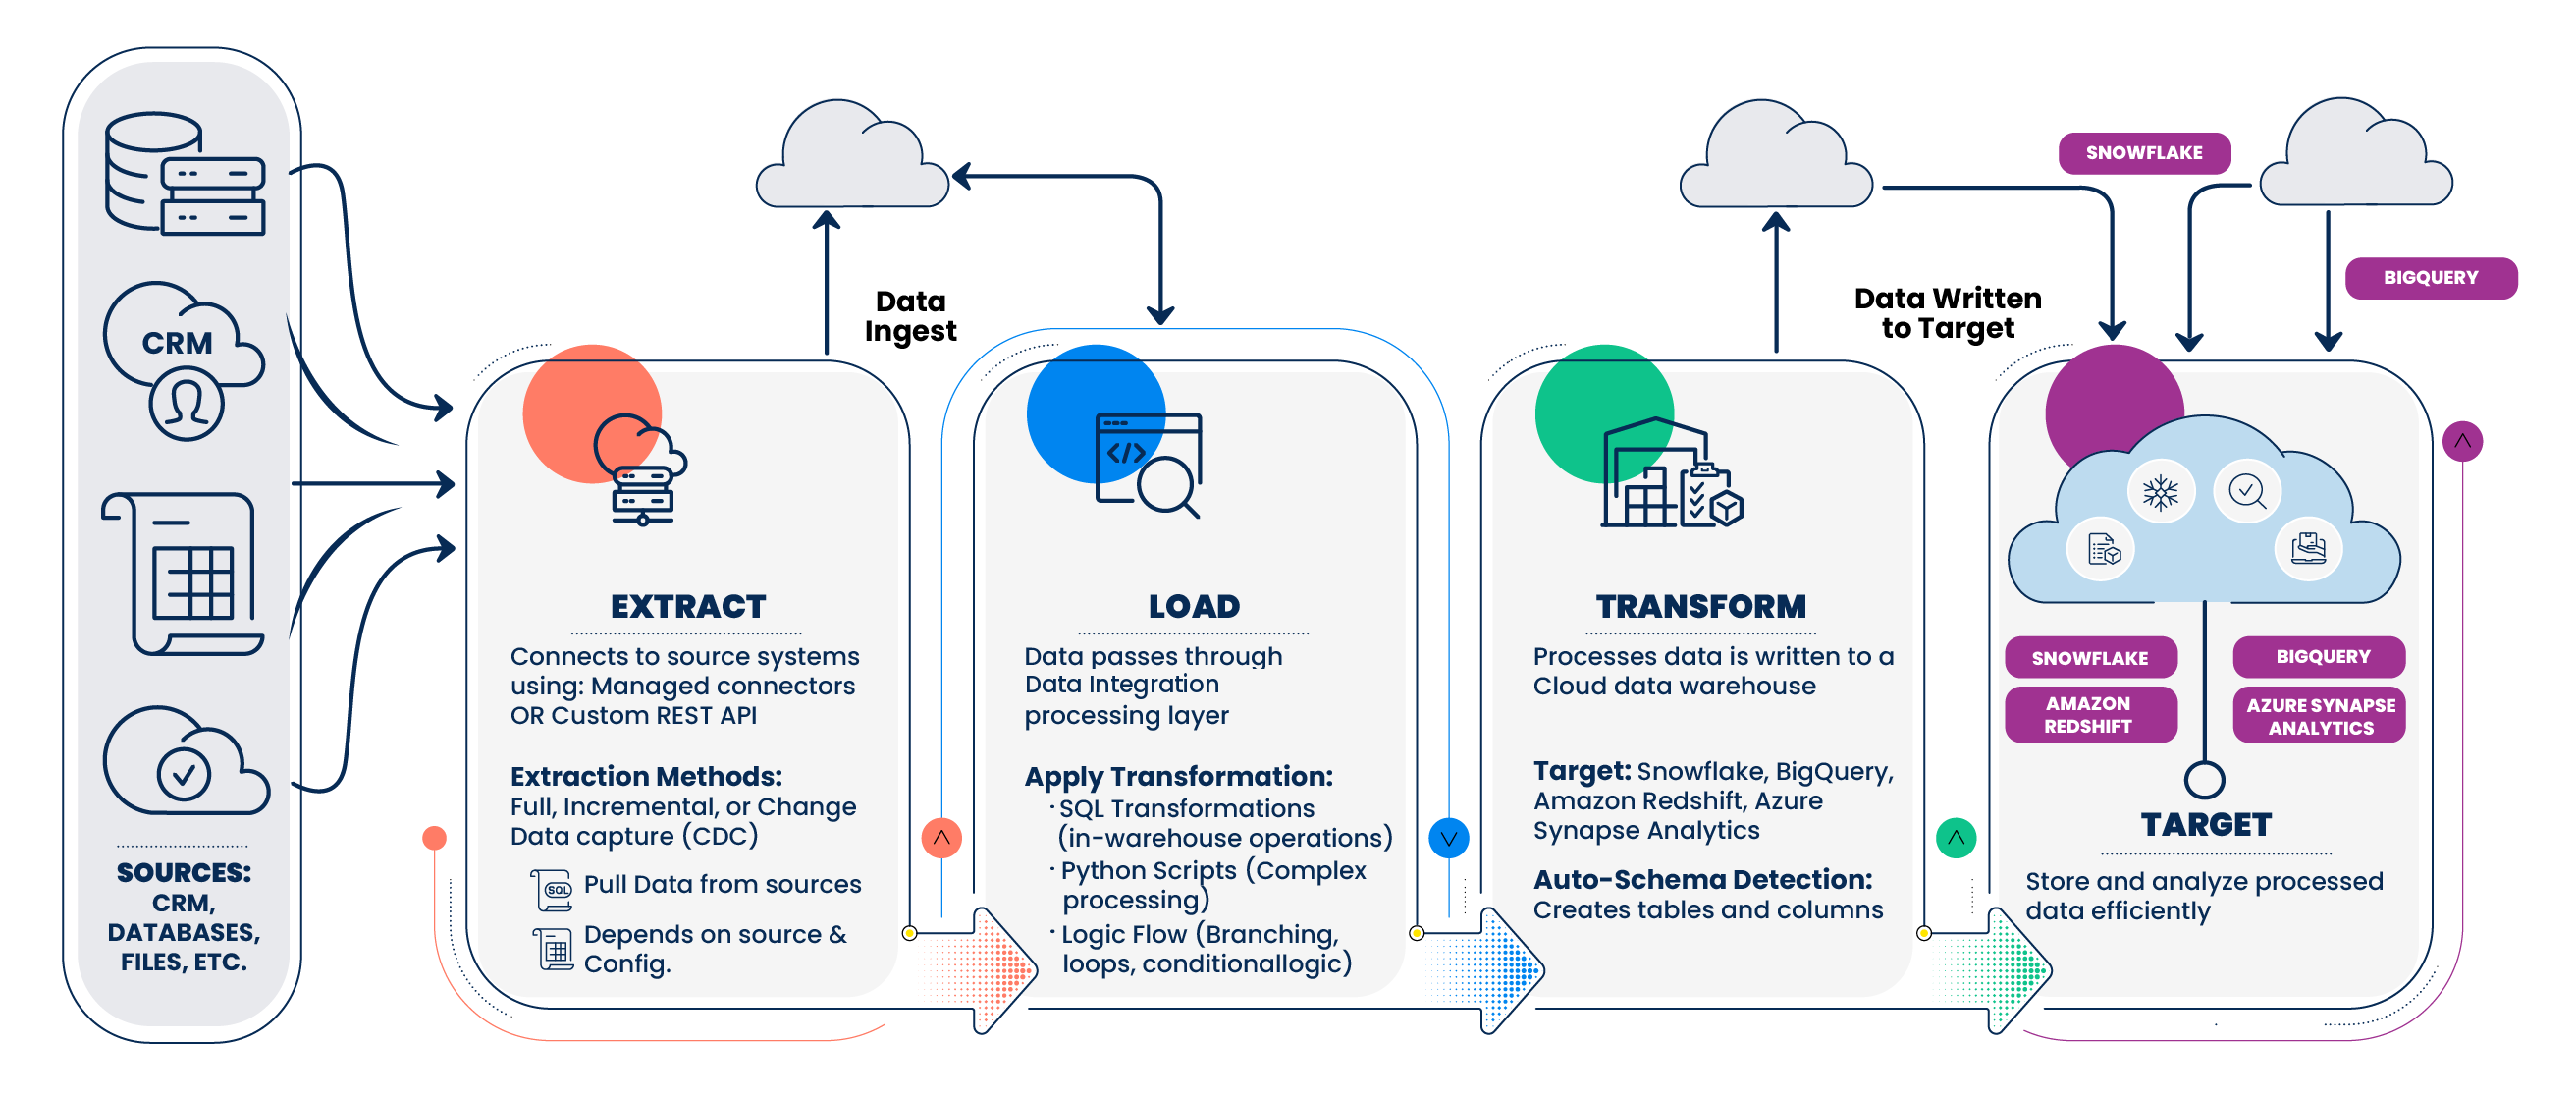
Every pipeline in Data Integration follows a three-stage pattern:
Extract > Load > Transform
- Extract: Data Integration connects to your source system using a managed connector or a custom REST API configuration. It pulls data using full extraction, incremental extraction, or Change Data Capture (CDC), depending on the source type and your configuration.
- Load: Processed data is written to your target — a cloud data warehouse such as Snowflake, BigQuery, Amazon Redshift, or Azure Synapse Analytics. Data Integration automatically detects the target schema and creates tables and columns as needed.
- Transform: Data passes through the Data Integration processing layer, where you can apply SQL transformations (for in-warehouse operations), Python scripts (for complex processing), or orchestrate both using Logic Flow with branching, loops, and conditional logic.
Data Flow types
Data Integration provides three Data Flow types to cover different integration patterns:
- Source to Target Flow: Extracts data from a source connector and loads it directly into a target data warehouse or data lake. Use this for straightforward ELT pipelines where transformation happens inside the warehouse.
- Logic Flow: Orchestrates multi-step workflows containing SQL steps, Python steps, REST Action steps, and nested Source to Target Flow. Use this for complex workflows that span multiple pipelines or systems.
- REST Action: Connects to any REST API as a source, a custom ingestion endpoint, or a target. Use this for systems without a native Data Integration connector, or to push data back into operational tools.
Deployment regions
Data Integration processes pipeline data in the AWS region you select when you create your account. Available regions:
- North America:
console.rivery.io- us-east-2 (Ohio) - Europe:
eu-west-1.console.rivery.io- eu-west-1 (Dublin) - Israel:
il-central-1.console.rivery.io- il-central-1 (Tel Aviv) - Australia:
ap-southeast-2.console.rivery.io- ap-southeast-2 (Sydney)
Security
All data in transit uses TLS 1.2+ encryption. Data Integration uses AWS IAM, CloudTrail, VPC, and KMS for segmentation, auditing, and access control. The platform holds SOC 2 Type II and ISO/IEC 27001:2013 certifications and is compliant with GDPR and HIPAA.
For secure connectivity to on-premise or firewall-protected sources, Data Integration supports IP address allowlisting, VPN, SSL, SSH tunneling, AWS PrivateLink, Azure PrivateLink, and Google Private Service Connect.
Before you begin
Before you start building in Data Integration, ensure you have the following:
- Data Integration Account: A valid, active account. If you do not have one, contact your account administrator or sign up.
- Source Credentials: Valid authentication details for the data sources you plan to connect (for example, database hostname/port, username, password, or API keys).
- Target Warehouse Access: Access to a supported cloud data warehouse target destination, such as:
- Snowflake
- Google BigQuery
- Amazon Redshift
- Azure Synapse Analytics
- Network Configuration: If you are connecting to an on-premise or firewall-protected data source, ensure your network security rules allow outbound connections to the designated Data Integration IP addresses.
Data Integration Flow: A quick start guide
Follow these steps to run your first data flow in Data Integration.
Step 1: Set up your account
- Navigate to the Data Integration Console and click Start for Free.
- Create an account using your email address and a unique password, or use Sign in with Google. Choose your operational region and click Get Started.
- Provide your name, company name, and Data Integration workspace name, then click Next.
- Verify your email address by clicking the link in the verification email from Data Integration.
This step does not apply if you use Google sign-in.
- Click Let's Go to access the Data Integration onboarding page.
Step 2: Create a connection
A connection stores the credentials for a data source or target. You need at least one source connection and one target connection before you can build a data flow.
- Click Connections in the left-hand menu.
- Click + New Connection.
- Select your data source or target from the list. If your system is not listed, select REST API Source to build a custom connection.
- Enter the required credentials for your system.
- Enter a Connection Name that identifies this connection when building Data Flows.
- Click Save.
For detailed instructions, refer to Creating a connection.
Step 3: Create a Data Flow
- Click Data Flows in the left-hand menu.
- Click + New Data Flow.
- Select the Data Flow type that fits your use case, such as Source to Target Flow, Logic Flow, or REST Action.
- Configure your source connection, target connection, and any transformation or scheduling options.
- Click Save.
For detailed instructions, refer to Creating a Data Flow.
Step 4: Run and monitor your data flow
- Open your Data Flow and click Run to execute it manually.
- Monitor the run status and logs in the Activity panel.
- Once your data flow runs successfully, set a schedule to automate future runs.
Step 5: Use a Kit (optional)
If you have a common use case, a Kit may save you significant setup time.
- Click Kits in the left-hand menu.
- Browse the Kits Marketplace and click Preview on a Kit to review its contents.
- Click Install to deploy the Kit to your account.
- Configure the required connections and variables, then run the included Data Flows.
For detailed instructions, refer to Configuring kits.
Getting help in the console
Data Integration provides in-context assistance so you can get answers without leaving your workflow:
- Ask AI: Use the built-in AI assistant to ask questions about your data, get Data Flow suggestions, and troubleshoot errors in natural language. Refer to Data Integration Ask AI for details.
- Onboarding guide: Select Help > Onboarding at any time to revisit the step-by-step onboarding experience.
- Documentation search: Use the search bar at the top of this documentation site to find topics by keyword.
- Support: Contact the Data Integration support team within the console by selecting Help > Contact Support.
Explore key topics
Once you are familiar with the basics, explore the following areas to get more out of Data Integration:
- Data Integration onboarding: Guided walkthrough of the onboarding console experience.
- Data Integration use cases: Real-world examples of how teams use Data Integration for marketing, cloud migration, and custom integrations.
- Creating a connection: Full instructions for connecting to data sources, including the Send External Link feature for external collaborators.
- Creating a Data Flow: In-depth guide to all three Data Flow types.
- Configuring kits: How to browse, install, and configure pre-built integration Kits.
- Adding variables: How to use Data Flow variables and environment variables across your flows.
- Working with environments: How to separate development, staging, and production workloads using isolated environments.
