Access Control tab and account groups
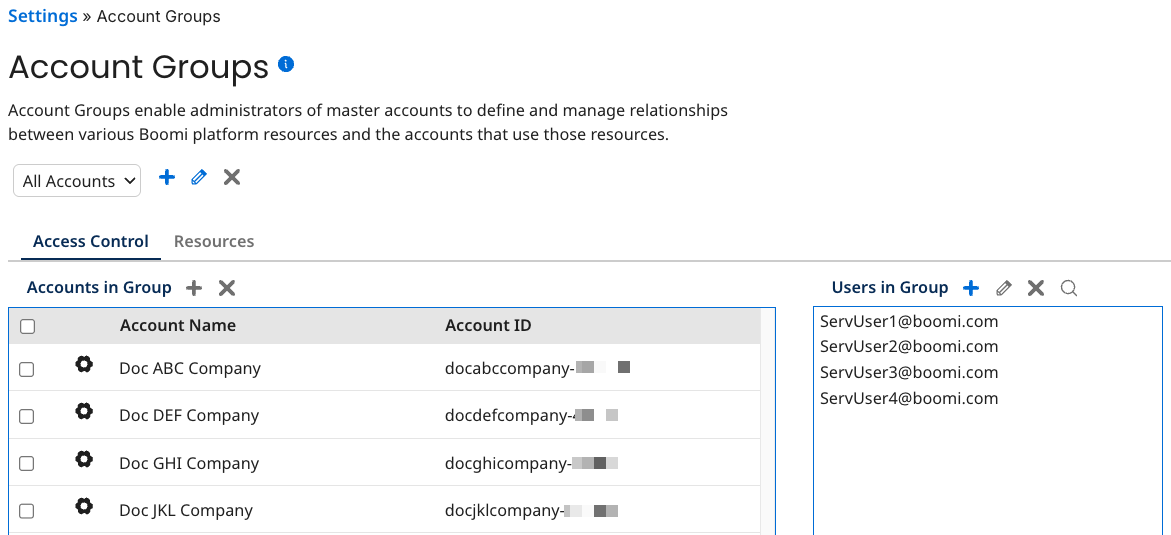
The All Accounts account group displays a table of accounts that the currently-selected primary account can assign to an account group.
By default, the All Accounts account group is displayed. If the currently selected account is not a primary account, then no accounts appear in the table. The primary account is not a member of the account groups it assigns accounts to.
In this example the "Documentation" account is the currently selected primary account. When you view the All Accounts account group, you can see four accounts that the Documentation primary account can assign to account groups.
Enabling single-sign on for some accounts and not others in will affect how you access accounts. Refer to Single sign-on and account access to learn more.
The Accounts in Group table displays all accounts that the currently selected primary account can assign to an account group. This is where you add and remove accounts from an account group.
-
Account Name - The name of the account, as displayed in the Account Name field on the Account Information tab.
-
Account ID - The account's internal ID.
-
View Account Group Membership (icon) - Used to view the account groups of which the selected account is a member.
-
View Account's Assigned Users (icon) - Used to view the members of the selected account.
Adding an account group
-
Select Settings and click the Account Groups tab.
-
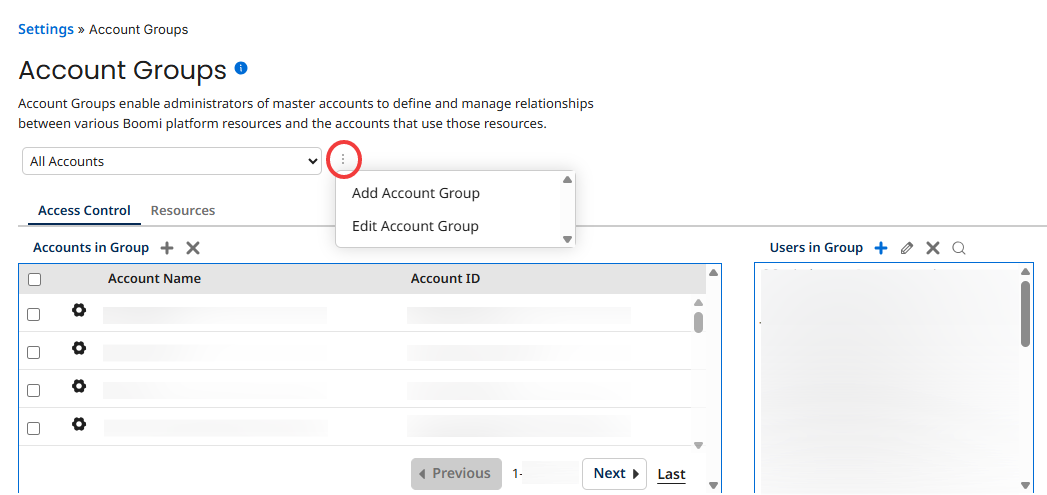
Select the three-dot menu icon to the right of Account Groups dropdown box.
-
Select Add Account Group.
-
Type an account group name.
-
Select a value from the Auto Subscribe Alert Level list if you want new and existing users to receive a specific kind of email alert for all accounts within the group.
-
Click OK.
Adding an account to an account group
-
Select Settings and click the Account Groups tab.
-
In the Account Groups list, select the account group to which you want to add accounts.
-
On the Access Control tab click the '+' to the right of Accounts in Group.
The Choose Account dialog opens.
-
Search for accounts, select one or more accounts, and then click OK.
The accounts are added to the account group.
Viewing an account's account groups
-
Select Settings and click the Account Groups tab.
-
On the Access Control tab, click the Actions icon to the left of the account and select View Account Group Membership.
The Account Group Membership dialog opens, displaying the account groups to which the account belongs.
-
Click Cancel.
Editing an account group
-
Select Settings and click the Account Groups tab.
-
Select the three-dot menu icon to the right of Account Groups dropdown box.
-
Select Edit Account Group and edit your selected value.
-
Click OK.
Viewing an account's members
-
Select Settings and click the Account Groups tab.
-
On the Access Control tab click the Actions icon to the left of the account and select View Account's Assigned Users.
The Account Users dialog opens, displaying the members' user name, account group and role(s).
-
Click Cancel.
Assigning user roles in account groups
You can also give users access to an account group and assign them roles.
-
Multiple users can be assigned to an account group and each user can have a different role within the group.
-
A user can have multiple roles within an account group.
-
A user can be a member of multiple account groups and can be assigned a different role in each account group.
Users must log in to the Boomi Enterprise Platform before they can be added to an account group.
Adding a user to an account group
-
Select Settings and click the Account Groups tab.
-
In the Account Groups list, select the account group to which you want to add accounts.
-
On the Access Control tab, in the Users in Group list click the green '+' icon.
The Add/Maintain User Roles dialog opens.
-
Type the user's email address, first name, last name, select one or more roles, and then click OK.
Viewing a users account groups
-
Select Settings and click the Account Groups tab.
-
In the Account Groups list, select the account group to which the user belongs.
-
On the Access Control tab, in the Users in Group list select the user.
-
Click the View All Account Groups icon.
The User's Account Groups dialog opens, displaying the account groups to which the user belongs.
-
Click Cancel.
