Enabling file uploads
By default, Agentstudio agents accept text-only input. When you enable file upload support on an agent, users can attach documents and images and send them directly to the agent as part of a conversation or automated workflow. This unlocks file-centric use cases that would otherwise require external preprocessing steps.
File upload support is available on both the North American and European Boomi Platform.
When to use file uploads
Use file uploads when your agent needs to act on the actual content of a document or image, not just a text description of it. Common scenarios include:
- Invoice reconciliation — Send an invoice PDF or image to an agent that extracts line items and compares them against purchase order data.
- Contract review — Attach a DOCX or PDF contract to an agent that identifies key terms, dates, and obligations.
- Data extraction — Upload a spreadsheet or scanned form so an agent can parse structured data and route it downstream.
Prerequisites
- Agent Garden Developer privileges. Refer to Access and privileges to learn more.
- An existing agent in Agent Designer. Refer to Building an agent for setup steps.
- Files must be no more than 2MB each. You can upload five files at a time. Refer to Important considerations for a list supported formats.
File persistence and data residency
File content is never cached or stored in the agent's conversation history. Data from uploaded files remains in the runtime region where you deployed the agent. For example, file data extracted from agents running in Japan remains in Japan.
How files carry across turns depends on how you send them:
- Conversation UI — Files uploaded in the Chat UI are automatically included in follow-up messages within the same active conversation session. If you navigate away from the conversation and return, you must upload the files again.
- Agent Garden API — Files are not carried forward between API calls. For multi-turn conversations, you must include the relevant files in each request where the agent needs them. Use the
session_idreturned from the first call to continue an existing conversation. - Agent step — The same API contract and file limits that apply to the Execute API apply to Agent step. Files are not retained between process runs.
Enabling file upload support
You can control whether your custom agent supports file upload through an agent-level setting. File upload support is off by default. Both conversational and structured agents support file uploads.
Enable it in Agent Designer for each agent where you want to accept file input.
- Navigate to Agentstudio > Agent Garden > Agents.
- Open an existing agent or select Create New Agent.
- In Profile > File Upload, turn on the Allow files to be uploaded toggle.
- Select the file formats the agent can support.
- Continue configuring your agent. Refer to Building an agent for assistance.
- Click Save and Continue.
Important considerations
- You can attach up to five files per request. Individual files cannot exceed 2 MB each. Total files cannot exceed 10MB per request.
- You cannot attach duplicate file names.
- There is no file preview available when attaching agents.
- After you send a message, file metadata, including file name and type, displays in the agent trace. It is not available in Agent Control Tower session logs.
- File upload supports the following file types: PDF, DOCX, XLSX, CSV, TXT, PNG, JPG/JPEG.
- Both conversational and structured agents support file uploads.
- EmbedKit does not currently support file upload for conversational agents embedded into custom applications.
- Structured agent schema requirement: For structured agents receiving files via Agent step, the agent's input schema must include a
filesfield. Without it, the agent will not receive the file content.
Sending files in the conversation UI
If you have enabled file uploads, users can attach files directly in the Agent Garden conversational UI.
To send a file to an agent in the conversational UI:
- Open the agent in Agent Garden.
- Do one of the following:
- Drag and drop one or more files into the message area.
- Select the attachment icon and choose files from your device.
- Confirm that the file appears in the chat.
- Optionally, type a message to accompany the files.
- Select Send.
The agent processes the attached files along with any text you include in the message. Agents also support file-only requests with no accompanying text.
Files attached in a conversation are automatically included in follow-up messages within the same active session. If you navigate away from the conversation and return, you must upload the files again.
Structured agents and sending files through an agentic workflow
You can route files to a structured Agent Garden agent directly from a Boomi Integration process using the Agent step. This is useful when a file originates from an upstream system. For example, fetching an invoice from a file server and routing it to an agent for extraction and processing.
To process a file successfully, the structured agent's input schema must include a field named files that conforms to the file upload field structure. If the schema does not include this field, the agent will not receive the file content. Refer to Structured Agent documentation for the required JSON draft 04 schema definition.
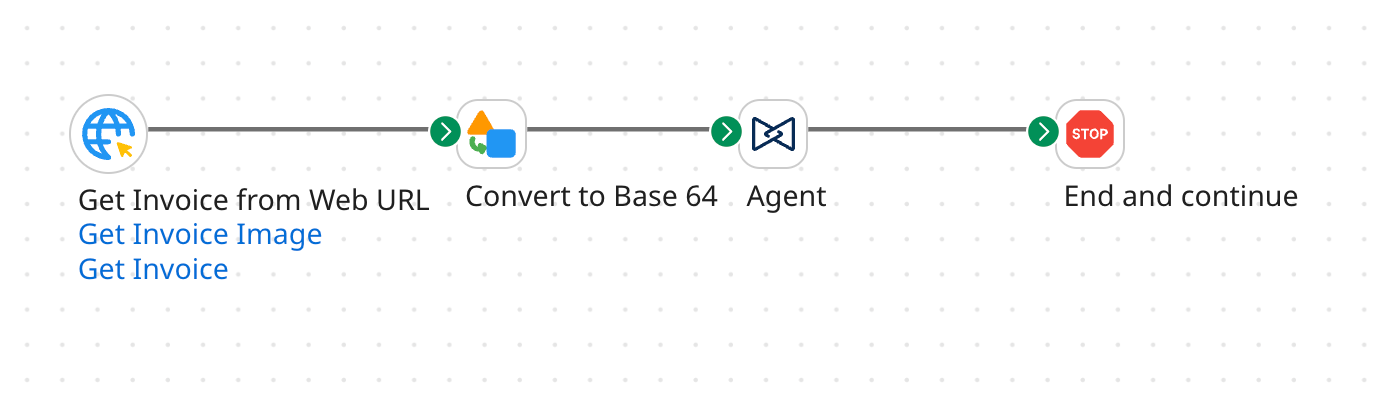
The following image shows an example of an agentic workflow using the file upload functionality. The file is sent to the agent, a Data Process step converts it to base64, the agent processes it, and then the agent sends it to a downstream accounting system.
Input schema example: Image
JSON input schema example for image file uploads
{
"$schema": "http://json-schema.org/draft-04/schema#",
"type": "object",
"required": [
"files"
],
"properties": {
"files": {
  "type": "array",
  "maxItems": 5,
  "items": {
    "type": "object",
    "properties": {
      "image": {
        "type": "object",
        "required": [
          "format",
          "source"
        ],
        "properties": {
          "name": {
            "type": "string"
          },
          "format": {
            "type": "string",
            "enum": [
              "jpeg",
              "png"
            ]
          },
          "source": {
            "type": "object",
            "required": [
              "bytes"
            ],
            "properties": {
              "bytes": {
                "type": "string",
                "description": "Base64-encoded image content"
              }
            }
          }
        }
      }
    }
  }
}
}
}
Input schema example: PDF
JSON input schema example for PDF file uploads
{
"$schema": "http://json-schema.org/draft-04/schema#",
"type": "object",
"required": [
"files"
],
"properties": {
"files": {
  "type": "array",
  "maxItems": 5,
  "items": {
    "type": "object",
    "properties": {
      "document": {
        "type": "object",
        "required": [
          "format",
          "source"
        ],
        "properties": {
          "name": {
            "type": "string"
          },
          "format": {
            "type": "string",
            "enum": [
              "pdf"
            ]
          },
          "source": {
            "type": "object",
            "required": [
              "bytes"
            ],
            "properties": {
              "bytes": {
                "type": "string",
                "description": "Base64-encoded PDF content"
              }
            }
          }
        }
      }
    }
  }
}
}
}
To send a file to an agent through an agentic workflow:
- Open your process in Boomi Integration.
- Add a step that retrieves the file. For example, a Disk, FTP, or Mail connector step or an HTTP step that retrieves it through an API.
- Add a Data Process step to base64 encode it.
- Connect the output of that shape to an Agent step in your process.
- In the Agent step configuration, select the deployed structured agent that has file uploads enabled.
- Confirm that the agent's input schema includes the
filesfield. - Deploy and run your process.
The Agent step forwards the file to the agent using the same API contract and file limits as the Agent Garden Execute API. Errors returned by the agent are surfaced back to the Integration process for retry or branch handling.
Refer to Agent step for full Agent step configuration guidance.
Sending files through the API
You can send files to an agent programmatically using the Agent Garden Execute API. Files are passed as base64-encoded bytes in the source.bytes field, included in a files array in the request body alongside your message. To continue a multi-turn conversation, include the session_id returned from the previous response in subsequent requests, along with any files the agent needs for that turn.
For the full API request structure, payload examples, authentication requirements, and endpoint URLs, refer to Agent Garden API documentation.
EmbedKit does not currently support file upload for conversational agents embedded into custom applications.
Error handling
If any file in an upload fails a validation check or is corrupt, the entire upload is rejected. No files from the request are processed. The error message returned is:
Upload failed. One or more files are corrupted or did not pass validation. Please review your files and upload them again.
If you encounter this error, check that each file opens correctly before uploading. If the error persists, try a different copy of the file or convert it to another supported format.
Files in unsupported formats are rejected with a structured error before processing begins.
Frequently asked questions about uploading files
Does file content count toward the agent's token limit?
When a file is sent to an agent, its content is converted into tokens for LLM processing. Large files, particularly dense PDFs or image-heavy documents, can consume a significant portion of the agent's context window. Refer to Agentstudio token limits for information on input token caps and how to stay within limits.
Can an agent reference a file across multiple conversation turns?
It depends on how you send the file. In the conversation UI, files uploaded in an active session are automatically included in follow-up messages — you don't need to re-attach them for each turn. If you navigate away and return, you must upload the files again.
Agentic workflows with Agent step are single-turn. Therefore all files (up to five) must be passed within the single-turn for the agent to process.
When using the API, files are not carried forward between calls. Include the files in each request where the agent needs them, and use the session_id to continue the conversation.
Can an agent output or generate files in its response?
No. Document and image generation as agent outputs is not currently supported. Agents can read and extract from files but cannot return files in the response.
Next steps
- Refer to Testing and troubleshooting agents for guidance on using the agent trace to verify file uploads during testing.
- Refer to Agent step to learn how to incorporate agent file processing into an agentic workflow.
- Refer to Building an agent if you haven't completed your agent setup yet.
