Setting up the External OAuth connection
Snowflake External OAuth supports the Client Credentials grant type using third-party authorization servers. Some of the external authorization servers that Snowflake supports are:
- Okta
- Microsoft Entra ID (Azure AD)
- Ping Identity PingFederate
- External OAuth Custom Clients
- Microsoft Power BI
- Sigma
This document describes how to configure External OAuth for Snowflake using Microsoft Azure AD as the authorization server.
We will obtain the necessary Client ID and Client Secret as well as set up the Snowflake account and establish a session.
Prerequisites
-
Azure AD requirements:
-
Permission to create App Registrations
-
Ability to grant Admin Consent given by a Azure Global Administrator
-
-
Snowflake requirements:
ACCOUNTADMIN role access to create:
-
Security Integrations
-
Users
-
Roles
-
How to find an Azure administrator?
If you do not have permission to grant Admin Consent:
-
Log in to the Azure Portal and navigate to Microsoft Entra ID.
-
Select Roles and administrators from the left-hand menu.
-
Search for Global Administrator.
-
Open the role and review both Active and Eligible assignments.
- This list shows users who can approve Admin Consent (including via Privileged Identity Management).
- Contact one of these administrators for the required permission.
Architecture overview
The client application authenticates directly with Azure AD using its Client ID and Client Secret.
Azure AD issues an access token, which is then presented to Snowflake to establish a session.
Key components:
-
OAuth Client: External application or service
-
Authorization Server: Microsoft Entra ID (Azure AD)
-
Resource Server: Snowflake
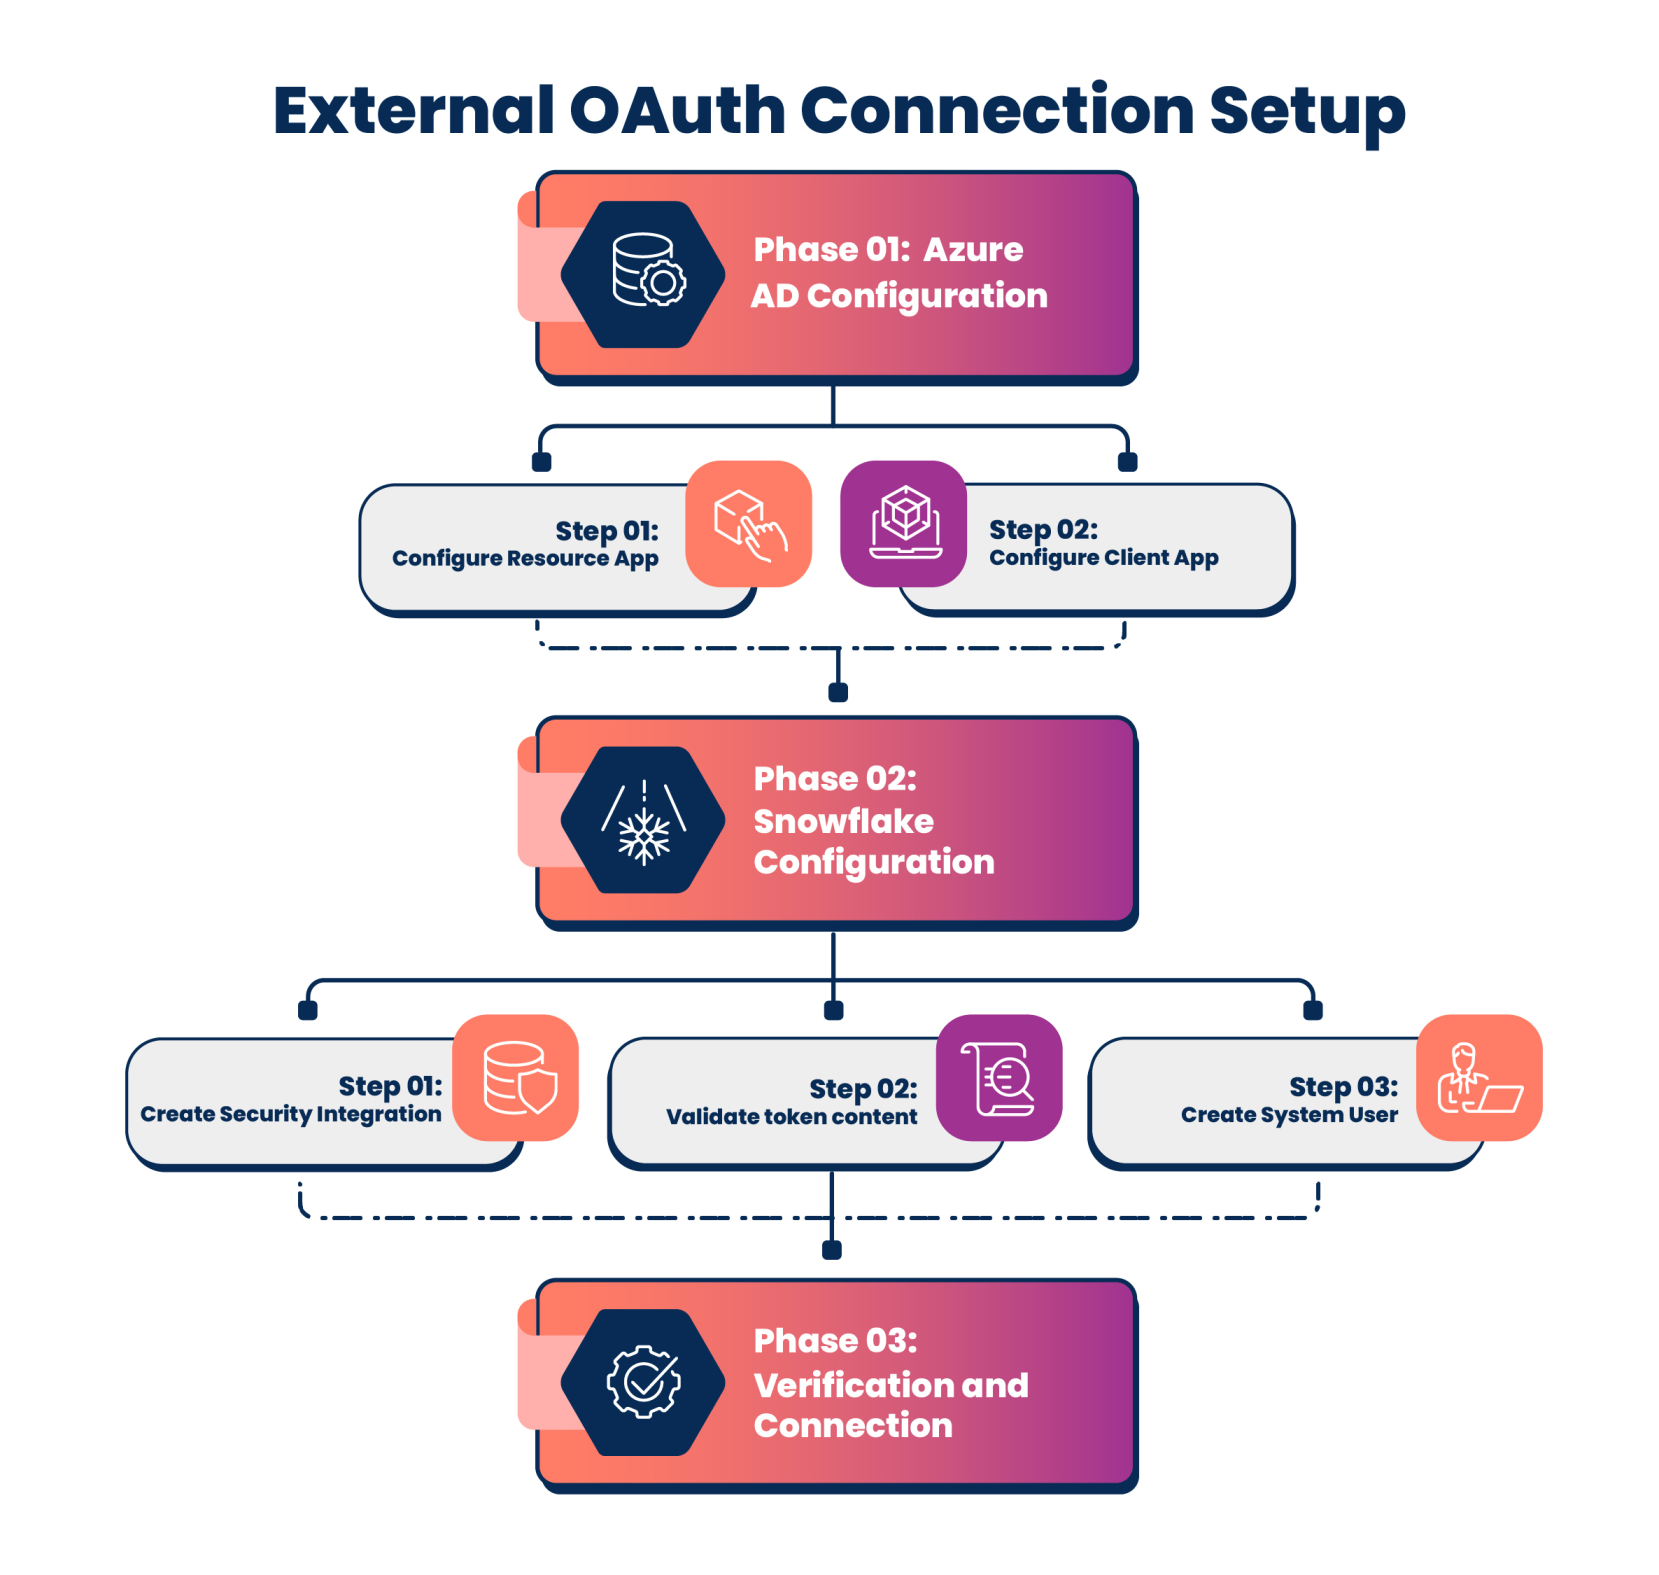
Phase 1: Azure AD configuration
Two Azure AD app registrations are required:
-
Resource App (Snowflake)
-
Client App (Application)
Step 1: Configure the Resource App (Snowflake)
-
Log in to the Azure Portal and navigate to App registrations.
-
Click + New registration and enter the following details:
-
Name: Snowflake OAuth Resource
-
Supported account types: "Accounts in this organizational directory only (Single tenant)".
-
Redirect URI: No action required.
-
-
Click Register.
Set Application ID URI
-
From the left-hand menu, navigate to Manage and select Expose an API.
-
Select Add under Application ID URI.
-
Accept the default (for example,
api://<client-id>) or define a custom URI. -
Save this value as
<RESOURCE_APP_ID_URI>on your local device. -
Click Save.
Create an App Role
This App Role maps directly to a Snowflake role. Granting this App Role to the Client App ensures that Azure AD embeds the role claim into the access token, allowing Snowflake to verify authorization and assign the correct privileges.
-
From the left-hand menu, navigate to Manage and select App roles.
-
Select + Create app role.
-
Fill in the following details:
-
Display name: ENGG_AI_ACT_ROLE
-
Allowed member types: Applications
-
Value:
session:role:ENGG_AI_ACT_ROLE
noteThe value should be in the format
session:role:<ROLE_NAME>. The app role is a case-sensitive value. In this instance we are using a custom roleENGG_AI_ACT_ROLEas an example. You can use Snowflake roles with privileges to the Snowflake database and schemas.- Description: Allow access to ENGG_AI_ACT_ROLE
-
-
Select the “Do you want to enable this app role?” checkbox.
-
Click Apply.
Collect endpoints
-
Navigate to Overview > Endpoints.
-
Copy the OAuth 2.0 token endpoint (v2) URL onto your local device.
-
Copy the OpenID Connect metadata document URL to a new browser tab. This displays a JSON document.
- Search for the key named jwks_uri.
- Copy the URL value associated with it (for example,
https://login.microsoftonline.com/{tenant-id}/discovery/v2.0/keys). - Save this value as jwks_url .
Step 2: Configure the Client App (Application)
-
Create a new App Registration and fill in the following details:
-
Name: Snowflake OAuth Client
-
Supported account types: Single tenant
-
Redirect URI: No action required.
-
-
Generate a Client Secret
-
Navigate to Certificates & secrets.
-
Select + New client secret.
-
Add a description (for example, Snowflake Client Secret) and expiry (for example, Recommended: 180 days (6 months)).
-
Copy the Client Secret Value as
<CLIENT_SECRET>onto your local device immediately. This is a one-time view value, and you cannot see it later.
-
-
Grant API Permissions
-
Go to API permissions.
-
Select + Add a permission.
-
Navigate to My APIs > Select Snowflake OAuth Resource (created in Step 1).
-
Choose Application permissions.
-
Select
ENGG_AI_ACT_ROLEthat you created earlier. -
Click Add permissions.
-
-
Grant Admin Consent
-
Click Grant admin consent for
<organisation>.noteIf the Grant admin consent is greyed out and not accessible to you, contact your Azure Global Administrator. Refer to How to find an Azure Administrator?.
-
Select Yes.
-
-
Gather IDs
-
Go to Overview.
-
Copy Application (client) ID.
-
Copy Directory (tenant) ID.
-
Phase 2: Snowflake configuration
You need ACCOUNTADMIN access to complete the following tasks. If you do not have the required access, contact your Snowflake Admin to perform the following task.
Before running the commands below, gather and define the following variables from Phase 1.
Variable definitions table
| Variable | Description | Where to find it in Azure |
|---|---|---|
<TENANT_ID> | Your Azure AD Directory ID | App Registrations > Snowflake OAuth Resource >Overview > Directory (tenant) ID. |
<JWKS_URI> | JSON Web Key Set URL | Endpoints > OpenID Connect metadata document. Refer to Collect Endpoints for more information. |
<RESOURCE_APP_ID_URI> | The Identifier for the Snowflake Resource App | Snowflake OAuth Resource > Expose an API > Application ID URI. |
<CLIENT_APP_ID> | The Client ID for the ETL/Bot App | Snowflake OAuth Client > Overview > Application (client) ID. |
<CLIENT_SECRET> | The Secret Key for the Client App | Snowflake OAuth Client > Certificates & secrets. |
Step 1: Create Security Integration
-
Log in to your Snowflake account.
-
From the left-hand menu, navigate to Manage > Admin> Integrations.
-
Select + Create > API > Azure.
-
Replace the placeholders with variables from Phase 1. Refer to the Variable definition table.
CREATE OR REPLACE SECURITY INTEGRATION EXTERNAL_OAUTH_AZURE_CC
  TYPE = EXTERNAL_OAUTH
  ENABLED = TRUE
  EXTERNAL_OAUTH_TYPE = AZURE
  EXTERNAL_OAUTH_ISSUER = 'https://sts.windows.net/<TENANT_ID>/'
  EXTERNAL_OAUTH_JWS_KEYS_URL = '<JWKS_URI>'
  EXTERNAL_OAUTH_AUDIENCE_LIST = ('<RESOURCE_APP_ID_URI>')
  EXTERNAL_OAUTH_TOKEN_USER_MAPPING_CLAIM = 'sub'
  EXTERNAL_OAUTH_SNOWFLAKE_USER_MAPPING_ATTRIBUTE = 'login_name';
Key configuration notes to remember
EXTERNAL_OAUTH_ISSUER: Must match the iss claim in the token (for example: https://sts.windows.net/...).EXTERNAL_OAUTH_AUDIENCE_LIST: The Application ID URI from Step 1.EXTERNAL_OAUTH_TOKEN_USER_MAPPING_CLAIM: Set to 'sub'. In Client Credentials flow, the sub claim identifies the Client App (Service Principal), not a human user.
Step 2: Validate token content
Before creating the user, generate a test token to find the correct User ID (Subject) to map.
Run the following cURL command:
curl -X POST -H "Content-Type: application/x-www-form-urlencoded" \
--data-urlencode "client_id=<CLIENT_APP_ID>" \
--data-urlencode "client_secret=<CLIENT_SECRET>" \
--data-urlencode "grant_type=client_credentials" \
--data-urlencode "scope=<RESOURCE_APP_ID_URI>/.default" \
'https://login.microsoftonline.com/<TENANT_ID>/oauth2/v2.0/token'
Extract and decode
-
Copy the
access_tokenfrom the response. -
Decode it using a tool like jwt.ms.
-
Verify these three fields match your configuration:
- iss (Issuer): Must match the
EXTERNAL_OAUTH_ISSUERused in Step 1 (for example,https://sts.windows.net/<Tenant_ID>). - aud (Audience): Must match the
<RESOURCE_APP_ID_URI>used in Step 1. - roles: Must contain the role value you configured (for example,session:role:ENGG_AI_ACT_ROLE). If this is missing, the Client App permissions (Phase 1 Step 2) were not configured correctly.
- iss (Issuer): Must match the
-
Identify the User ID:
- Look for the sub (Subject) field. This is the Object ID of the Client Service Principal.
- Note this value. You will use it as the
LOGIN_NAMEin the next step.
Step 3: Create a system user
Create a Snowflake user that corresponds to the Azure Client App. Use the role you created in Microsoft Azure AD while configuring a resource app.
-- Create the role mapping to the scope
CREATE ROLE IF NOT EXISTS ENGG_AI_ACT_ROLE; -- Please grant privilages
-- Create the user
CREATE OR REPLACE USER <OAUTH_CLIENT_USER>
  LOGIN_NAME = '<SUB_VALUE_FROM_DECODED_TOKEN>'
  DISPLAY_NAME = '<OAUTH_CLIENT_USER> (Azure OAuth)'
  DEFAULT_ROLE = ENGG_AI_ACT_ROLE;
-- Grant privileges
GRANT ROLE ENGG_AI_ACT_ROLE TO USER <OAUTH_CLIENT_USER>;
Phase 3: Verification and connection
Use the SYSTEM$VERIFY_EXTERNAL_OAUTH_TOKEN function to ensure Snowflake accepts the token before attempting a full connection.
SELECT
SYSTEM$VERIFY_EXTERNAL_OAUTH_TOKEN('<PASTE_ACCESS_TOKEN_HERE>');
- Success: Returns Validation Result: Passed and shows the mapped user claim.
- Failure: Returns an error message indicating why (for example, Issuer mismatch, Audience mismatch).
Next steps: Adding a Snowflake provider account
