Modifying the properties of a field
You can modify the properties of a field in a model in response to changes in requirements.
Procedure
-
In the Fields tab, click the field name.
The Modify Field Properties dialog appears and takes focus.
-
To change the field’s name, type the new name in the Name field.
-
To change the field’s type, which is permitted only if the field is not in a published version of the model, select the new type in the Type list.
-
(Enumeration fields only) To add a value to the Allowable Values list, type the value in the field above the list and click
 Add allowable value.
 -
(Enumeration fields only) To delete a value in the Allowable Values list, click
 Delete this value adjacent to the value in the list.
 -
To require the field to have a value in records, select Required — Yes. Otherwise, select Required — No.
-
(Text fields only, not applicable to Long Text fields) To set or change validation options for the field, click Validation Options and do any or all of the following. Incoming entities having one or more fields that fail validation will be quarantined.
-
To require validation of a minimum number of characters, in the Minimum Text Length field, type that number (or, if applicable, edit the previously specified minimum).
-
To require validation of a maximum number of characters, in the Maximum Text Length field, type that number (or, if applicable, edit the previously specified maximum). Setting the Maximum Text Length to a value lower than the previously published value will generate a dialog in which you can opt to truncate existing field data to the new saved value. If left blank or deleted, the field Maximum Text Length defaults to 100 characters.
-
To require validation using pattern matching, in the Regular Expression field, type the regular expression specifying the pattern against which to match (or, if applicable, edit the previously specified regular expression). Refer to regular expression syntax for help on how to build regular expressions.
-
-
(Reference fields only) To change the model to which the field refers, which is permitted only if the field is not in a published version of the model, select the new model in the Refers To Model list.
-
(Reference fields only) To ensure the enforcement of referential integrity with respect to the field for entity contributions, select Reference Integrity — Enforce Inbound. Otherwise, turn it off.
-
(Reference fields only) To ensure the enforcement of referential integrity with respect to the field for channel update requests, select Reference Integrity — Enforce Outbound. Otherwise, turn it off.
-
Optional: If the field will contain sensitive data, apply data masking to field values. Read Setting up user accounts and access to learn more. Select an option from the Mask drop-down:
- All - hides entire data. Not available for Reference data types.
- Partial Mask - hides a portion of the data. Not available for Boolean and Reference data types.
- Partial Show - reveals a portion of the data. Not available for Boolean and Reference data types.
- None - reveals entire data.
-
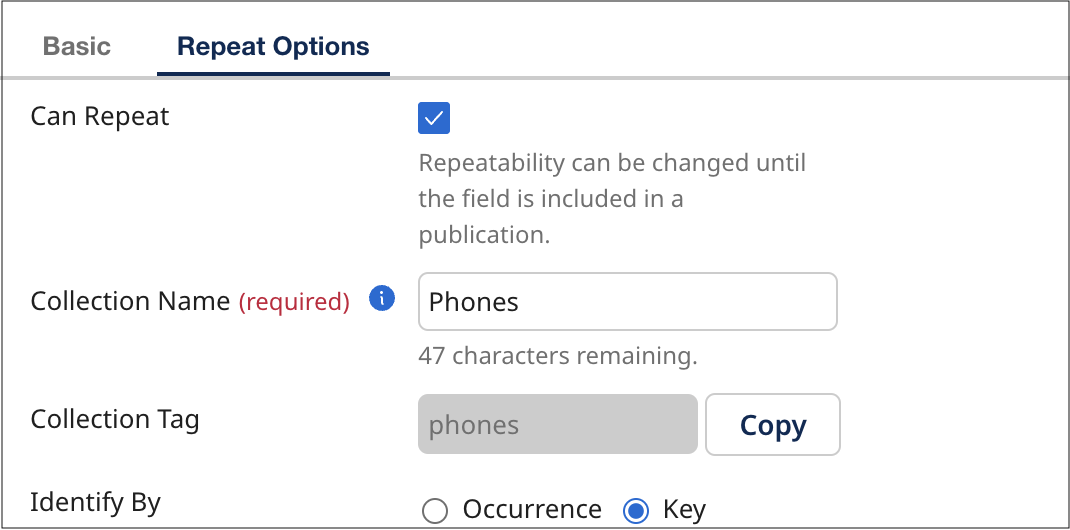
To change the field’s repeat options, select the Repeat Options tab and do the following. Otherwise, skip to step 12.
-
To make the field repeatable, select Can Repeat. Otherwise, turn it off and skip to step 12.
-
To set or change the collection name, in the Collection Name field, type the new collection name.
-
To set or change the method by which collection items in incoming entities are matched with collection items in golden records, select the desired Identify By option:
-
To enable matching based on order of occurrence, select Occurrence.
-
To enable matching by key field values, select Key.
-
-
-
Click Save.
The dialog closes, and the list entry for the field updates to reflect the changes.
