Working with steps
You can manage the steps within a process, including adding, connecting, removing, copying, and selecting steps. You can also add notes and manage the display of steps in the steps palette. The following sections provide more details on working with steps on the process canvas.
Adding steps to a process
Processes contain a series of steps that determine how data is run within the system. To add steps to a process, drag them from the steps palette onto the process canvas.
Processes can contain a maximum of 250 steps and notes. If you add a step that exceeds the limit, you will receive a warning and will not be able to paste it into the process.
You can add steps to your process from the steps palette or the inline builder.
From the steps palette:
-
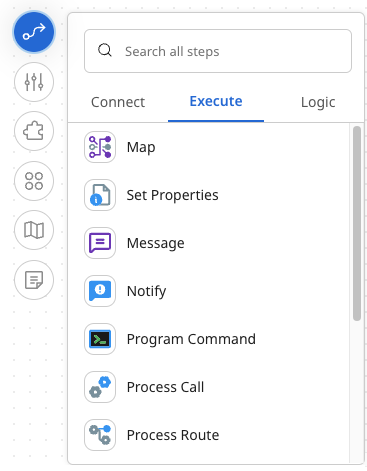
From the palette to the left of the process canvas, chose from the three step types Execute, Logic, or Connect to see the available steps.
-
Choose a step and drag it on to the canvas.
The configuration dialog automatically displays and your step is visible on the canvas.
-
Connect the steps by clicking the arrow on one step and dragging it to the other.
From the inline builder:
-
Click on the plus sign next to an existing step. This shows you a list of available steps and connectors you can choose from, along with recommendations based on previously used steps. When you use this method, steps connect automatically.
You can configure the step by clicking "Configure" below the step on the canvas.
-
Optional: Type a name for the step or step in the Display Name field.
The name appears below the step icon on the process canvas.
-
Configure the step as needed.
-
After you complete the dialog, click OK.
The step appears on the canvas. If any required configurations are missing, the step shows a warning icon and a link to the configuration dialog.
-
Use the steps palette or inline builder to add more steps.
-
To reconfigure a step or to select a different component, do one of the following:
-
Click the step’s icon.
-
Hover over the step and click Configure
-
Click the Configure link below the icon.
The configuration dialog opens.
-
-
Click Save to save the new step to the process canvas.
Getting data into a process
On the left side of the canvas is the Start step. The Start step contains the inbound connector or other processing options that bring data into the process. A process can retrieve data from an application or a data source such as Disk, Mail, HTTP, FTP, SFTP, Trading Partner or Database. A process can also be configured to listen for processing requests in real-time.
-
Open a process.
Every process contains a Start step automatically.
-
Click the Start step to configure the type of connector or other option that gets data for this process.
-
Refer to Connectors for more specific information about a particular type of connector.
-
Refer to Start step for information about other options for getting data.
-
-
Click Save.
Connecting steps in a process
You can connect two steps by clicking the arrow icon from one step and dragging it onto another. The arrow turns green when the two steps are connected. If you add a step by clicking the plus icon attached to an existing step, the new step is automatically connected.
Disconnecting steps in a process
To disconnect steps, simply click the green arrow icon. It turns grey, indicating that the steps are no longer connected, and you can rearrange or add steps as needed.
Copying and pasting process steps
The capability to copy and paste steps helps you streamline process building. You can either copy and paste just one step at a time or multiple steps.
-
To copy one step, hover over the step and click Copy. To copy multiple steps, click and drag a rectangle around the steps that you want to copy.
A button bar appears above the rectangle that displays the number of selected steps.
-
Click the Copy button.
A message indicates that the step or steps have been copied.
noteIf the copied steps include a Start step, the Start step is not included when you paste the steps onto the canvas. There can be only one Start step per process.
-
Click the process canvas where you want to paste the step or steps and click Paste. You can paste steps into the same process or a different process.
-
Click Save or Save & Close in each process that you changed.
Moving a step in a process
You can move a step by clicking the step and dragging it on the canvas. As you drag the step, any lines connecting it to other steps move with it.
Arranging a process automatically
You can tidy the process canvas by using the Arrange button to automatically align steps, branches, and routes in your process. When you use this feature, you are prompted to save the process before the arrangement. Boomi recommends that you save the process so that you can easily revert if necessary.
When steps are automatically arranged, any unconnected steps are moved to the lower left of the process canvas.
Removing a step from a process
If you no longer need a step in a process, you can remove it from the canvas. If you remove a step from a process and the step references a saved component such as a map, connector, or profile, the component will not be deleted from your account.
To remove a step, hover over it and click Remove from the button bar that appears and then click OK.
Selecting multiple steps
You can simultaneously select multiple steps for moving or removal by dragging a rectangle around them.
-
Click and drag a rectangle around the steps that you want to select.
A transparent rectangle appears on the canvas with a button bar that displays the number of selected steps and the option to Copy or Remove them.
-
Optional: To move the selected steps, click one of the steps within the selection rectangle and drag it to the new location.
All selected steps move to the new location.
-
Optional: To remove the selected steps, click Remove, then click OK.
The steps are removed; you cannot undo this action.
Adding notes to a process
You can add notes, each containing up to 300 characters, to a process for documentation purposes. There are two types of notes you can add: canvas notes and step notes.
-
To add a canvas note, click the Notes icon on the canvas. You can drag the note anywhere on the canvas. When the note is closed, it appears as a small yellow sticky note. Hover over it to see the body of the note, edit it, or delete it.
infoYou can edit or delete a canvas note only if you are its author or an administrator.
-
To add a step note, open the configuration dialog for a step and click the Notes tab. You can add a title and body text. After saving the step, a note icon displays on the upper-right corner of the step icon. Hovering over the note icon displays the note with the options to delete or edit it.
noteThe Notes tab is available in all steps except for the Business Rules step.
Sharing a process
You can share Integration assets directly from the Integration process canvas. When you click the Share icon, the system uses the Packaged Component of the Integration process to create a Bundle and delivers it either directly to one or more target accounts or through a public URL. You can also view a list of recently shared Integration processes to review assets shared earlier and access them whenever required.
For more information, refer Sharing a process.
Displaying or hiding the steps palette
When you're on the process canvas, you can display or hide the steps palette. The steps palette allows you to find any step and drag it onto the canvas. You can search all steps or choose a category, Connect, Execute, or Logic, and scroll to find the step you want.
-
To display the steps, click the Steps icon
-
To hide the steps, click the Steps icon again
Using the navigation palette
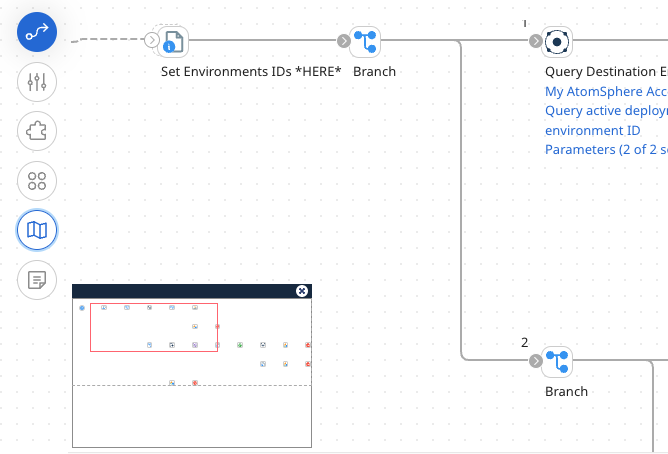
The navigation palette is a scaled-down view of a process that is optionally available when a process is too large to view in its entirety.
You can view a navigation palette on the canvas by clicking the Navigation icon represented by a partially folded paper map. By default, the navigation palette opens in the lower left corner of the canvas.
The navigation palette allows you to:
-
See the entire process
-
See where you are located in the process
-
Quickly and easily move to a specific point in the process
Your current location in the process is indicated by a red rectangle. The red rectangle contains everything that is currently visible on your canvas.
When you drag or click in the navigation palette, you change your location on the canvas. This allows you to move quickly to a point on the canvas without having to scroll up and down and left and right until you find the correct location. You can also dock the palette by dragging it to any of the four corners of the canvas. To close it, click the "x" in its upper right corner or click the Navigation icon again.
Because the process canvas and navigation palette are synchronized, if you make changes or navigate on the canvas, you see them on the palette.
The navigation palette is also available in Test mode, which allows you to navigate a process while Test mode is running.
