Cleanse step
The Cleanse step enables you to validate document field values and either repair or reject the document before further processing. It is often helpful to use a Cleanse step before a Map step, so that invalid values can be corrected before potentially causing errors while mapping.

The Cleanse step uses a profile to determine which restrictions to validate. The restrictions are defined in the profile at the field (or element) level. Restrictions defined on repeating or "detail-level" elements are automatically performed for each instance. The available restrictions differ slightly between different types of profiles but include:
- Mandatory value
- Minimum and maximum length
- Date and numeric data type and formatting
For each element, you can configure how to handle each restriction violation: reject the document or repair the value. The repair options vary based on the type of restriction. It is important to understand that:
-
The entire document will be rejected immediately upon the first violation. Subsequent restrictions are not validated.
-
This also means that if your integration scenario involves a single batch file but requires individual records to be evaluated independently, you will need to use a Data Process step to split the data into individual documents before the Cleanse step.
Documents are cleansed and then passed down one of two paths, "Clean" or "Rejected", to be processed accordingly. If a document is rejected, the message is made available as a document property (Document Property > Meta Information > Base > Cleanse Result Message). This value can be referenced in a Notify or Exception step to create an alert, for example. At execution time, the Rejected path is executed first, followed by the Clean path.
Rejected documents are processed before "clean" documents. This allows you to halt the entire process (using a Stop or Exception step) if a single document is rejected, if required by your integration scenario.
The Cleanse step trims leading and trailing spaces from XML document data elements.
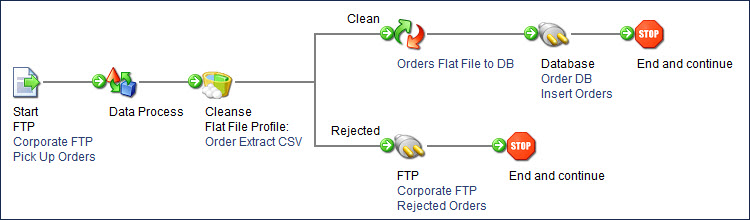
Cleanse step example
This example illustrates a batch CSV file of new orders picked up from your company's FTP server. The batch file contains many orders.
A number of restrictions are defined in the flat file profile "Order Extract CSV", including mandatory values, maximum lengths, and numeric and date formats. Properly formatted and populated orders should be inserted into the ordering database for fulfillment, but rejected orders should be sent back to the FTP site to be corrected.
Your process might look like this:
Adding a Cleanse step to a process
Add a Cleanse step to a process to validate document field values and either repair or reject the document before further processing.
Procedure
-
Drag a Cleanse step onto the process canvas. The Cleanse step dialog opens.
-
On the General tab, in the Display Name field, enter the name to describe the step. If you do not enter the name, “Cleanse” appears on the step. The selected profile type also appears on the label.
-
In the Profile Type field, select one of the following profile types:
- Database
- EDI
- Flat File
- XML
- JSON (Not currently supported)
-
In the Cleanse data using field, select the Profile to edit or create a Profile component.
You should have already configured the profile with the necessary restrictions.
-
If you do not want to configure any repair options, skip to the last step.
-
Expand the profile tree on the left.
Elements preceded by a gray arrow icon do not have any restrictions defined in the profile.
Elements with restrictions in the profile are preceded by a red stop icon and are set to "No repair - Reject document" by default.
-
Click an element to display its cleansing details on the right.
-
Click the arrow next to a cleansing detail.
-
If you want to repair the value, select the appropriate repair option from the list and enter a default value or pad character, as appropriate. The following are repair options:
-
This element is mandatory
If empty:- No repair — reject document
- Set a default value
Default to value (available if Set a default value is selected) — Enter a default value in this field.
-
This element has a required minimum length
If too short:- No repair — reject document
- Prepend character to pad length
- Append character to pad length
Pad character (available if Prepend or Append character to pad length is selected) — Enter a character in this field.
-
This element has a maximum length restriction
If too long:- No repair — reject document
- Trim leading characters
- Trim trailing characters
-
This element, if filled, must contain (date, numeric) data
In profiles created as of the October 2013 release or later, the Cleanse step catches numeric fields containing any non-numeric data. In profiles created prior to the October 2013 release, the Cleanse step does not catch numeric fields consisting of a leading number followed by one or more characters.
If non-numeric / If not a date:
- No repair — reject document
- Set a default value
Default to value (available if Set a default value is selected) — Enter a default value in this field.
-
-
Repeat the previous step for each cleansing detail belonging to the selected element.
If you selected a repair option and default value or pad character for all of the element's cleansing details, the element and the details have a green check mark icon next to them.
If an element has multiple repair options but only some are set, the element has a yellow triangle icon next to it. The details have a green check mark or red stop icon next to them, as appropriate.
If an element has one or more repair options but none are set, the element and the details have a red stop icon next to them.
-
Repeat steps 7-9 for each element that you want to repair.
-
On the Notes tab,
- Enter the title of the note in the Title field.
- Enter the note in the Note field.
-
Click OK.
-
Connect the Clean and Rejected paths to the rest of the process.
