Agent step
The Agent step allows you to integrate AI agents from the Boomi Agent Control Tower that you create with the Agent Designer directly into your integration process workflows.
You can select Agents deployed to multiple regions, such as ANZ, GBR and Japan, directly within the Agent step. While you manage the actual deployments in the Agent Garden, your Agents deployed outside the default US region automatically sync to the Agent Control Tower, allowing you to easily find and select them for your Integration processes. For more information, refer to Agent Garden.
To help you identify integrations in your account that are ready to use with Agent step, refer to Installing recommended agents to learn more about agent templates available in Agentstudio.
-
You must have Agentstudio to configure the Agent step. Contact your Boomi representative to add this feature.
-
Your account must have a Boomi public cloud instance to use the Agent step.
-
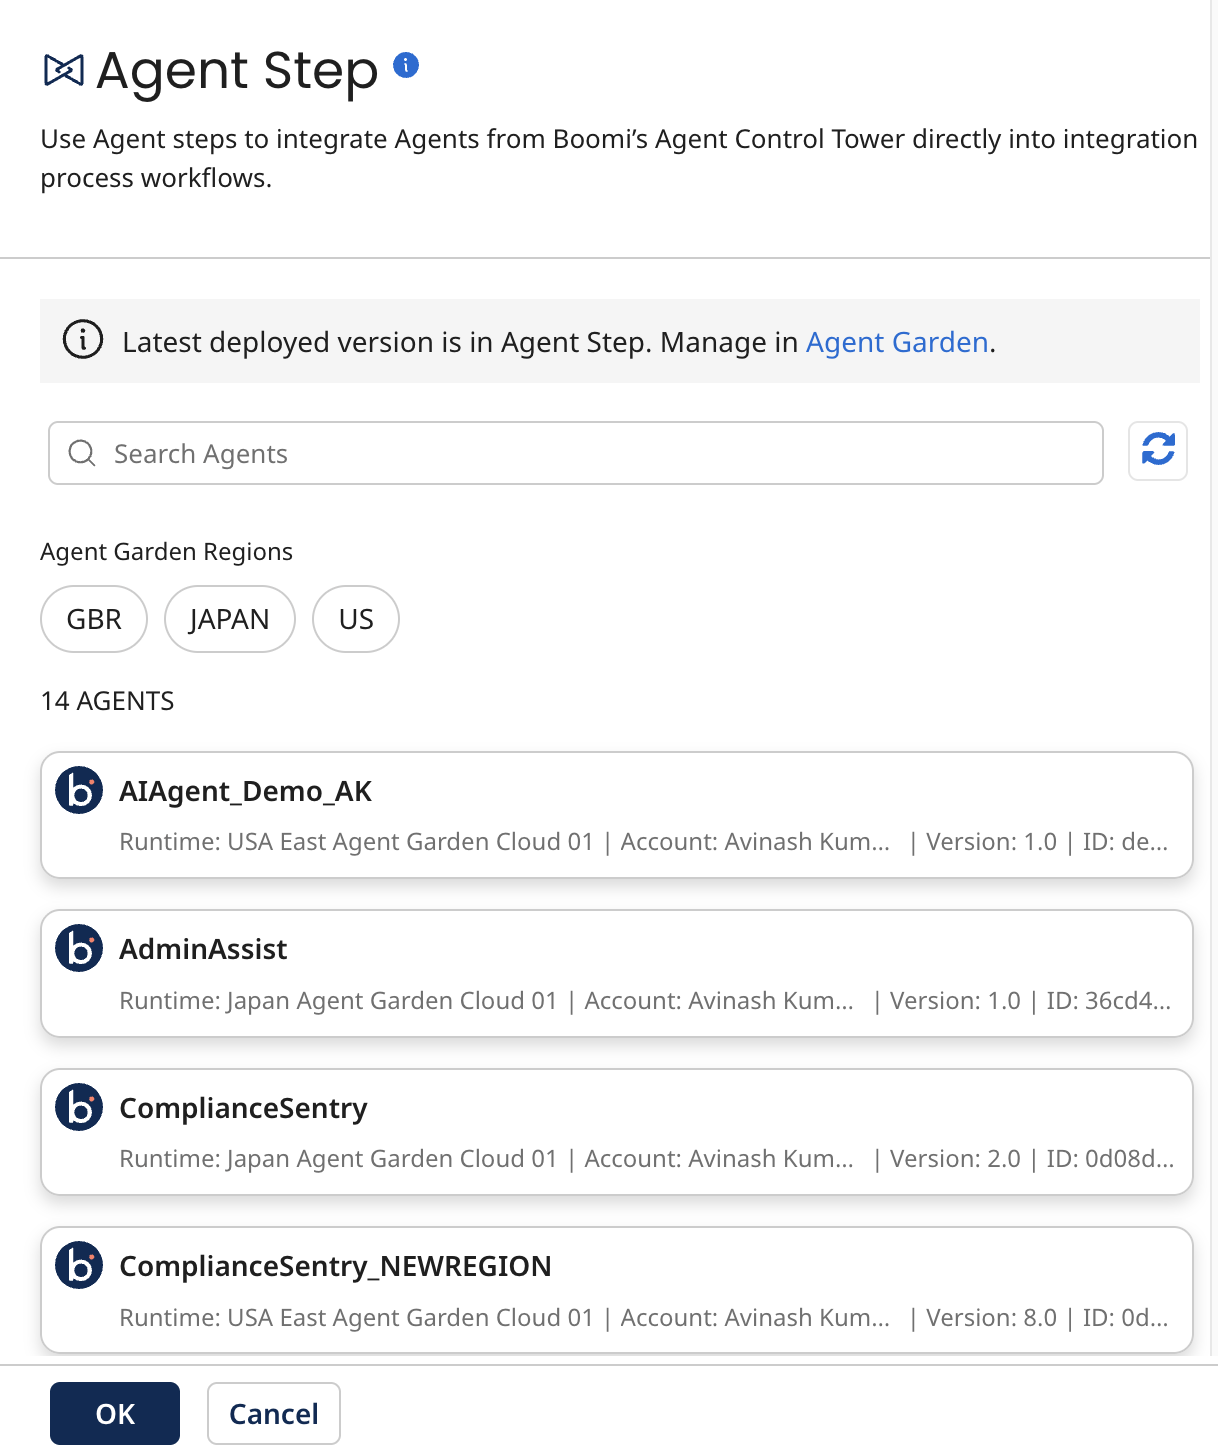
You can find the Agent step in the Execute section of the Steps Palette. After adding it to the canvas, you can choose from the available agents in your Control Tower to configure in the step.
The Agent step displays available agents with the following columns: Agent, Runtime, Version, and Account. Hover over any agent row to view a tooltip showing the agent's name, version, runtime, account name, and ID. Use this information to identify and select the correct agent when the same agent is deployed across multiple regions or versions.
Select the region to filter and display only agents associated with that specific region. This is useful when your account has agents across multiple regions. You can also search for a specific agent using the Search Agents search bar. To view the most recent list of agents from the Control Tower, click the Refresh button.
-
Only the latest active deployed version of an Agent to the Runtime is displayed for selection under Agent step.
-
For the existing agents which are active before May release, the default region and Runtime is considered as US and version 1.0.
Before the Agent step is in the workflow, you need a step that can generate a prompt for the agent, such as the Message step. You can store the Agent step output as a process property to easily use it elsewhere in the process.
Some possible uses for the Agent step in a process are:
- Customer support and service - Summarize support cases or call center interactions
- Data analysis and insights - Analyze Boomi Community articles and comments to output a sentiment score
- Legal and compliance assistance - Analyze prospective customer information and produce a contract draft
- Recruitment and HR management - Input position requirements from Workday and candidate resumes from GreenHouse, and produce a score that reflects the match for next-level screening
If you install and maintain local runtimes, you must add IP addresses for communicating with Agent Tower to your allowlist. For more information, refer to Hostnames and IP address for the Boomi Enterprise Platform.
Component Explorer
When you configure an Agent step within a process, agent-specific configurations are stored in an Agents sub folder within the process's folder in the Component Explorer.
When you create an Agent step for the first time, a root-level Agents folder is generated. This folder contains the connection details for the agent provider and cannot be edited for Boomi agents.
Each configured agent has its own subfolder within the process's Agents folder containing its specific configurations. Multiple configurations for the same agent within that process are in this subfolder.
If the same agent is used and configured in a process located in a different folder, a new Agents subfolder will be created within that process's folder to hold the new configuration.
Sync agent
Agents must be synced in Control Tower before use in an Agent step. Since syncing is not immediate, you can sync agents manually.
- Go to Agent Control Tower > Manage Providers > Boomi Agent Garden.
- Select the Account link, then select the Action icon > Sync Now. Syncing may take several minutes. A Success status indicates completion.
Agent configuration
Your account must have a Boomi public cloud instance to use the Agent step.
You can generate a configuration for your first setup of the agent directly in the Agent step or select a previous configuration.
You should not copy Agent connection components to another account because the connections are tied to the account in which they were created. The copied component will include the original account information in the component URL and the Agent step will not run.
Since you cannot edit this component, you can delete it and re-configure your step to let the system recreate it for you with the right information.
When building an agent, you can choose how an AI agent responds in the Profile screen. There are two agent response modes:
-
Conversational mode (default) - The AI agent responds in natural language text. This mode is ideal for conversational agents where the user may have follow up questions after the initial prompt. The agent can use chat history and context to respond to the user and achieve its goal.
-
Structured mode - The AI agent receives JSON input from Boomi Integration and responds in a consistent, structured JSON format. This model is ideal for workflows that use Agent step where the agent’s response is consumed by downstream systems. The response is single turn, meaning the agent has a single input and output with no reference to previous responses.
- Conversational agents
- Structured agents
- Click Generate Configuration.
- Enter a configuration name in the Configuration Name field, or accept the displayed default name.
- (Optional) Select Return Application Error Responses to prevent failed operations from appearing in Process Reporting. This option lets you handle them directly in your processes.
- Click Ok.
Message step
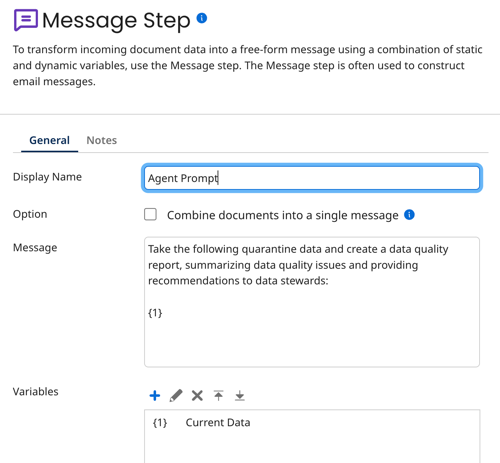
Add a Message step before an Agent step to prompt the agent to respond.
-
Add a Message step to the canvas before the Agent step.
-
In the Message step, enter the AI agent prompt. You can copy a Conversation Starter from the agent's profile.
-
(Optional) To pass data from a previous step:
- In Variables, add a variable.
- Set Type to Current Data.
-
Select OK, then save your progress.
Data Process step
You can use the Data Process step to clean up the response from the Agent step.
-
Add a Data Process step to the canvas after the Agent step.
-
Under Data Process Properties, click the plus icon to add a new property and use the following configuration:
-
Processing Step - Select "Search/Replace"
-
Text to Find -
[\s\S]*event: message\n.*\"content\":\s?\"(.*)\", \"timestamp\"[\s\S]*This searches the output of the Agent step for only the message.
-
Replace With -
$1 -
Search - Select "Entire document at once"
-
-
Click OK to save the step.
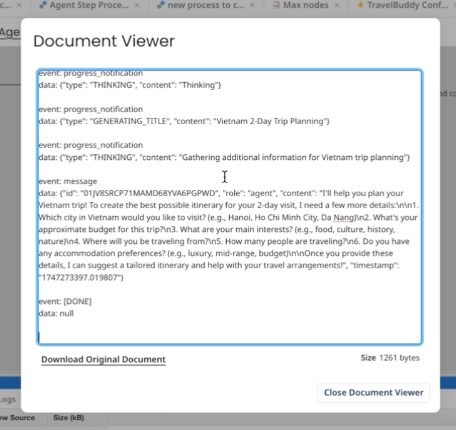
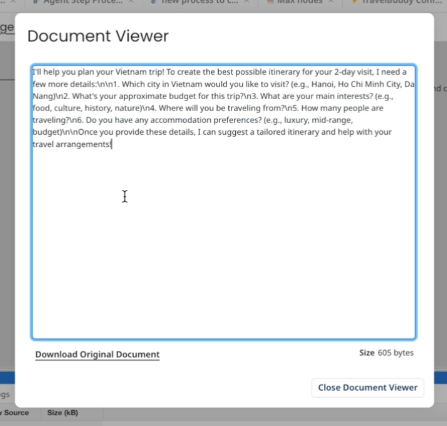
Adding the Data Process step searches the Agent step's output and returns only the message in an easy-to-read format.
- Click Generate Configuration to generate the JSON request and response profiles.
- Enter a configuration name in the Configuration Name field, or accept the displayed default name.
- Click Sync with Agentstudio to pull the latest schemas defined in the Agentstudio.
- (Optional) Select Return Application Error Responses to prevent failed operations from appearing in Process Reporting. This option lets you handle them directly in your processes.
- Click Ok.
For structured agents created before the November 8 platform release, you must modify and re-sync them in Agentstudio to generate profiles in the Agent step. For newly created structured agents, you can generate profiles directly without a re-sync.
Authentication
To invoke the agent in the Agent step, you must have a Boomi Platform API token. For more information about API tokens, refer to Adding new API Token on a user account.
Platform API Token updates apply only to the selected configuration and must be associated with your Boomi username.
- Click Click to Set and enter your API token.
- Click Apply.
After you save the configuration, you can find it in the Component Explorer and open it to configure a few other settings, such as error behavior, document archiving, tracking, and caching.
Video: Using Structured Agents in the Agent step
Use Structured agent mode when you want the agent’s response sent to downstream systems in a predictable, formatted structure. The response is single turn, meaning the agent has a single input and output with no reference to previous responses. Refer to Structured agent mode to learn how to set this mode for your agent and examples of inputs and outputs.
The following video provides a quick overview of using Structured Agents in the Agent step:
Configuration component
After generating the initial configuration in the Agent step, you can open the configuration component from the Agent's folder in the Component Explorer to view the following configuration settings:
-
Error Behavior - If checked, failed operations are not reported in Process Reporting, allowing you to act on them in your process.
-
Platform Username and Platform API Token - These are automatically populated based on the account used to create the Agent step. You do not need to configure these fields manually.
cautionModifying the Platform Username and Platform API Token fields could disrupt the connection between the Agent step and the agent.
-
Advanced Configuration (Timeouts) - You can set connection and read timeouts (in milliseconds) for the Agent step so that the process does not wait indefinitely.
Limitations
-
You can configure the Agent step only with agents created in the Agent Designer
-
The Agent step accepts a single input and produces a single output, so agents with complex API tools or chatbots are not compatible
-
Context window limitations: User prompt, agent goals, tasks, and instructions combined cannot exceed 200K input tokens.
-
The Agent Designer supports XML and JSON API responses.
-
Agentstudio truncates tool responses greater than 100k tokens.
-
Regenerate configurations in the Agent step after you change the agent type in Agentstudio to reflect the updated agent definition.
-
Be cautious when updating agents in a deployed process, as these changes can cause issues or process failures.
-
You cannot create Agent connections or operations through the Component API.
-
You can continue to deploy processes to any region regardless of the Agent's deployment location in Agent Garden, as no regional restrictions are currently enforced.
-
Existing Agent Step configurations remain unchanged to ensure stability. If you have a step configured with version v1 and deploy a newer v2 through the Agent Garden, the system does not automatically upgrade your configuration. The input and output schemas only update when you explicitly select Sync with Agent Studio, and even after syncing, the version selector remains on v1 until you manually choose to change it.
-
Since multiple packaged versions share the same
deployment_id, an Agent Step executes the latest deployed version (v2) even if the UI still displays v1; however, to avoid execution failures caused by schema mismatches or invalid configurations from deleted agents, you must manually sync to ensure the Agent Step reflects the current active schema.
Additional resources
- Agent Management
- Agent Designer
- Agent Garden
- Browse available agents in the Boomi Marketplace
