Creating a new user
Procedure
- Navigate to the Boomi Managed File Transfer File sharing site.
- Select Administration from the top-right drop-down menu.
- Click Users from left-hand side menu.
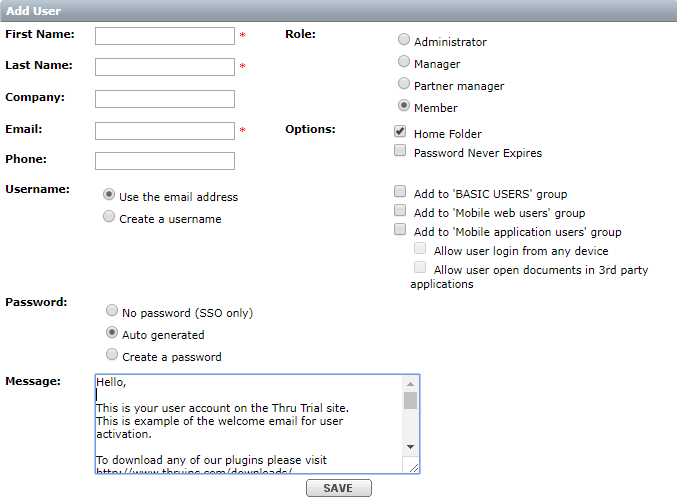
- Click Add User on the top left of the "User" page.
-
Enter the user’s basic contact information (First and last name, company, email, phone number).
-
There are two ways to assign the user’s login username.
- Select Use the email address to use the email you already entered as the username.
- Select create a username to create a unique name.
-
Enter a welcome message in the Message box that the new user can view when their account is activated.
-
Choose the "Role" of the new user.
- Administrators have all the privileges to the site and can maintain the site.
Including the ability to change the options on the site, as well as see the home folders of all the currently active and inactive users. - Managers have the option to manage the users but will not have permission to change the site options.
- Partner Managers have the ability to access the administration portal and manage users within the same domain.
- Members can only access their own individual home folder and cannot navigate to the administration options.
- Administrators have all the privileges to the site and can maintain the site.
To know more about the different user roles, refer to Role Definitions
- Select different Options you want to configure for the new user.
- Home Folder: When this is selected, the user is given their own home folder where they can store files and send them to recipients.
- Password Never Expires: When this is checked, the user’s password will never expire and the site’s password options (discussed in the Site Options section) will be overridden.
- Add to ‘BASIC USERS’ group : Group members have limited visibility in MFT portal UI
- Add to ‘Mobile web users’ group: Adding the user to the Mobile web users group enables them to access the MFT site via mobile web browsers.
- Add to ‘Mobile application users’ group: Adding the user to Mobile application users enables them to use MFT native mobile applications for iOS.
- Allow user login from any device: Lets the user log in to MFT native mobile applications from any device.
- Allow user to open documents in 3rd party applications: This is a security feature to control which users can open files in external applications.
Checking this feature allows the user to open files from the iOS or Android app in external applications for editing.
If left unchecked, the user can only view files within the MFT mobile apps as a ‘sandbox’.
Users who are not allowed to use external applications are added to the group Controlled Mobile Distribution.
note
If users are created in MFT automatically via Active Directory or SAML integrations, they have to be manually added to “MOBILE WEB USERS” and “MOBILE APP USERS” groups, by default users are not members of these groups on security grounds.
- Click Save to create the user.
- The new user receives an email about the account.
- If you selected Auto Generate Password, the new user will receive an email directing them to create their password so that they can access the site.
