Setting up web services for the Microsoft Dynamics AX connector
By setting up document exchange and setting up a web service that uses NTLM authentication, data can move into and out of Microsoft Dynamics AX.
About the task
Complete this task before you create a Microsoft Dynamics AX connector.
Procedure
-
Create an inbound HTTP port:
-
Open MS Dynamics AX.
-
Go to System administration > Setup > Services and Application Integration Framework > Inbound ports.
The Inbound ports dialog opens.
-
Click New to create an inbound port.
-
In the Adapter field, select HTTP.
-
Configure the remaining fields, such as Port Name, URI, etc.
-
Select the services to expose.
For more information, see the Microsoft TechNet site.
-
Configure the Processing options, Troubleshooting and Security settings.
-
-
Configure the authentication schema for the port:
-
Select the inbound port that you created.
-
Next to the Adapter drop-down menu, click the Configure button.
The WCF configuration editor opens.
-
In the warning dialog, click Yes.
-
In the Configuration pane on the left, select the Bindings folder.
-
In the Bindings pane on the right, click New Binding Configuration....
The Create a New Binding dialog opens.
-
Select basicHttpBinding and click OK.
-
On the Binding tab, in the Name field change the name to basicHttpBindingWithNTLM.
-
On the Security tab, in the Mode field enter TransportCredentialOnly.
-
Also on the Security tab, in the TransportClientCredentialType field select Ntlm.
-
In the Configuration pane on the left, open the Security folder and the Endpoints sub-folder, and select the reqReplyEndpoint.
-
In the Service Endpoint pane on the right, on the General tab, locate the BindingConfiguration field. Enter the configuration that you just created: basicHttpBindingWithNTLM.
-
Save and close the WCF configuration editor.
You return to the Inbound Ports dialog.
-
-
To activate the inbound port, click Activate.
-
Configure IIS:
-
Open the IIS Manager.
-
Verify that the authentication settings for the MicrosoftDynamicsAXAif60 application look like the settings in the following image:
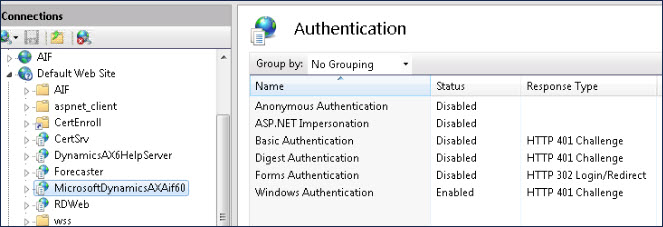
-
Restart the IIS server to make sure that the changes are reflected.
-
-
Validate the setup:
-
Use your web browser to get your WSDL.
-
The WSDL URL is the URI that you specified when you created the inbound port in step 1, with ?wsdl added to the end.
For example: http://myhost:85/MicrosoftDynamicsAXAif60/myportname/xppservice.svc?wsdl
-
Next steps
Set up a document exchange.
