Building and publishing steps
Once you have created and set up a Flow in your tenant, you can build the Flow itself using the Flow canvas drag-and-drop interface. Once you have built your Flow, you can run and publish the Flow to make it available to your users.
The Flow canvas
Use the Flow canvas visual drag-and-drop interface to build a Flow, adding "steps" to the canvas, that can then be configured, linked together and positioned to define the workflow of your Flow.
To get started using the Flow canvas, refer to The Flow canvas and Using the Flow canvas.
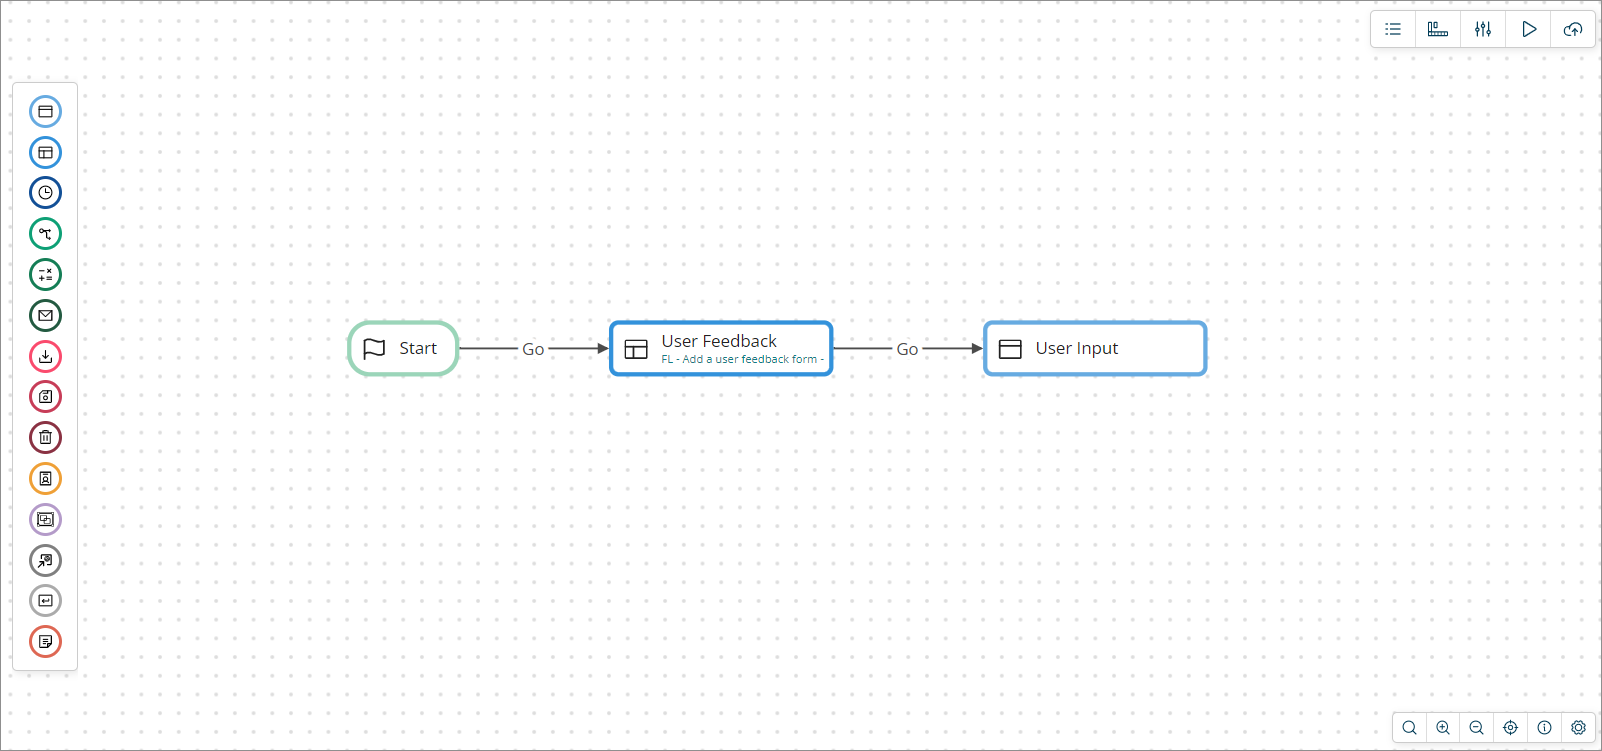
Steps
Steps are used to define the workflow and behaviour of a Flow, and can be thought of as the building blocks that make up a Flow on the canvas. Each step provides access to a different feature that can be added into a Flow, such as showing a screen to a user, obtaining user input, updating and manipulating data, and so on. Connecting map steps with outcomes allows you to determine the path (or paths) that a Flow will take.
To get started with adding map steps and joining them with outcomes, refer to Steps and Outcomes.
You can add the following steps to the Flow canvas:
| Icon | Name | Description |
|---|---|---|
 | Start | The Start step represents the beginning of your Flow on the Flow canvas. |
 | Step | Presentation steps are used to present content to the users of a Flow by allowing simple user interfaces to be created. A presentation step can contain videos, images, tables, links, presentations, and code snippets. |
 | Page | Page steps are similar to presentation steps in that they are used to present content to the users of a Flow, however page steps allow for more complex, interactive pages to be built. Page layout templates are used to define the actual structure and feature of the page. |
 | Modal | You can use modal steps to open content in a modal-type browser window. |
 | Wait | Wait steps are used to pause the execution of a Flow for a set amount of time. When a user running a Flow reaches a wait step, the Flow is paused, and a screen/message displayed to the user for the duration that is set in the wait step. Once this time period has elapsed, the Flow continues running, progressing to the next step in the Flow. |
 | Decision | Decision steps allow conditional routing within a Flow, for example where one incoming path gets split into two or more outgoing paths, based on pre-conditions. This is achieved using outcomes and business rules within a Flow. |
 | Operator | Operator steps allow the state of a value to be changed, using standard operations (such as adding two values, emptying a value) or by using macro operations to perform more sophisticated operations (such as calculating a percentage, random number assignments, and so on). |
 | Message | Message steps allow the sending and receiving of requests to third-party messaging connectors. These can be used to configure both incoming and outgoing messages. |
 | Database Load | Database load steps allow data to be loaded from an external data source into a Flow, such as from a database. |
 | Database Save | Database save steps allow data to be saved to an external data source from a Flow, such as to a database. |
 | Database Delete | Database delete steps allow data to be deleted in an external data source from a Flow, such as data in a database. |
 | Swimlane | Swimlane steps are used to group and restrict access to steps in a Flow application, for specific users and groups that require different authorization privileges. For example, you could create an "employee" swimlane and a "manager" swimlane for a Flow application that approves expense submissions. |
 | Group | Group steps allow you to organize multiple steps on the Flow canvas into a single group, which can then be moved and positioned as a single canvas step. |
 | Subflow | Subflow steps can be added to a Flow to call another Flow as a child subflow. Refer to Subflows. |
 | Return | Return steps are used in a subflow to indicate that the parent Flow process should be rejoined from the subflow. Refer to Subflows. |
 | Note | Note steps allow you to add notes directly to the Flow canvas, to provide information about the Flow. |
Shared steps, navigation, and properties
Additional options are available on the top-right of the canvas.
| Icon | Name | Description |
|---|---|---|
| Dependencies | Shared steps are 'global' tenant steps that can be shared and re-used across multiple flows within a tenant. | |
| Navigation | You can add a navigation step to a Flow to allow non-sequential navigation within a Flow, allowing Flow control to pass from one step to another without waiting for a previous step to be executed. | |
| Flow Properties | View and edit the properties for a Flow directly from the Flow canvas. |
Flow History
| Icon | Description |
|---|---|
| Flow History allows you to view and compare previous releases of a Flow. |
- Click Compare Releases button to compare two versions by selecting them.
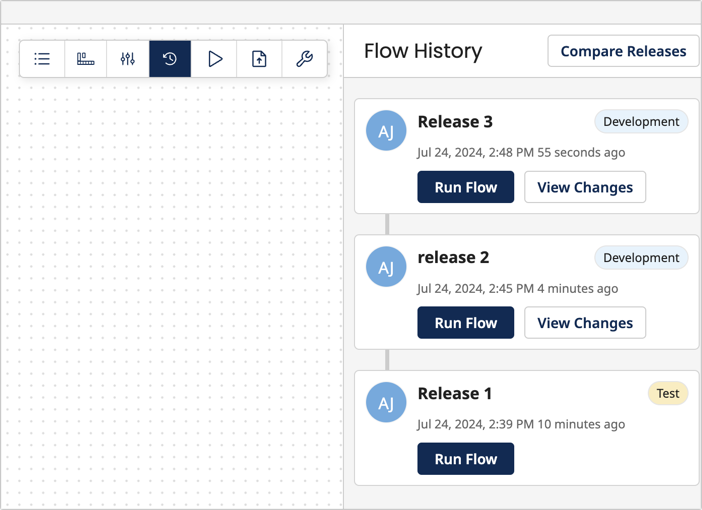
- Click Run button to launch the versions.
- Click View Changes to view a list of additions, deletions, and modifications that have occurred since the preceding version in the list.

Running and publishing flows
Once you have configured your Flow on the canvas, you can run or publish the Flow to make it available to your users.
-
Running a Flow allows you to generate and view the Flow, without making it the default version of a Flow.
-
Publishing a Flow allows you to generate a Flow in the same way as runnign a Flow, except that the published Flow "snapshot" is then set as the default version of the Flow.
To get started with running and publishing your flows, refer to Running a Flow and Publishing a Flow.
| Icon | Name | Description |
|---|---|---|
| Running a Flow | Running a Flow will build and execute a Flow, but will not make it the default version of the Flow. A snapshot is taken of the current version of the Flow, and a URL is generated for this version of the Flow, allowing you to access the Flow in a browser as a web application. This URL can then be used to share the Flow with other users. | |
| Publishing a Flow | Publishing a Flow will build and execute a Flow, and make it the default version of the Flow for your users. A snapshot is taken of the current version of the Flow, with this version becoming the default version of the Flow. The default URL for the Flow is generated for this version of the Flow, allowing you to access the Flow in a browser as a web application, and share the Flow with other users. |
