Steps
Steps are added to the Flow canvas to define the workflow and behaviour of a Flow.
Drag-and-drop steps from the left-hand menu onto the canvas, and join them to other steps to form your application workflow. Steps can be thought of as the 'building blocks' that make up a Flow on the canvas; each step provides access to a different feature that can be added into a Flow, such as showing a screen to a user, obtaining user input, updating and manipulating data, and so on.
Connecting steps with outcomes allows you to determine the path (or paths) that a Flow will take. Refer to Outcomes.
For example, adding a presentation step into a Flow can display a page to a user when published as a web application, and adding a database load step allows data from an external database to be loaded into the Flow.
Steps
The following steps are available on the Flow canvas. Refer to Using the Flow canvas.
| Icon | Name | Description |
|---|---|---|
 | Start | The Start step represents the beginning of your Flow on the Flow canvas. |
 | Presentation | Presentation steps are used to present content to the users of a Flow by allowing simple user interfaces to be created. A presentation step can contain videos, images, tables, links, presentations, and code snippets. |
 | Page | Page steps are similar to presentation steps in that they are used to present content to the users of a Flow, however page steps allow for more complex, interactive pages to be built. Page layout templates are used to define the actual structure and feature of the page. |
 | Modal | You can use modal steps to open content in a modal-type browser window. |
 | Wait | Wait steps are used to pause the execution of a Flow for a set amount of time. When a user running a Flow reaches a wait step, the Flow is paused, and a screen/message displayed to the user for the duration that is set in the wait step. Once this time period has elapsed, the Flow continues running, progressing to the next step in the Flow. |
 | Decision | Decision steps allow conditional routing within a Flow, for example where one incoming path gets split into two or more outgoing paths, based on pre-conditions. This is achieved using outcomes and business rules within a Flow. |
 | Operator | Operator steps allow the state of a value to be changed, using standard operations (such as adding two values, emptying a value) or by using macro operations to perform more sophisticated operations (such as calculating a percentage, random number assignments, and so on). |
 | Message | Message steps allow the sending and receiving of requests to third-party messaging connectors. These can be used to configure both incoming and outgoing messages. |
 | Database Load | Database load steps allow data to be loaded from an external data source into a Flow, such as from a database. |
 | Database Save | Database save steps allow data to be saved to an external data source from a Flow, such as to a database. |
 | Database Delete | Database delete steps allow data to be deleted in an external data source from a Flow, such as data in a database. |
 | Swimlane | Swimlane steps are used to group and restrict access to steps in a Flow application, for specific users and groups that require different authorization privileges. For example, you could create an "employee" swimlane and a "manager" swimlane for a Flow application that approves expense submissions. |
 | Group | Group steps allow you to organize multiple steps on the Flow canvas into a single group, which can then be moved and positioned as a single canvas step. |
 | Subflow | Subflow steps can be added to a Flow to call another Flow as a child subflow. Refer to Subflows. |
 | Return | Return steps are used in a subflow to indicate that the parent Flow process should be rejoined from the subflow. Refer to Subflows. |
 | Note | Note steps allow you to add notes directly to the Flow canvas, to provide information about the Flow. |
 | OpenAPI | OpenAPI steps allow you to manage multiple OpenAPI requests by minimizing repetitive configurations. |
Step configuration options
When a step is added to the Flow canvas, a configuration panel opens that allows you to define a number of additional configuration options for the step. For example, all steps allow you to add comments, but only some will allow you to add outcomes directly in the configuration panel. Refer to step configuration options.
Step metadata
Steps of a Flow are converted into JSON formatted metadata, which can be viewed and edited if required. Refer to step metadata.
Step ID
Every step has a unique ID and version ID. The unique ID remains the same throughout the life cycle of the Flow; the version ID changes every time the step is modified.
When a Flow snapshot is created, the build process takes the latest version of all steps associated with the Flow, and locks the Flow to those versions of the steps. A Flow references all of the steps that are needed for it to run.
Insights and Traffic Ratio
View Insights: This option gives you the capability to visualize outcome clicks through an easy-to-read chart. You can compare these clicks against the preceding day, week, or month which is useful for monitoring the impact of changes made to the Flow.
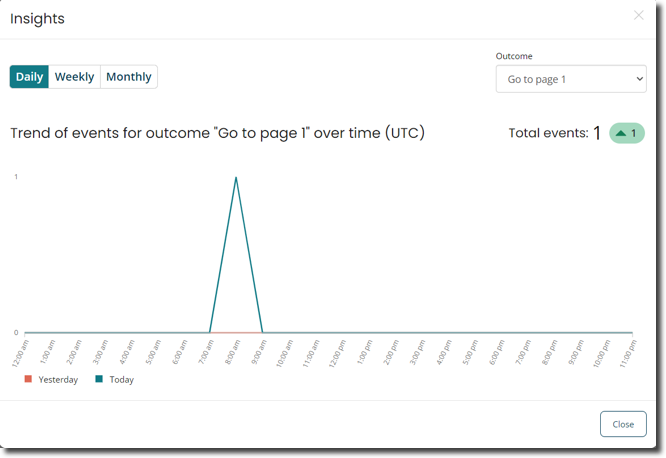
You can change the time period to either daily, weekly, or monthly. You can also change the outcome using the select box at the top right side.
View Traffic Ratio: You can view the ratio of traffic for the current month distributed across all outcomes that exit the step. The depiction of the percentage value is displayed underneath the outcome label.

Business rules
Business rules allow you to define different outcomes or actions based on whether the conditions specified in the rule have been met. Business rules are typically applied in a Flow to determine which path a Flow should take if there are multiple outcomes available, but can also be implemented on a user interface, data, or validation. Refer to Business rules.
