Navigation
You can add a navigation step to a Flow to allow non-sequential navigation within a Flow, allowing Flow control to pass from one step to another without waiting for a previous step to be executed.
A navigation step allows you to build a nested hierarchical menu that allows Flow users to navigate to a specific step (such as a page) from anywhere within a Flow. When the user selects the menu item, the Flow executes the linked step.
For example:
-
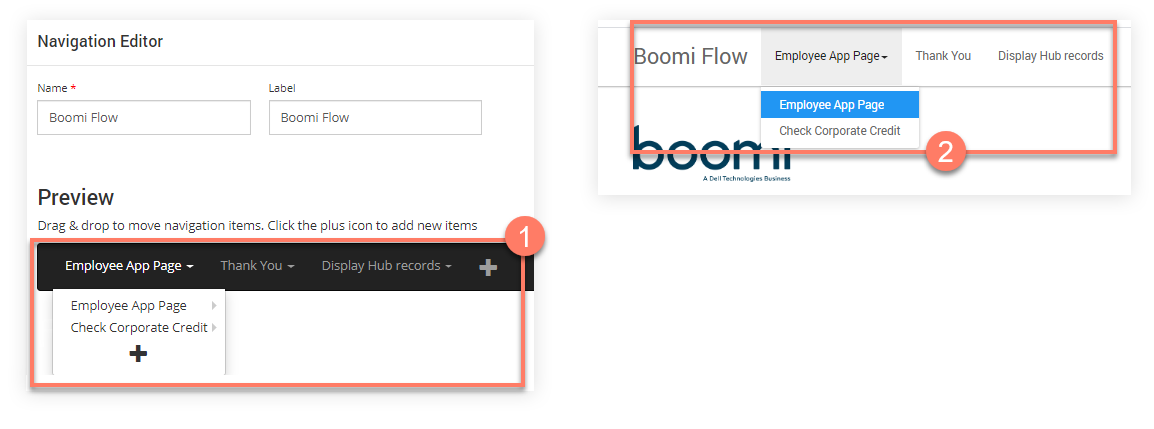
A navigation step is added in a Flow, containing a top-level menu and a sub-menu on the Employee App Page menu item. Each item links to a page step in the Flow.

-
When the Flow is published as a web application using the default player, the navigation step shows as a fixed navigation menu at the top of the page.

When the user selects a menu item from the navigation bar, they are taken to the relevant page in the Flow.
Note: You can also change the navigation and hierarchy of menu items by applying a navigation override setting for individual steps on the Flow canvas. This allows you to hide/disable an entire navigation bar or menu items from a user. Refer to Configuring Navigation Override on a step.
Prerequisites
- You have created a Flow in your tenant and opened it in the Flow canvas. Refer to The Flow canvas.
Adding and configuring a navigation step
To add a navigation step to a Flow:
-
Select Navigation from the right-hand menu on the Flow canvas.
-
The Navigations form is displayed. Any navigation steps you have set up for the Flow are displayed and can be edited or deleted as required. Click New Navigation.
-
The Navigation Editor is displayed.
-
Name: Enter a name for the navigation step.
-
Label: Enter a label for the navigation step. This will be displayed as a heading to the left of the navigation bar.
-
Add top-level menu items as follows:
-
Click the Plus icon to add a new top-level menu item.
-
Select the step to link the menu item to from the Navigate To drop-down menu.
Instead of navigating to a step, you can select the "URL" option to open a URL. Select or create a string value with the URL that you want to open when the menu item is selected, and select whether to open the URL in the same or a new browser tab, from the URL Target drop-down menu.
-
Enter a label in the Label field. This text is shown on the menu item in the navigation bar.
-
Click Save to save the new menu item and add it to the navigation bar. The Preview area will update to show the new menu layout.
-
Add further top-level menu items as required.
-
-
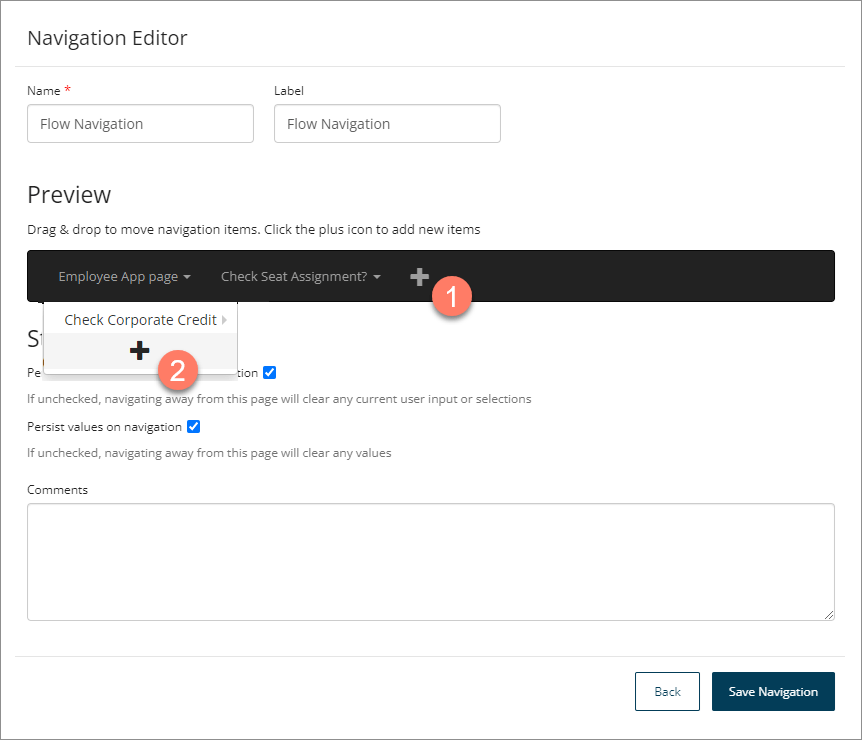
Add nested sub-menu items as follows:
- Hover over an existing menu item and click the Plus icon to add a nested menu item within it.
- Select the step to link the sub-menu item to from the Navigate To drop-down menu.
- Enter a label in the Label field; this is what will be displayed on the sub-menu item.
- Click Save to save the new sub-menu item and add it as a nested menu item. The Preview area will update to show the new menu layout. Hover over the top-level menu item to show the new sub-menu item.
- Add further sub-menu items as required. You can also add sub-menu items to other sub-menu items to create a hierarchy of nested menus.
- Hover over an existing menu item and click the Plus icon to add a nested menu item within it.
-
Persist input/selection data on navigation: Define whether user input/selection state data is saved when navigating away from a page. This feature is useful in scenarios where performance improvements need to be made due to large amounts of state data being present on a page that may negatively impact performance when navigating.
-
If selected (default), all state data such as user input and selections is saved when navigating away from the page.
-
If this setting is not selected, any current user input or selection state data is cleared when a user navigates away from the page.
-
-
Persist values on navigation: Define whether all values are cleared when navigating away from a page.
-
If selected (default), all valid values are passed between flows when a navigation link is used.
noteValue passing behaviour also depends on the type of value, such as when passing values between parent flows and subflows. Refer to Passing values using subflows. When defining access for a Flow, you can also use a swimlane, by selecting the Swimlane step in the canvas to build a Flow that passes control between users with different privileges. For example, there may be an ’employee’ swimlane and a ‘manager’ swimlane for a Flow app that approves expenses submissions. Refer to Swimlane steps.
-
If this setting is not selected, all values are cleared when a user navigates away from the page using a navigation link.
-
-
Translations: Select Show a language selector on the navigation to display a language dropdown in the navigation bar at runtime, allowing Flow users to switch between available translated languages.
- This setting is off by default.
- When enabled, the language dropdown appears at the end of the navigation bar.
- The dropdown only appears if at least one translation exists for the Flow.
- The dropdown lists all languages that have existing translations.
-
Comments: Add any useful information about the navigation step.
-
Click Save Navigation to save the new navigation and return to the Navigations form. The new navigation step is displayed in the list of navigations, and can be edited or deleted as required.
-
When the Flow is published as a web application, the navigation step is converted into a navigation bar that allows the user to freely navigate between steps (pages) in the Flow.
Customizing the navigation step
The default navigation bar is based on React and Bootstrap 3, which means you can customize the look and feel of the navigation bar using Bootstrap components.
For example, this can be done by adding the React components property to the navigation setting in a custom player.
The following line of code can be added to a player to insert a new custom navigation item:
navigation: {
 isFixed: true,
 isWizard: false,
 components: [React.createElement("li",
 null, React.createElement
 ("a", { href: "https://example.com" },
 "My Custom Nav Item"))]
}

-
The navigation step also has a number of options that can be defined in the default HTML5 player, such as whether it is fixed or uses a 'breadcrumbs' style. Refer to Customizing players and Default legacy player options.
-
CSS styling also allows you to customize the navigation step by overriding the main bootstrap navigation .mw-bs .navbar-nav class and sub-classes. Refer to Adding CSS and Javascript to custom players and Navigation CSS.
