PostgreSQL connection
PostgreSQL is a powerful relational database management system (RDBMS)supporting advanced data types, and offers extensive features for data integrity and performance optimization. Its versatility and adherence to standards helps to manage and query data effectively.
PostgreSQL Compatible Configurations
The following PostgreSQL database services are compatible with Data Integration:
- On-premise PostgreSQL
- Amazon RDS/Aurora PostgreSQL
- Google Cloud PostgreSQL
Compatibility versions
| Data Flow Modes | Versions supported | Manage Schema drift |
|---|---|---|
| Standard Extraction | Versions 9.6 and Above | Yes |
| Change Data Capture (CDC) | Versions 9.6 and Above | Yes |
Prerequisites
- Before establishing a connection, you must configure a secure connection method compatible with your network architecture. For more information, refer to selecting connection methods such as Private networking, SSH tunnel, reverse SSH tunnel, and VPN.
- Configure PostgreSQL for Data Integration - Establish a user account specifically for Data Integration and assign the necessary privileges to the user.
Configuring PostgreSQL for Data Integration
Before integrating PostgreSQL with Data Integration, you must perform certain configuration steps. The instructions provided here are for Standard extraction. If you need Change Data Capture extraction, refer to the Configuring PostgreSQL CDC replication slots and publications topic.
Creating a user for Data Integration
Execute the following SQL command to create a new user for Data Integration, replacing <'myUsername'> with the desired username and <'password'> with an encrypted password:
CREATE USER `<myUsername>` WITH ENCRYPTED PASSWORD '`<password>`';
For users considering Change Data Capture usage, the special characters such as +, ?, #, &, {, } are not permitted in passwords. You can use the following characters: -, ., _, ~, $, and !.
Grant permissions to the user
Grant the new user access to the table or schema from which you want to extract data. Use the following commands, replacing <'database'>, <'schema'>, and <'table'> with the appropriate names:
- Grant connect privilege on the database:
GRANT CONNECT ON DATABASE `<database>` TO `<myUsername>`; - Grant usage privilege on the schema:
GRANT USAGE ON SCHEMA `<schema>` TO `<myUsername>`; - Grant select privilege on all tables in the schema:
GRANT SELECT ON ALL TABLES IN SCHEMA `<schema>` TO `<myUsername>`;noteIf you want to assign privileges to specific columns, you can use the following SQL script:
GRANT SELECT (Column_1, Column_2, Column_3, Primary_Key, ...) ON `<schema.table_name>` TO `<myUsername>`;Ensure to replace Column_1 and the others with your chosen column names. If a Primary Key exists in the table, to include it in the script.
- Set default privileges for future tables in the schema:
ALTER DEFAULT PRIVILEGES IN SCHEMA `<schema>` GRANT SELECT ON TABLES TO `<myUsername>`;
Establishing a connection
-
Navigate to the Data Integration Console.
-
Click Connections and select + New Connection.
-
Choose PostgreSQL.
-
Enter the Connection Name.
-
Enter Host.
-
Fill in the Port Number.
-
Enter your Database name.
-
Input your Username and Password.
-
click the Test Connection to verify if your connection is up to the task. If the connection succeeded, you can use this connection in Data Integration.
Disconnect handling
The following are two ways to deal with database disconnects:
-
Optimistic - The optimistic approach to dealing with stale / closed connections is to let SQLAlchemy handle disconnects as they happen, at which point all connections in the pool are invalidated. They are assumed to be stale and are refreshed upon the next checkout. In general, the pessimistic approach adds some overhead but provides a more stable connection, whereas the optimistic approach is faster but recommended for databases that are less likely to be disconnected or restarted.
-
Pessimistic - This approach entails issuing a test statement on the SQL connection at the beginning of each connection pool checkout to ensure that the database connection is operational.
SSH connection
Data Integration has the capability to establish connections with on-premises servers by employing a hybrid approach for data processing. While we suggest using the SSH Tunneling Method and it is not mandatory.
Data Integration can establish connections to on-prem servers by employing a hybrid data processing approach. While we suggest using the SSH Tunneling method, ensure to know that its adoption is not obligatory.
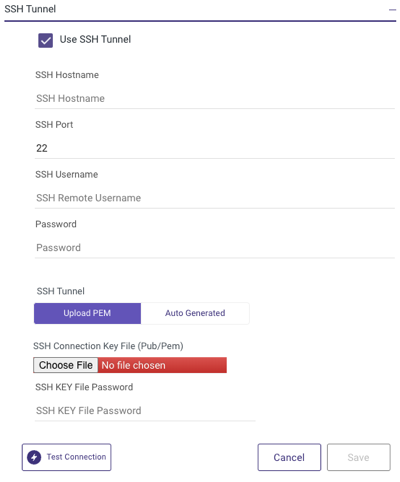
To use the SSH Tunneling via Data Integration, configure your SSH Tunnel server in your network. This server can get SSH connections from Data Integration IP addresses, and connect to your database server via the internal IP address or address. Data Integration connects to that SSH server using a private key.
After configuring SSH tunneling, you can set it up in the Data Integration connection:
SSL connection
To establish a connection, certain PostgreSQL hosts may need the use of an SSL certificate for validation and enabling.
- Utilizing an SSL connection is optional.
- SSL connections are available when using PostgreSQL databases hosted on Amazon RDS/Aurora and Google Cloud SQL.
Custom file zone
Setting up a Custom File Zone in Data Integration is an optional feature, with the default option relying on the Managed File Zone provided by Data Integration, which requires no setup.
The primary benefit of establishing a Custom File Zone is that it enables organizations to ensure they store their data within their designated file zones instead of the Data Integration Managed File Zone.
Procedure
- Enable the Custom File Zone toggle.
- You can choose the pre-configured FileZone connection by clicking on FileZone Connection (ensure that only Custom File Zone in Amazon S3 is compatible).
- Choose a Default Bucket from the drop-down list.
- Click Test Connection to verify if your connection is up to the task.
- If the connection is successful, click Save.
