Jira walkthrough
Currently supported:
- Rest API - Version 3
- Rest Agile API - Version 1
Integrating Jira with Data Integration enhances project management by automating data-related tasks. It handles project tracking, analysis, and reporting, improving efficiency.
Connection
To connect Jira with your destination, follow the step-by-step tutorial. Select a Source connection after creating a connection.
Predefined reports
Data Integration provides a convenient entry point and recommended approach for accessing a range of predefined reports for your use. Each report includes a concise data description, a list of customizable fields (if applicable), and the schema mapping.
These reports follow a standardized format, so specific fields are locked, and you can only access them through the Custom reports.
Custom reports
Select a specific report to pull data from Jira.
Use Strict datatypes
The Jira connector includes a Use strict datatypes toggle in the Predefined Reports configuration. This controls whether the connector infers field types from Jira's schema or treats all fields as strings.
- Navigate to the Predefined Reports tab of the data flow.
- Select the checkbox next to your desired report (for example, Group Users) and click the Edit button on the right.
- In the Table Settings tab, scroll down to the Predefined Report's Parameters section.
- Use strict datatypes defaults to OFF for all data flows. To enable strict type mapping, select the toggle.
- ON: Infers field types from Jira's schema. IDs are mapped as integers and timestamps as datetime.
- OFF (default): Treats all fields as strings. Use this for backward compatibility with existing target schemas.
Switching this toggle ON changes the mapped types. If your Target Schema (for example, Snowflake) has ID columns loaded as STRING, re-mapping your data after enabling this toggle causes a schema mismatch or a load failure. Review your Target Schema before enabling this on an existing data flow setup.
Issues
The Issues report lets you extract all issues from a given project.
-
(Optional) Select specific projects for issue extraction, or leave this blank to include issues from all projects.
-
(Optional) To exclude specific projects while extracting all other issues, select these projects under the Excluded Projects section.
-
(Optional) Use the Fields selector to choose the specific fields to include in the report output. If you leave this blank, the report returns all available fields.
-
(Optional) Use the expansion option to add an extra field to the report.
-
(Optional) The report supports Jira Query Language, letting you include additional filters under Advanced Search Query.
These filters are combined using an AND clause.
- Select a Time Period. The report time frame aligns with the JQL updatedDate. Refer to the Time Period section for more information.
If you want to gather a significant volume of expanded changelogs in the Issues report, select the Issue Changelogs report (exclusive to Jira Cloud services) from the drop-down menu. This report retrieves any additional fields you have selected. To view the issues and the expanded information, merge the data from the Issues and Issue Changelogs reports in your target.
For Jira Server instances, the connector uses an optimized pagination limit to improve data retrieval efficiency. You do not need to configure this — the improvement applies automatically.
Resolution
The Resolution report returns a list of all issue resolution values. This is a dimension.
User
The User report returns all the users in your Jira account.
The emailAddress column contains an email address value for users who set their profile privacy settings to public. Otherwise, this column contains a null value.
Project
The Project report returns all the projects in your Jira account.
Project categories
The Project categories report returns all the project categories in your Jira account.
Project type
The project type report returns all the project types in your Jira account.
Project rule
The Project rule report returns all the project rules in your Jira account. You can filter the project rules to return with the project input or leave it empty for all projects.
Time period
Select the time period for the report. It can be a custom date range or a defined time period (for example, Yesterday or Last Week).
Date range:
- Select the start date and end date.
- Leave the end date empty to pull data until the Data Flow runs.
- After each run of the Data Flow, the start date updates automatically with the end date, and the end date updates with the empty value. This enables the next run to pull data from the end of the previous run.
- Select the time zone offset. This is relevant only if the end date is empty to determine the Data Flow’s run according to the time zone.
- Days back - Use this input to pull data from a given number of days before the selected start date.
- The start date does not advance if a Data Flow run is unsuccessful. If you do not want this default setting, click More Options and select the Advance start date on unsuccessful run checkbox (not recommended).
If selecting any other value:
Select the timezone offset to send the correct dates that consider that offset.
Activity logs
The Activity Logs offer an inside perspective of the processes taking place in Jira Data Flow.
Additional features in the issues report
Preventing schema update problems with custom fields
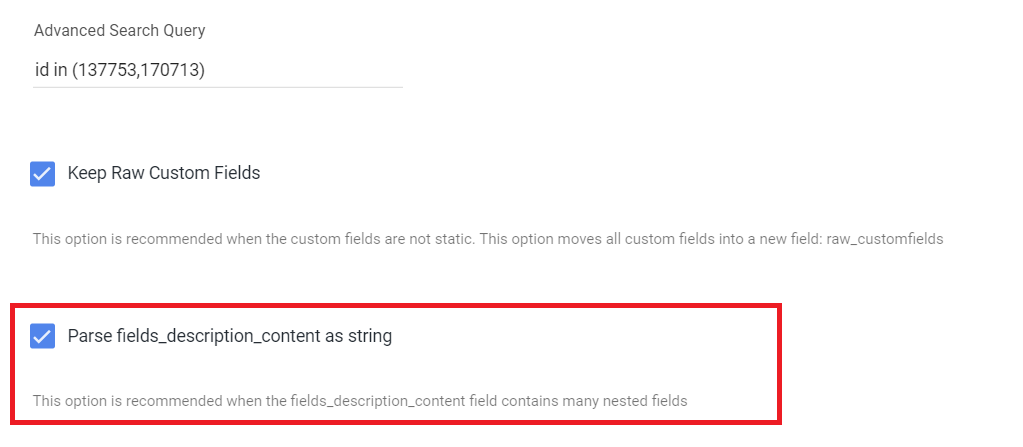
If your custom fields frequently alter and you want to avoid repeatedly updating the Data Flow's schema, use the Keep Raw Custom Fields checkbox option. This option lets you maintain the original custom fields as a JSON string.
All existing and newly added custom fields appear in the Data Flow’s mapping under the raw_customfields field.
Resolve issues with a Complex field
If you experienced a problem running the Issues report, you might view one of the following errors:

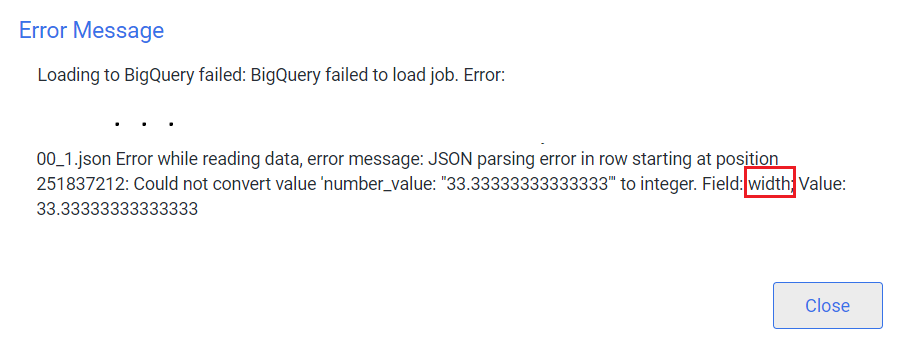
Select Parse fields_description_content as string checkbox:
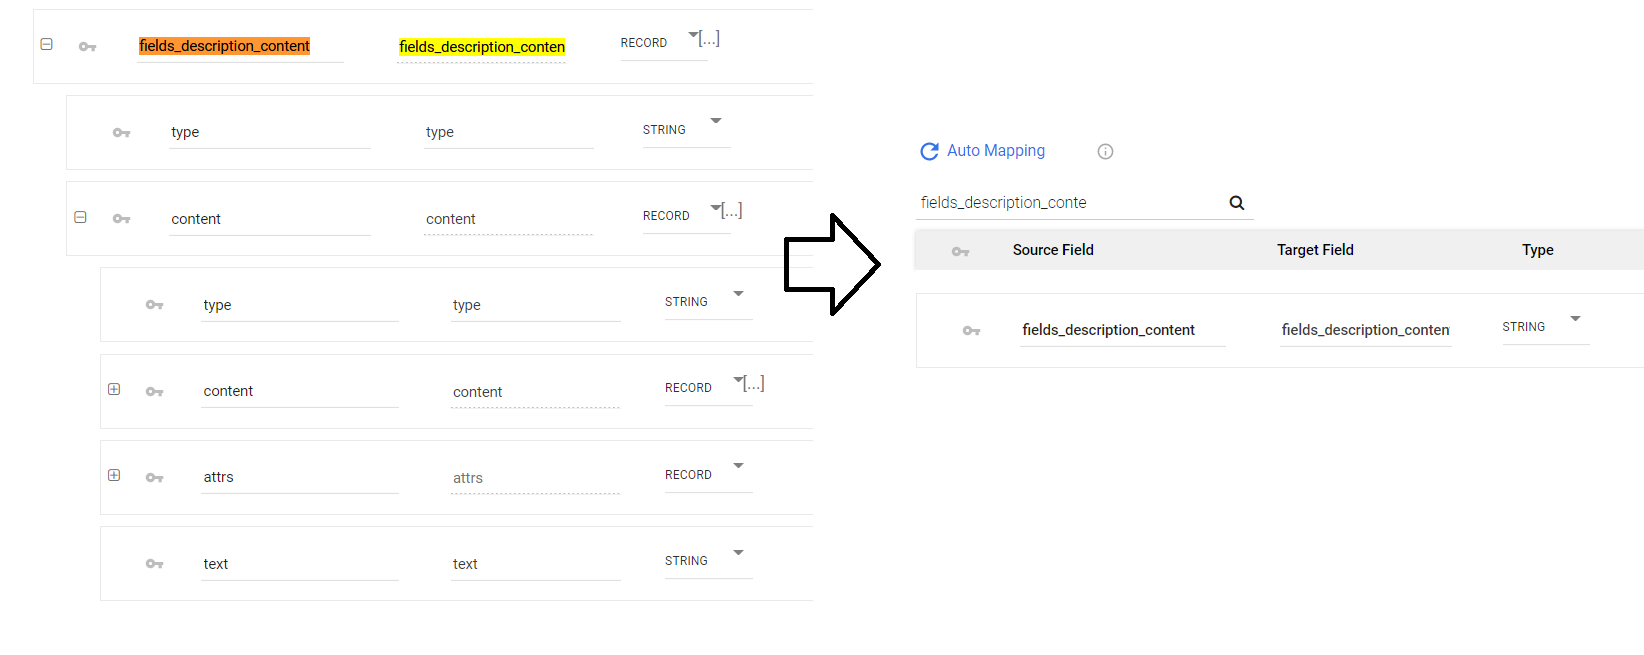
- When selected, the
fields_description_contentfield stores as a JSON string instead of a complex record field. This lets attribute fields (for example, width and length) use alternative data types such as float or int.
- After enabling this option, clear the mapping and click Automap to detect the updated field data types.
- Run the Data Flow.
