Boomi API Gateway Java updates
Updating Boomi API Gateway on Java 8 to use Amazon Corretto
Use the “Update Java Provider to Corretto” link on the Gateway Information panel to update your API Gateway running on Java 8 from Oracle to Amazon Corretto.
Boomi supports the Amazon Corretto JDK distribution, Boomi recommends updating your API Gateway from Oracle to avoid licensing concerns when applying your own security patches. Users with API Gateways on Amazon Corretto Java 8 are responsible for updating containers with their own security updates until they upgrade them to Java 11, the latest version of Java that Boomi supports.
This feature does not upgrade your container to Java 11 and is available only for 32 and 64-bit containers on Windows and 64-bit containers on Linux.
-
Go to Configure Server and click the Gateways tab.
-
Click on a Gateway Name from the list.
-
In the Gateway Information panel, click the "Update Java Provider to Corretto" link.
noteThis link displays only if the container is on Java 8 and does not already use the supported Amazon Corretto Java provider.
For Windows users, the update wizard file (atom_corretto_upgrade.exe), is downloaded to your local drive. For Linux users, the update wizard file (CONTAINER_corretto8_upgrade64.sh) is downloaded to your local drive.
-
Locate and run the atom_corretto_upgrade.exe (Windows) or CONTAINER_corretto8_upgrade64.sh (Linux) file from your local drive.
Windows users may encounter a unknown publisher security warning. If you encounter this warning, click Run to proceed with the update.
-
On the Welcome step, click Next.
-
On the Select the Directory Containing the Gateway step, verify that the folder directory is correct for the Gateway you wish to upgrade or click Browse to locate and select the directory for the correct runtime container. Then, click Next.
-
Optional: On the Choose the installation directory JRE or an external JDK step, do one of the following:
- If you want to use Boomi's distributed version of Amazon Corretto Java 8 and want to change the directory location of the pref_jre.cfg file's to be the Gateway installation JRE directory, choose the Switch the preferred JRE to runtime Installation's JRE Directory option. Then, click Next.
- If you want to use Boomi's distributed version of Amazon Corretto Java 8 but do not want to change the pref_jre.cfg file's current directory location, choose the Do not make changes to the preferred JRE option. Then, click Next.
- If you want to use your own distributed version of Amazon Corretto Java 8 rather than the JDK provided by Boomi, turn on the Use External JDK? option and then click Browse to locate and select the directory containing the JDK. Then, click Next.
-
Optional: On the Migrate Certificates step, optionally migrate certificates from your current JVM to the new one that the container uses after the update. Do one of the following:
- To migrate certificates, turn on the Migrate existing custom certificates automatically option, and then click Browse to locate and select the directory which contains the existing JVM. Then, click Next.
- If you do not want to migrate certificates, click Next without making any selections.
The update wizard completes and your Gateway is updated to use the Amazon Corretto Java providers.
When the update finishes successfully, the Gateway Information Panel no longer displays the "Update Java Provider to Corretto" link for the updated Gateway, and the Startup Properties panel updates the Java Version and Java Home fields to its new Java version and directory location, respectively.
Upgrading Boomi API Gateway to Java 11
You can upgrade an API Gateway so that it uses Java 11.
If a Gateway had Broker feature that was retired on March 31 2023, the Broker feature must be removed prior to upgrading to Java 11. The update to Java 11 must be carried out manually if the Gateway ever had Broker feature. For troubleshooting information, refer to Gateway with Broker feature Removed Unable to Upgrade to Java 11
When you download and run the upgrade wizard to upgrade your API Gateway to a new version of Java, the wizard gives you the option to use either the Boomi-provided JDK or your own managed Java JDK from which your container will run. If you choose to use the Boomi-provided JDK, the full JDK is automatically downloaded to your local directory and your runtime container is updated to use the newest version of Java 11.
Upon upgrading, the upgrader places the new Java files a new directory called jre_a (previously named jre_backup), and modifies the runtime's pref_jre.cfg file to make this the new active Java location. If jre_a is already the active Java, the upgrader places the new Java files in the jre directory and modifies the pref_jre.cfg file accordingly.
However, choosing an external JDK allows you to select and use your own distributed version of Java 11 JDK in which your upgraded container will run. If you choose to use your own distribution of Amazon Corretto Java 11, you must install the Java 11 JDK before you can upgrade an API Gateway to use Java 11. You can download the Java 11.0.18.10.1 JDK here.
If you do not use the Boomi-provided JDK, you must run the upgrader and specify the external JDK during step 9 of the upgrade instructions detailed below. Neglecting to specify the JDK causes the API Gateway to fail at start up.
If the API Gateway that you are upgrading was configured to use a JDK (one that you, not the installer, installed) that is shared among other applications or programs, the upgrader places a private copy of the JDK in your API Gateway’s jre directory automatically. The private JDK takes precedence over the shared JDK. Therefore, any JDK configuration in your shared JDK, such as custom certificates, security JAR files, etc., needs to be reconfigured in the private JRE.
For Linux, if you choose not to use the GUI to upgrade your Gateway, use the console mode option (-c) of the install4j installer.
-
Optional: If you previously upgraded to a new Java version, copy the full
<installation_directory>/jredirectory and the full install4j folder to different locations before running the upgrader. -
In the API Management user interface, navigate to Configure Server > Gateways.
-
From the table of available Gateways, click the name of the Gateway that you want to upgrade.
-
From the Gateway Information panel, click the Update to use Java
<version number\>link.A confirmation dialog opens, showing which upgrade program you chose to download. If the displayed file is
gateway_upgrade64.exe, this means that you are upgrading a 64-bit Gateway for Windows. If you are upgrading a 64-bit Gateway for Linux, the file is namedgateway_upgrade64.sh. -
Click Save File.
-
Locate and run the file that you downloaded.
-
If you are using Windows or the Linux GUI, run the file and follow the wizard to complete the required steps.
-
For Linux, if you want to run the installer in console mode from a command line, run the file with the
-cflag:sh /<path>/gateway_upgrade64.sh -cFollow the prompts, which take you to step 7.
-
-
On the Welcome to the Gateway Upgrade Wizard screen, click Next.
-
On the Select the Directory Containing the Gateway screen, do one of the following:
-
If you are using Windows or the Linux GUI, click Browse on the Select the Directory Containing the Gateway page, locate and select the directory in which the Gateway is installed. Click Next.
-
If you are using the Linux command line, type the path to the Gateway installation directory. Make sure the upgrade program completes successfully, then skip to the last step.
-
-
Optional: On the Select the Directory for the External JDK screen, do one of the following:
- If you choose to use the Boomi-provided JDK, click Next without making any changes.
- If you want to use your own distributed version of Java 11, turn on the Use External JDK? box and click Browse to find the local folder containing a custom JDK that your selected container will run from once upgraded. Click Next.
-
On the Migrate Certificates screen, do one of the following:
- If you do not want to migrate custom certificates automatically, click Next without making changes.
- If you want to migrate custom certificates automatically, turn on the Migrate existing custom certificates automatically box and click Browse to locate the folder containing the JDK that your Gateway is using. Then, click Next.
-
The wizard begins upgrading your selected container according to the preferences you have set earlier in this topic. When the wizard completes successfully, click Finish.
Your Gateway is now successfully upgraded to a newer version of Java 11. To confirm that the upgrade is successful, view the Java Version field in API Gateway settings > Runtime Management > Startup Properties panel for your selected container.
Upgrading Boomi API Gateway to Java 11 directly from Gateway settings
You can upgrade the Java version of an online API Gateway directly from the Java Information panel in the API Gateway settings page.
If you want to download the upgrade wizard instead of upgrading directly from the platform, select Download the Java upgrade wizard for the Upgrade Method and then click Download and Close. Refer to the topic Upgrading an API Gateway to Java 11 for more information.
If the API Gateway is offline, Download the Java upgrade wizard is the default option.
-
In the API Management user interface, navigate to Configure Server > Gateways and then select the API Gateway that you want to upgrade to open the API Gateway settings page.
-
Select Java Information to open the Java Information panel and click Update to Java
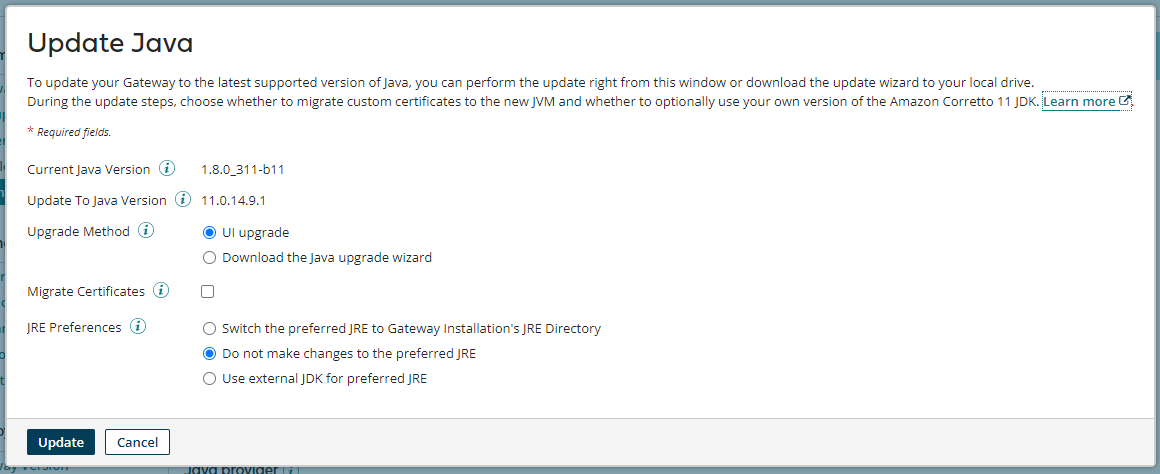
<version number>.A dialog box opens with the following information and options:
-
Current Java Version
-
Update to Java Version
-
Upgrade Method
-
Migrate Certificates
-
JRE Preferences
-
-
To upgrade directly from the Boomi Enterprise Platform select UI Upgrade for the Upgrade Method.
noteSteps 4 and 5 are available only for the UI upgrade method.
-
Optional: Select the checkbox next to Migrate Certificates if you want to migrate any certificates during the upgrade process and then locate the folder containing the JDK that your Gateway is using next to Certificate Path.
-
Next to JRE Preferences, select one of the following options
-
Switch the preferred JRE to Gateway Installation's JRE Directory changes the location of the Gateway's
pref_jre.cfgfile to the installation's JRE directory -
Do not make changes to the preferred JRE updates the Gateway installation's JRE directory with the latest version of Java, but does not change the location of the
pref_jre.cfgfile from its existing directory locationnoteIf the
pref_jre.cfgfile is pointing to thejre_a (previously named jre_backup), the internal JRE backup directory created during the upgrade process, the file will be changed to point to the Gateway installation's JRE instead. -
Use external JDK for preferred JRE uses a custom distributed version of Java 11. Next to External JDK Path, enter the location of the folder that contains the external JDK that you want to use.
-
-
Click Update
A pop-up dialog box displays in the bottom right corner of the screen, indicating that the upgrade will begin shortly.
Rolling back Boomi API Gateway to use a previous version of Java
You can roll back an API Gateway to the previous version of Java from the API Gateway settings page.
If you upgraded an API Gateway to the latest Java version and want to roll it back to the previous version, you can use the Boomi Enterprise Platform. You can also use the AtomSphere API to roll back the Java version. For more information about this topic, refer to Roll back Java operation. The Roll back option is not available if:
-
The API Gateway is offline
-
The container is not upgraded to the latest Java version
-
The container currently uses an external JRE location
-
There is no jre_a (previously named jre_backup) folder in the installation directory
-
In the API Management user interface, navigate to Configure Server > Gateways and then select the API Gateway for which you want to roll back the Java version.
-
Select Java Information to open the Java Information panel and click Roll back.
A dialog box opens and displays the current Java version and the roll back version.
-
Click Roll back to confirm that you want to roll back the Java version.
A pop-up dialog box displays in the bottom right corner of the screen, indicating that the roll back will begin shortly.
Setting a schedule to update an API Gateway to the latest Java version
Use the Boomi Enterprise Platform to set a schedule to automatically update an API Gateway to the latest Java version.
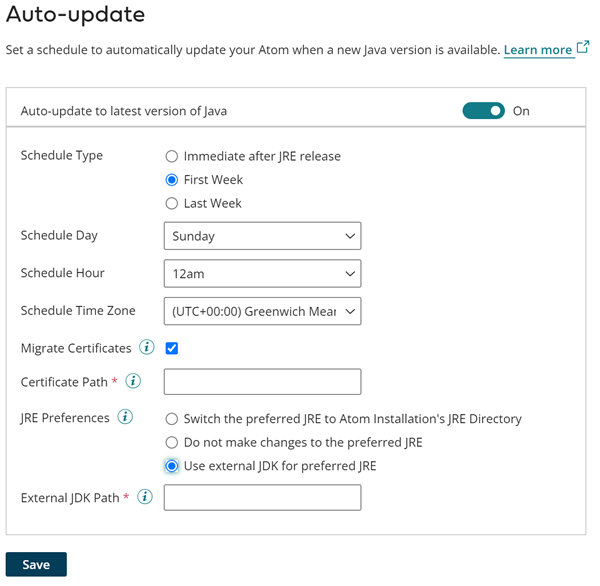
You can set a schedule from the Java Information panel to automatically update an API Gateway to the latest version of Java after it becomes available.
-
In the API Management user interface, navigate to Configure Server > Gateways and then select the API Gateway for which you want to set a schedule.
-
Select Java Information to open the Java Information panel.
-
In the Auto-update section, select the toggle next to Auto-update to latest version of Java to set a schedule.
-
For Schedule Type, select one of the following options:
-
Immediate after JRE release - The Java version is updated immediately after it is released. If you select this option, skip to step 8.
-
First Week - The Java version is updated in the first week after the JRE is released.
-
Last Week - The Java version is updated in the last week after the JRE is released before the Platform Release.
-
-
For Schedule Day, select which day of the week you want the update to be applied from the drop-down menu.
-
For Schedule Hour, select the time of day you want the update to be applied from the drop-down menu.
-
For Schedule Time Zone, select the time zone for which you want the date and time settings to apply for the Gateway to be updated from the drop-down menu.
-
(Optional) If you want certificates to be migrated automatically during the update process, check the box next to Migrate Certificates. Enter the directory location of your certificates in the Certificate Path field.
-
For JRE Preferences, select one of the following options:
-
Switch the preferred JRE to runtime Installation's JRE Directory - Changes the location of the runtime's pref_JRE.cfg file to the installation's JRE directory.
-
Do not make changes to the preferred JRE - Updates the runtime, runtime cluster, or runtime cloud installation's JRE directory with the latest version of Java, but does not change the location of the pref_JRE.cfg file from its existing directory location.
noteIf the pref_JRE.cfg file is pointing to the jre_a (previously named jre_backup) directory, the internal JRE directory that is created during the upgrade process, pref.JRE.cfg is changed to point to the runtime, runtime cluster, or runtime cloud installation's JRE directory instead.
-
Use external JDK for preferred JRE - Uses a custom distributed version of Java. In the External JDK Path field, enter the location of the directory that contains the external JDK that you want to use.
-
-
Click Save.
